Soda Enjoyer (talk | contribs) (The event where the portals switch positions was removed over a year ago) |
No edit summary |
||
| Line 1: | Line 1: | ||
Dev known as Rio was kicked out of the development team due to evidence of grooming and pedophilia towards a 13 year old boy who lasted for 3 years until it was made recent, Yuga and RagnaEdge knew of this behavior and did nothing to stop it. Here is the evidence: <nowiki>https://drive.google.com/file/d/1_BtvntUrTem8m_V8H73yBipY04HjpccE/view</nowiki> | |||
Like [[Yume Nikki]] and many of its fangames, there are many events found throughout Yume 2kki. Here is a list of all the current events that can be found, along with their individual locations and what they may unlock when activated. | Like [[Yume Nikki]] and many of its fangames, there are many events found throughout Yume 2kki. Here is a list of all the current events that can be found, along with their individual locations and what they may unlock when activated. | ||
This article '''doesn't list all the events in this game''', only the most remarkable events from the wiki members perspective. Feel free to '''expand this article by adding more events if necessary.''' | This article '''doesn't list all the events in this game''', only the most remarkable events from the wiki members perspective. Feel free to '''expand this article by adding more events if necessary.''' | ||
Revision as of 21:44, 15 June 2022
Dev known as Rio was kicked out of the development team due to evidence of grooming and pedophilia towards a 13 year old boy who lasted for 3 years until it was made recent, Yuga and RagnaEdge knew of this behavior and did nothing to stop it. Here is the evidence: https://drive.google.com/file/d/1_BtvntUrTem8m_V8H73yBipY04HjpccE/view
Like Yume Nikki and many of its fangames, there are many events found throughout Yume 2kki. Here is a list of all the current events that can be found, along with their individual locations and what they may unlock when activated.
This article doesn't list all the events in this game, only the most remarkable events from the wiki members perspective. Feel free to expand this article by adding more events if necessary.
Note that although these events are listed in alphabetical order, nearly all of their names are NOT official.
Amusement Park Clown Hell
Location: Underwater Amusement Park

Description: Found in the deepest level of the clown dungeon in the Underwater Amusement Park, this event begins once Urotsuki steps through either of two doorways at the last room in the dungeon, just past the jail cells with the skeletons. Urotsuki is transported to the the center of a row of pillars, with NPC children standing on the pillars to the left and to the right. A large piston descends and crushes the boy on the left pillar, leaving an imprint on the base of the piston he was standing on. The same thing then happens to the girl standing on the pillar to the right. Finally, the piston comes down over Urotsuki, crushing her and leaving an imprint of her on the pillar as with the others. The scene then cuts to the pillars of the boy, girl, and Urotsuki having been placed amongst the countless other pillars surrounding the path leading to the entrance to the clown dungeon in the Underwater Amusement Park. Urotsuki then startles awake.
This event unlocks wallpapers #114 and #129.
Ancient Rave
Location: Ancient Crypt

Description: At the halfway point of exploring the area, the colors will begin to saturate. Going north as this happens will eventually lead to a short corridor with a brown barrel at the end. Interacting with it shows a short animation of an abstract figure flashing different colors while funky music plays. This is a reference to the Aztec Rave Monkey event from the original game.
Blood Sacrifice
Location: Blood World

Description: This event is accessed by stepping into the largest pool of blood in Blood World and chainsawing the white rooted creature that can be found in front of the blood sacrifice table. Doing so will cause the room to become dark, and make the music scary. Ghosts will swarm Urotsuki and inhibit her motion while Scary Faces pursue her. If they catch her, the screen fades to black, and Urotsuki wakes up. Viewing this event will unlock wallpaper #101.
Buddha Rave
Location: Marijuana Goddess World

Description: Probably the easiest to find of all the events, this one located almost directly east from entrance to Marijuana Goddess World and is similar to the Aztec Rave Monkey from Yume Nikki. Stepping on the flashing red tile on the idol’s forehead will activate a full-screen event where a moving image of the figure will zoom in and out while upbeat music plays.
Activating this event also changes Marijuana Goddess World’s background to images of the deity and unlocks Wallpaper #5.
Youtube Video of the Buddha Rave event: http://www.youtube.com/watch?v=s18tFJF2wxg&feature=relmfu
Chasers in Urotsuki’s Room
Location: Urotsuki's Dream Apartments

Description: There is a chance that when you turn the TV on in Urotsuki’s Dream Apartments, instead of the normal Shadow Woman appearing in front of the curtains and the TV at channel 5, the TV will turn to channel 0 and show many different Chasers in the room with her. The background music will become much more ominous and the chasers will become real. If the chasers catch you, you’ll wake up. As of v0.96, if you manage to escape the room without being caught (Note that the clown can still move around while the Invisible effect is equipped), there will be flat Shadow Women standing in front of two doors (they will not move) and a fox-masked man in front of a third door. If Urotsuki tries to go downstairs, the man will run up to her and cause her to wake up.
If you make it outside the room and get caught by the fox-masked man, Kura Puzzle #42 will be unlocked.

Chasers in the Woods
Location: Fairy Tale Woods
Description: Heading north from the entrance, you can find a person in the well. Dropping them, and heading back to the entrance will start the event. As you head down the long streetlight path, chasers will start to appear running behind you, eventually capturing Urotsuki and forcing her to wake up.
The Cloning Room
Location: The Red Brick Maze in Toy World

Description: This event is found by going down a flight of stairs in the Red Brick Maze. Inside the room are some giant books, a poster, and a clone of Urotsuki sitting on purple pedestal with some red wires hooked into her connected to a large machine. Interacting with the control panel next to her will make her jump off of the pedestal and rapidly create clones of herself, filling up the room quite quickly.
Unless you have the Chainsaw it is recommended that you move towards the exit after turning the switch on, otherwise you may find yourself trapped. Exiting and re-entering the room will cause the clones to disappear, but the machine will still be turned on and will soon begin to fill up with clones again.
The clones will respond to certain effects; equipping the Eyeball Bomb will make them do the same, while equipping Invisible and disappearing will make the clones disappear. Interestingly, the clones will also similarly react to Wolf and Penguin, but only in debug mode.
Interestingly, before turning on the panel the screen above it will read “RUN” (turning it on will change it to “OUN” temporarily and then to “OK”).
Activating this event also unlocks Wallpaper #69.
(Note: It is possible to softlock the game here. If you try to kill the clone that spawns more clones, you'll get caught in an infinite loop of killing it over and over, unable to do anything but close the game.)
Giant Cloning Room
Location: The Red Brick Maze in Toy World

Description: This event is found by going down the same flight of stairs in the Red Brick Maze that will take you to The Cloning Room. After viewing Ending #4 you have a 1/10 chance of being taken to a large, spacious room, sparsely decorated with giant books.
At the top of the room, a clone of Urotsuki is sitting on purple pedestal with some red wires hooked into her, connected to a large machine. Interacting with the control panel next to her will make her jump off of the pedestal and rapidly create clones of herself, slowly filling the gigantic room.
Unless you have the Chainsaw it is recommended that you move towards the exit after turning the switch on, otherwise you may find yourself trapped. Exiting and re-entering the room will cause the clones to disappear, but the machine will still be turned on and will soon begin to fill up with clones again.
The clones will respond to certain effects; equipping the Eyeball Bomb will make them do the same, while equipping Invisible and disappearing will make the clones disappear. Interestingly, the clones will also similarly react to Wolf and Penguin, but only in debug mode. Additionally, when no effect is equipped, the clones will scatter and move away from the real Urotsuki.
Interestingly, before turning on the panel the screen above it will read “RUN” (turning it on will change it to “OUN” temporarily and then to “OK”).
After a while, the cloning machine will stop working, however the cloning sound effect won't stop playing.
Clowns at the Circus
.png)
Location: The Circus
Description: Getting near the albino girl in the circus tent causes the screen to go black for a few seconds while a loud sound of a door opening (or closing) plays twice. Suddenly, a clown will appear in the tent with you. The Invisible effect doesn’t work on the clown, and if it catches you, you’ll be transported to a sectioned off area of the Shinto Shrine. If you manage to evade it and make it back outside, the area will be swarming with clowns moving at twice their normal speed. Getting caught by these will also send you to the sectioned off area of the Shinto Shrine.
If you manage to escape the clown and make it outside, Wallpaper #109 will be unlocked.
The Colossus of Rhomb
Location: Square-Square World

Description: If the player has visited either the Cog Maze, used the glasses in the secret room required for Ending -1 in Flying Fish World, or visited the moonlit balcony accessed by interacting with the Helmet Girl, and has had at least four drinks, they can head left from the Theatre World entrance to Square-Square World through the doorway, and keep going left. If one of these conditions are met the screen will fade out as you travel, and you'll come to a narrow pathway, with the view zoomed out. Immediately start walking to the left, without stopping, as you have a very limited amount of time to reach the end. Stopping for even an instant will end the event prematurely. If successful, the camera should pan to the left once you reach the edge of the pathway, revealing a gigantic creature, partially submerged in mud. Urotsuki then wakes up.
Creatures of the Power Plant
Location: Power Plant

Description: From the entrance from Sign World, keep moving towards the right and you’ll come to a hallway where lots of different monsters can be seen in tanks. As you continue moving down this path, it will gradually get darker, and eventually you’ll come to a room with a large red circle with what looks like a tiled floor on the inside of it. Stepping onto the circle causes the screen to shake and make loud thudding noises, will quickly become more intense, and suddenly a hole will appear in the floor and you’ll fall through. The screen will cut to black, and when it comes back on, Urotsuki will be trapped in the empty tank you passed by. Pressing the interact key breaks her out of it.
Although the tank will be destroyed, you can still go back to the room and trigger this event as many times as you want.
Activating this event unlocks Wallpaper #132.
The Crying Eyes
Location: Cloudy World

Description: Within Cloudy World, there's a cave with droplets trickling down the wall. Interacting with the wall will pan the screen upward reveals the droplets are tear from a pair of eyes. Repeatedly panning upward will cause the eyes to open. They react to various effects.
Danger Panic Zone
Location: Broken Faces Area

Description: Technically, this is more of a separate area than an actual event. Walking though the mouth of the white face with bleeding eyes and white hands beside it will transport you to the Danger Panic Zone, a small looping area where one-eyed black and white creatures resembling fetuses will move around frantically while a variation of Monochrome Feudal Japan’s background music will play, startling any unsuspecting players. Using the Invisible effect here will cause the creatures to become transparent and crowd around Urotsuki and follow her, doing this will unlock Wallpaper #179. Walking through the face’s mouth again will take you back to the Broken Faces Area.
Decapitation
Location: Realistic Beach

Description: At the very end of the cave area at the Realistic Beach, after having gone upside down, the player is met with a small area featuring an inverted telephone pole in front of a bright sky. There is only one NPC here, a black sheep near the end bouncing up and down. Chainsawing it causes it to bleat and make the screen turn dark. More chainsaw noises are heard, and then the screen shows a slightly-graphic picture of a decapitated Urotsuki before she wakes up on the floor. While this does not unlock a wallpaper, the 34th one features the sheep character.
DECK RAVE
Location: Smiley Face DECK

Description: Somewhere in one of the dead ends of this world, there is a cycloptic mushroom that you can interact with, once you do it, the screen will begin to wave a few times, and the whole area will become colorful while upbeat music is playing, the background turns neon and moves rapidly, and all the faces on the tiles turn into smiley faces. The entire screen will momentarily distort every few seconds.
Dream of Roses
Location: Red Rock Caves

Description: After entering the small grotto by chainsawing either of the two NPCs blocking it, the player will find themself before a two large, gel-like creatures combining their red and green colors together to form a blue fluid that's pouring down into a rose. Interacting with it with the Fairy or Rainbow effects will lead Urotsuki to take a stroll through a beautiful path filled with flowers, other creatures, and calm music. Eventually, pictures of roses will fade in and the path will end with four more creatures gazing over a waterfall together. Urotsuki will jump down it and find herself in a small bunch of rose petals at the first part of the cave.
Alternatively, interacting with the rose while using the Chainsaw or Torch effects will lead to a different version of the event where the hallway will grow to be ominous, with blood and dead plants halfway through. Doing this will lead the rose to be permanently destroyed, making it so the original event can no longer be accessed.
Seeing this event unlocks wallpaper #200.
Duet with Elvis Masada
Location: Elvis Masada's Place

Description: Interacting with Elvis Masada while having Trombone effect equipped will start the event. Doing so will treat you to a brief scene where Elvis Masada and Urotsuki play together in a smooth jazz duet.

The Fisherman
Location: The underwater area between the School and the Dream Beach
Description: A somewhat lesser-known event. Normally, to reach the Dream Beach, you have to interact with the hook in the middle of the underwater area, but if you have the Penguin effect on and interact with it you’ll be taken to another small area that also looks like it’s underwater. It’s completely blue and the only other thing in the map is a sad looking fish that seems to ‘deflate’ if you try to interact with it (you can actually walk on top of it when it deflates), and a valve to the right. Interacting with the valve causes it to open and it’ll be revealed that you’re actually inside the fisherman’s bucket! A large picture of the fisherman next to the bucket will show briefly and a small Urotsuki will fall out of the valve and back into the water.
Flight
Location: Urotsuki's Dream Apartments

Description: When going into the Apartment Amoeba's room, there is a 1 in 6 chance of a tree being present on the wall near the kitchen. Going inside it leads the player to a small room with a painting of a balcony. Interacting with it leads the player to the rooftop overlooking a city with a plane. Getting inside it leads to a small scene that's a reference to the Witch's Flight event from the original game. Pressing ESC leads the player back.
The Flower Lady
Location: Apartments

Description: The Flower Lady can be found in the far left room on the ground floor of the Apartments. If you chainsaw her OR her pet caterpillar and walk out onto the balcony, it will have holes in it and be covered in purple vines. Many ghostly copies of the Flower Lady will follow you around. Interestingly, the other balconies on the left and the right are also covered in purple vines and have holes in them. Walking back into the apartment room will cause the Flower Lady to respawn and the balcony will return to normal.
Gallery of Me
Location: N/A

Description: Upon waking up, there is a roughly 1/818 chance of instead being transported to the Gallery Of Me, a strange white corridor filled with clear window-like frames containing various versions of Urotsuki.
Giant Cat
Location: School

Description: Like the Danger Panic Zone, this is more of a separate area than an actual event. There’s a black cat found in the fourth room of the School; interacting with its north side transports you to a small area with an enormous cat. You can pet the cat and it’ll purr loudly. You can also sit on it or climb up onto its back. Moving between its tail and leg causes it to meow loudly at you. There are two black and white cat-like NPCs moving around in the area, interacting with either takes you back to the room in the School.
Sometimes the cat is found on top of a desk; in that case you’ll need to equip the Chainsaw to scare it off.
The Graveyard’s Sculpture
Location: Graveyard World

Description: This event is found in the small gray building in Graveyard World. Entering it will take you to a small room with a large, strange green and turquoise sculpture with splatters of the same color on the floor. This room also houses nine purple monsters, the same kind found outside the room, except these ones can’t be killed. To active the event, you must chainsaw the sculpture. The music will become more high-pitched and ominous and causes the purple monsters to come alive and chase you. If they catch you, the screen will turn red, and after a transition both the sculpture and the monsters will be gone and you won’t be able to exit the room. If you manage to escape the room without being caught, outside will be more purple monsters forming a square around the building, trapping you, while more of them inside the square (the same ones found right outside the building before you entered it) will chase you, trapping you in the same room. The Invisible effect doesn’t work on any of the monsters.
But it is, in fact, possible to escape without getting caught by using the Bat effect. After chainsawing the sculpture, equip the Bike and quickly move towards the door. Before exiting, equip the Bat effect, and while outside immediately hold down the interact key to mark the spot Urotsuki is standing in, then hold it down a second time to fly up into the air… although there’s not quite enough time to do both things before getting caught (by this time the monsters should have gathered around you and the screen has turned red) , but Urotsuki will still fly into the air, and when she flies back down, the screen will still be red, but the purple monsters forming the square will fade away, the screen will turn back to normal and the monsters that would normally chase you will become docile again. By doing this, it’s possible to activate the event more than once.
Hallucination
Location: Laboratory

Description: If you kill the head scientist in his office, the other scientists will become chasers. When they touch you, they will take you to be a test subject for a hallucinogenic substance. Urotsuki will be in a small room behind a glass wall being monitored by the scientists, all whilst having a trippy hallucination with Shadow Women, red hourglasses, yellow blobs, forest creatures and purple graveyard monsters dancing around her. Multicolored neon patterns will be moving around the room and wonky music will be playing. If you go up to the glass where the scientists are (Urotsuki will also move slower than usual) and press the action button, she will bang her head against the glass. After doing this several times, the hallucination will go away, but she will still continue to do it until blood can be seen on the glass. Two scientists come in to try and restrain her, Urotsuki finally falls unconscious and you will wake up. Something of note is that using any effects is impossible during the entire event, both during the Hallucination, and smashing your head on the glass.
Haniwa Dance
Location: Haniwa Temple

Description: In the temple, use the Haniwa effect to move the haniwa statue blocking the pathway, then go up the pathway and interact with the statue at the end to view the Haniwa Dance event. Haniwa statues will dance on screen while a happy tune plays.
The Haunted Cabinet
Location: Nostalgic House
Description: Going through the second hallway of the area leads to a room featuring a dead plant, a lamp, and a large cabinet. Interacting with it will cause it to open and show a few frames of static before the screen goes dark. It then shows a full screen, monochromatic image of a naked woman sitting next to a dark hole, accompanied by grinding noises and an old TV filter. Using the arrow keys will reveal that her face has been scribbled out, and this can be done indefinitely.

High Priestess Event
Location: Forest Carnival
Description: Interacting with the radio in area of the Forest Carnival with the ladders in the sky will start the event. The screen will darken and Urotsuki will be in a new area with ominous music and a giant, faceless Virgin Mary statue. Interacting with the statue will make the screen pan upward to show her face (or lack of one, rather). To the left and right of the statue are tents with a sleeping person and a normal-sized Virgin Mary statue inside. Chainsawing the person in the room on the right and then leaving the tent will take you to a different area with six white dressers. After applause, the dressers will open, releasing fast, small blob-like chasers. Urotsuki must then navigate the area and chainsaw the dressers while evading the shadow blobs. If she is caught after a certain number of times (seemingly a random number around 1-4), she will be teleported to an inescapable area. If she succeeds, the screen will fade to black and then reveal six carnies- implying that Urotsuki killed them.

It is highly recommended to use the Crossing Effect to complete this event.
Honoring the Dead
Location: Dream Mexico

Description: After interacting with a black coffin in the leftmost house, you'll be sent to another room inhabited by the same NPCs seen just outside the house, now visible without the need of the Invisible or Grave effects, and Urotsuki now wears a beautiful black funneral attire. After going right for a while, you'll see the same NPC found in the cyber maze that brought you here, interacting with it will take you to another section of the cyber maze fully decorated with marigolds, coffins and graves, the skeleton NPCs are here as well. By going all the way to the right and interacting with the skeleton at the end, Urotsuki will turn around and start to leave flowers behind her as she leaves the place. The skeleton will then follow the trail and Urotsuki will be back into the original room with the black coffin, now decorated with the same flowers she was holding in her hands. This event unlocks Wallpaper #210 and can only be seen once.
The Hospital Chainsaw Massacre
Location: Hospital
Description: There are a series of consecutive hallways in the Hospital, each containing three doors. The middle door in the last hallway leads to a room containing a bed with something moving underneath the bedsheets. Interacting with the bed will make it start oozing a green fluid, staining the bedsheets and eventually teleporting Urotsuki to an inescapable room covered in a sickly, green wash with no windows.
This room is home to Aojiru, a patient in the hospital hooked up to an IV. Although Aojiru does nothing but stand there like a lemon, interacting with them will automatically make Urotsuki cut them down with the chainsaw, even if she does not currently possess the chainsaw effect. She will then be trapped in the room, with no way out except for the Eyeball Bomb effect or pinching herself awake.

Into the Mirror
Location: Jigsaw Puzzle World
Description: Once the witch has left the main room, the player will be able to access another small room featuring a glossy mirror with reversed music. Upon first interaction, it shows a picture of the witch and then of Urotsuki. After this, it will turn purple, and then using different effects on it will result in a few different outcomes.
Using the Polygon effect will play a static noise and then show a distorted image of Urotsuki's room with her dressed up as the witch and sitting in the very middle. The game then cuts back to the mirror room, which will have the player be drawn to it before waking up in the same position as the picture. Using the Marginal effect, however, will unlock the witch as an effect, which can only be used in this world.
Both of these scenarios will unlock a wallpaper.

Japanese Turntables Event
Location: Urban Street Area
Description: Normally the Urban Street Area is a fairly empty, quiet area, but by using the Fairy effect here it causes a purple creature to fall and hit the ground behind you with a splat. A pair of turntables will appear while shadows of people walking around also appear at random moments. Interacting with the turntables causes a hip hop-like beat to play, and pressing the arrow and interact keys lets you add other beats on top of it. This also causes the screen to change colors and pictures of maps to flash up on screen.
The Lady and the Sun
Location: Pastel Blue House

Description: This event is found on the second floor of the Pastel Blue House. Going through the last door on this floor leads to a small path where a lady in white can be seen under a large, red sun with one eye. Trying to equip the Chainsaw here will cause the screen to take on a red hue, the sun’s eye will glow, and your Chainsaw will be de-equipped.
Activating this event unlocks Wallpaper #77.
The Lamppost-Girl
Location: Apartments

Description: Thought of as the 2kki equivalent of Monoe and found in a path near the Apartments. Trying to interact with her causes a detailed picture of her (drawn in a similar style to Monoe) to appear on screen before disappearing along with the girl. You can activate this event once per dream.
Lonely Urotsuki
Location: Underwater Amusement Park

Description: After viewing most of the attractions at the Underwater Amusement Park and returning to the entrance, interact with the LED-matrix display when it says “さようなら” (Goodbye) to activate the Lonely Urotsuki event. You’ll be transported to a scene where a transparent, child Urotsuki will be standing all alone in the middle of a sectioned off road surrounded by fences, while shadow people walk past with their children. Walking back through the entrance takes you back to the Underwater Amusement Park and the board’s text will change, so you’ll have to view most of the attractions again if you want to witness this event more than once.
If you’re using the Child effect before interacting with the electric board, the event will change slightly. When this happens, you’ll be the one in the middle of the road. The shadow people won’t interact with you, and if you try to bring up the menu, they’ll all smile menacingly. There’s a break in the top part of the fence where a normal-size Urotsuki watches the event in the darkness. Walking through the break in the fence takes you back to the Underwater Amusement Park.
If you also use the Glasses effect during this event and press the interact key, the shadow people will also smile in the same way they do when you’re using the Child effect.
This event unlocks quite a lot of Wallpapers. Activating this event unlocks Wallpaper #67 and #134, and if you’re using the Child effect, Wallpaper # 94 will be unlocked. Using the Glasses effect during the event unlocks #74 (although many people have also unlocked #74 by using the Stretch effect and crying during the event).
Madotsuki’s Room
Location: Never-Ending Hallway

Description: Again, this event is more of a separate area than an event. After passing by the smiling man in the hallway, you may come across a window that’s completely dark. Interacting with it takes you to a room that closely resembles Madotsuki’s room from Yume Nikki. While inside, the screen often cuts to static for brief moments. There doesn’t appear to be anything you can interact with in the room, and if you stay in it for too long, static will take up the entire screen and you’ll be sent back out into the Never-Ending Hallway.
Maiden Outlook Event
Location: The Maiden Outlook, reachable from the Library or Japan Town

Description: Entering from either area will place you in front of a bus on a cliff overlooking a suburban town, moving towards the left side of the cliff reveals an enormous geisha sitting off in the distance. The menu is inaccessible in this area.
The time of day in this area changes randomly with each visit. If it’s daytime or the evening when you arrive, moving all the way the edge of the cliff causes the geisha’s head to rocket off her body and fall next to you. After this event plays, you’ll be taken back to wherever you entered the area from.
If it’s midnight when you arrive, the geisha will already be headless, and her head will be flying over the town, moving in and out of the foreground and doing spins.
After witnessing this event, entering Marijuana Goddess World during the same dream session may instead take you to the Maiden Outlook a second time, although very rarely.
- To reach the outlook from Japan Town you have to sit next to the man reading a newspaper, known as News Man. Sitting at the bus stop with him and waiting a few seconds makes a bus arrive and pick both of you up, taking you to the Maiden Outlook.

March of Progress
Location: Chess World
Description: Inside Chess World, there are two chess pieces with signs beside them. Going between them brings you to a hallway similar to those in the Monkey Mansion. In the room at the end of the hall is a throne Urotsuki can sit on. Doing so puts you in control of a brief event parodying the March of Progress.
Mask Shop Event
Location: Mask Shop

Description: While inside the Mask Shop, ringing the bell several times without buying a mask will slowly darken the shopkeeper's expression until her eyes aren't visible. Trying to leave afterward will spawn a ghostly clown chaser at the doorway, which walks slowly towards you. doubling back up towards the shop will spawn an army of ghostly clowns, effectively trapping Urotsuki.
When the clown catches her, any effect or mask will be unequipped and the screen will shake and fade to black. When it fades back in it will show a monochrome view of the mask shop, with Urotsuki's decapitated head turned into a mask, and placed on the shelf with the others.
Mechanical Heart Act

Location: Amphitheater
Description: Taking a sit on the Amphitheater's audience seats will show a stage performance, where two masked performers dance on stage as piano music plays, after a mechanical heart is shown above the stage.
Mirror Urotsuki
Location: Day & Night Towers

Description: There is a room in the Day & Night Towers that appears to be some sort of mirror, where a copy of you (your ‘reflection’) will copy your movements. If you chainsaw this Urotsuki though, you’ll hear two high-pitched screams and both of you will fade, causing you to wake up. Using the Glasses effect will cause the reflection's face to vanish and make an eye appear on its chest.
Using different effects in this room will cause the reflection to react to them visually in different ways:
- Wolf - makes your reflection use the Red Riding Hood effect, and vice versa.
- Tall - makes your reflection use the Child effect, and vice versa.
- Biker Wolf - makes your reflection copy you, but with a snazzy pair of goggles on her head.
- Haniwa - doesn't make your reflection copy you, but it will make her blur as she tries to walk around with you.
- Glasses- Your reflection's face will be replaced with a hole and her shirt will have an eye on it
Chainsawing your reflection unlocks Wallpaper #70.

Monochrome Eye
Location: The monochrome room in Flying Fish World
Description: A full-screen event that happens when you interact with the large eye on the wall. Interacting with it causes a gray kaleidoscope-like image to appear and spin around on the screen for a few seconds before zooming in on it and fading away.
The Nail Lady
Location: Nail World

Description: Near the upper left area of the world lies a mannequin with Urotsuki's plain pattern cut across its body. Chainsawing it five times will lead to a sectioned-off part of the map with a lady in a white dress spinning on a platform in the middle. Interacting with her will cause her to spin faster and have her head pop off and then show a full-screen image of her. After this, more headless women will appear spinning on the other platforms.

Odorika’s Dance
Location: Red Streetlight World
Description: Odorika is found standing next to a single streetlight inside a larger circle of streetlights in Red Streetlight World. Interacting with her while bowing with the Maiko effect causes a full-screen event where an animation of Odorika and her rabbits are dancing.
Interestingly, the animation of Odorika dancing seems to have been made with Flipnote Studio (with a few minor edits).
Activating this event unlocks Wallpaper #20 and Kura Puzzle #18, although you don’t need the Maiko effect to unlock the Kura Puzzle, you just need to interact with her. A video showcasing the event can be found here.
Out-of-Body Experience
Location: Innocent Dream

Description: By interacting with the Piano Girl in Innocent Dream, she will play a short tune and take Urotsuki to an isolated room, with one of the creatures from Chaos World. Urotsuki's soul will then leave her body. There's not much she can do in this room until she gets caught by the creature, which teleports her to the couch in the Fantasy Library, or the Cloud Tops if text events are disabled.

The Paying Customer
Location: The Hotel in Japan Town
Description: Starting from the entrance of the Hotel, go through the left doorway and then go down the stairs to the bottom floor. There should be three doorways here, and you’ll want to go through the doorway on the left. Going through this doorway leads you behind the front desk, where the smiling geisha sometimes is. While behind the desk, if you wait a bit, a shadow blob NPC will walk up to the desk and pay you some money (note that you have to be all the way to the left of the desk for it to pay you), and then walk into the left doorway. You can only activate this event once per game.
Penguin GB Game
Location: Urotsuki's Dream Apartments

Description: This event is required to get the Penguin effect.
In Urotsuki’s room inside the dream apartments, interacting with the game console will transport you into a game viewed through heavy scanlines, featuring a series of grassy ledges connected by ladders that are watched over by two NPCs with strangely shaped heads. When you first start, you’ll be wearing the Penguin effect, although you can open the menu and equip other effects.
One of these NPCs patrols the the topmost ledge and must be passed using one of the ladders to progress, but it does not pose a threat to Urotsuki and will simply turn around if it collides with her.
If you equip the glasses effect near the platform the ladder leads down to, it will reveal a flashing red orb on the platform behind the second stationary NPC that is seemingly unreachable, but there is a 60/255 (approximately 23.5%) chance determined when you go to sleep that it will be floating close enough to the ledge above that you can interact with it, which will take you to a glitched out level in the game with non-traversable geometry with no way to leave, forcing you to use the Eyeball Bomb or wake up.
Once past the patrolling NPC, If you keep going to the right you’ll probably notice that you’re stuck on a looping path. To get past this, you have to use the Penguin effect to slide past the barrier. then you can continue going to the right. Once beyond the looping path, continuing to the right leads to the next area, a cliff with a small ledge sticking out of it.
Pressing the down arrow key near the ledge causes Urotsuki to jump off it, but a shadowy figure appears behind her and laughs, hinting that she was pushed off instead of jumping off. Doing this ‘completes’ the game and you’ll wake up.
Note that you don’t need to finish the game to keep the Penguin effect, you can wake up or Eyeball Bomb yourself out of the game and you’ll still get the effect.
Getting the Penguin effect unlocks Wallpaper #86 and Kura Puzzle #29, and if you complete the Penguin GB Game you’ll also unlock Wallpaper #105.
Photorealistic Event
Location: Fused Faces World

Description: There's an interruptor somewhere in this world, interacting with it will make the whole area photorealistic and chasers will appear, if caught you will be sent to an isolated area with a giant face in the background and disfigured faces surrounding you. The gaping mouths in the photorealistic state now sends you to Onyx Tile World, unlocking a connection frm there to here.
Rooftop
Location: Techno Condominium

Description: Traveling up every flight of stairs will lead to the rooftop of the Techno Condominium, where there doesn't seem like much to do. However, walking off the edge of it will have Urotsuki equip the Bat effect regardless of whether or not she has it, and then start an event similar to that of the Witch's Flight from the original game. A scene plays with her soaring through the night sky, and passing the moon allows her to access Cotton Candy Haven, with the scenery now dark. Doing this again with the dark rooftop leads back to the Techno Condominium connection.
Seishonen’s Glitched Room
Location: Urotsuki's Dream Apartments

Description: Thought of as Yume 2kki’s equivalent of Poniko. From Urotsuki’s room, go down the stairs and to the left should be another door, next to another set of stairs. Inside is Seishonen. Normally his room is bright green, but there is a 1 in 31 chance that upon entering it will become ‘glitched’. When it becomes glitched, the room’s colors become black and dark red and the entire room becomes distorted. Seishonen’s sprite becomes what appears to be a mass of eyeballs while bits of him and the room randomly flash around on screen. A black figure can also be seen occasionally walking just in view in a corner of the room before disappearing again. There is also a hidden exit to the Magnet Room in the top right corner. However, the Magnet Room's background music will not be present if entered from here.
Activating this event unlocks Kura Puzzle #41.
Screaming Forest
Location: Bright Forest

Description: Triggered by interacting with a mushroom-like creature located at the east of this area, hidden between the trees. After interaction, static will intermittently cover the screen, before changing the area into a deteriorated version of itself, where the rainbow algae is replaced by red flowers and red, smiling faces. A red head can be seen rapidly moving in the background, while the static keeps appearing in the screen repeatedly. In this state, there's a 1/35 chance that the creepy music of the event changes instead to the Smiley Face DECK music, but only for a couple of seconds before reverting to the event track. Going back to the Solstice Forest or finding the cube that leads to the Rainbow Ruins stops the event and also unlocks Wallpaper 378.

The Cursed Corridor
Location: Execution Ground
Description: If you have killed the blonde lady in one of the rooms of the Atelier, there will be a static flash when going half way through. The area will then take a more dreadful appearance, with the door being locked, leading the you to go all the way to the rest of the corridor. Along the way, the corridors become increasingly disturbing in appearance, and turning back at any point will return you to the lobby, forcing you to start from the beginning. Making your way to the end, the blonde lady whom you have slain will chase you, where getting caught by her will cause static to flash. At the end of the area, you will find a pink door similar in appearance to the corridor in its normal state, and entering it will return the corridor to normal, enabling access to the Atelier once again.
Shadow Woman Forest
Location: Forest World

Description: If you chainsaw the sane Shadow Woman in Forest World, she’ll become insane and start to chase you, like a normal Shadow Woman. But if you make it to the Underground area and walk back out, you’ll find yourself in the Shadow Woman Forest, an essentially darker, eerier version of the Forest World. The entire world becomes black and red and infested with Shadow Women. The portal back to the Nexus turns into a giant red blob-like figure with one eye and the portals to other areas disappear. The only way to escape besides waking up or using the Eyeball Bomb effect is to walk back into the Underground area and then walk back out, which makes Forest World return to normal.
Activating this event unlocks Wallpaper #40 and Kura Puzzle #30.
The Shadow Woman's Lap
Location: Toy World

Description: After chainsawing the creature between the two buildings at the Day & Night Towers, Toy World will become infested with miniature Shadow Women. However, one southwest of the Red Brick Maze entrance is normal-sized and stationary. Interacting with her sends you to a unique area where you can sit on her lap. If Urotsuki is normal-sized, the Shadow Lady will grow bigger before catching you.
Spider Queen
Location: Spiders' Nest
Description: When you chainsaw the spider queen's egg sack, it will rouse the fury of the spiders and start chasing you. Getting caught by them, Urotsuki is cocooned, unable to do anything and forcing her to wake up.
Strange Image
Location: The TV room in Flying Fish World

Description: Near the potted plant that takes you to the Monochrome Eye is another one that leads the player to a small room featuring a run-down TV full of static while unsettling music plays in the background. Using the Telephone effect will cause the entire screen to be filled with it while an odd image slightly appears before going away. Turning down the volume is recommended, as the sound effect is very loud.
The Spider’s Web
Location: Scenic Outlook

Description: From the area of the Scenic Outlook where the Bug Girl guarding the pole is, go down the stairs to the left to enter a small forest area. Walk up the ladder and use either the Chainsaw or Bug effect to get rid of the spider blocking the doorway, then go through it. You’ll be taken to an area of the Bug Maze. Move forward to enter another area of the Bug Maze where there are lots of NPCs moving around and the music changes. If you move to the end of this area, you’ll see a huge spider above a spider web. It will then slowly wrap you in its web, eventually covering up the entire screen. After this event finishes, you’ll be taken back to the entrance of the Bug Maze, where you first entered from the forest area of the Scenic Outlook.

Urotsuki's Execution
Location: Execution Ground
Description: By chainsawing any of the gray-faced figures in the Execution Ground and getting caught by the clown who chases Urotsuki as a result, Urotsuki will be taken to the guillotine room, with a fanfare sound before the execution. The audience will then jeer at Urotsuki before the blade falls on her, which will make the screen go red as an applause sounds, waking Urotsuki up with a start.

Vision
Location: Urotsuki's Room
Description: If the player has killed 50 NPCs (or any higher multiple of ten), there is a chance that upon waking up, Urotsuki will have a vision. The title theme music can be heard, playing slowly as a sound of a closing door can be heard. Urotsuki then appears in a purple-tinted room, sitting in front of her TV. Either a silhouette of herself or a Shadow Lady will appear behind her. Few moments later, the apparatition will walk towards Urotsuki, causing her to wake up from her vision, as the room goes back to normal.

The White Drooling Creature
Location: Apartments
Description: A short full-screen event. The White Drooling Creature is found in the door on the first floor, second room from the left, the same room you’re transported to from the Library. Interacting with it causes numbers to wave about on screen for a few seconds while a loud sound plays, startling any unsuspecting players. After viewing this event, the creature will then begin to run around the room quickly.
Woman and the Mirror
Location: Ocean Storehouse

Description: In the red curtain room of the Ocean Storehouse, there is a 1/9 chance that interacting with the left door will trigger a static flash. Once the flash fades, a full-screen event will start that shows a red-walled room with a bizarre background. In this room, a woman sits in front of a mirror filled with static, twitching as unsettling music and chewing noises play.
Zalgo
Location: Magnet Room

Description: The Magnet Room houses the Zalgo event, which can be accessed by finding the fenced-off section of wall with a crevice in it, and heading directly south from the crevice's position in the wall. Continue south and run into the north face of the blue cube. It should push you over the barrier and into the enclosed area with the crevice. It is unclear what version the location of the teleporter in this room changed, however, you'll want to immediately begin traveling northwest, not southeast, as there is a limited time before Urotsuki is transported out of the area and dropped off at the Intestines Maze. Note that the Motorcycle effect cannot be equipped here, as well as the background changing hence its name. Interacting with the dark gray teleporter (located in a bloody area a good distance northwest of the entry point) will bring you into a black room with a large NPC and rain.
Interacting with the NPC unlocks wallpaper #62.
???-tsuki and the Liar's Vision
Location: Unknown Child's Room

Description: After sleeping several times in the bed of the child's room, you'll end in an alternate version of the room, with a puddle of blood where the child used to be, and a purple figure resembling The Liar near the door. If you step on the blood puddle, a glitch sound will play and a fullscreen event will trigger, showing the infamous number 28, along with images of ???-tsuki, The Liar and the Child itself. After this you'll end in a dark empty room with the child. If you meet very specific conditions, you'll be able to give the child a present, making it fade away as a beautiful and calming music plays, equiping the glasses effect will reveal that the present is actually a depressed 01-kun.
???-tsuki's Descent
Location: The Second Nexus

Description: There is a pink blood puddle in ???-tsuki's balcony, interacting with it will make Urotsuki jump from the balcony. After this, a short cutscene will play in which ???-tsuki descends into a pit which starts of with red and cyan scribbles, followed by some hand-like elements, ending with a series of floating "280"s that, along with the background, get increasingly distorted towards the end. After this, Urotsuki will end up in a puddle of blood in Originator Garden. Interacting with the creature that spawns after this will unlock Menu Theme #36.
Variable 44 events
The variable #44 contains a randomized value between 0 and 255, which changes every time Urotsuki goes to sleep in Urotsuki's Room when awake or while dreaming in the bed located in Urotsuki's Dream Apartments. This allows many events to be obtainable only on certain dream sessions. Not every random event in the game uses this value, but knowing which events use this variable allows us to predict if other rarer events are currently active. The following sections lists some events related to this variable.
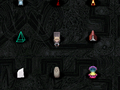
Nexus Background
Location: The Nexus
The nexus changes its color and design from gray if the value of variable #44 is less than 128 to blue if is more than 128.
As this is the easier to check event that uses the variable 44, it's highly recommended to use this event as first indicator of the current value the variable 44 has.
Variable #44 has value between 0 and 127.
Variable #44 has value between 128 and 255.


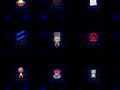
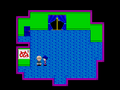
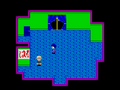
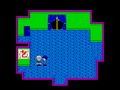
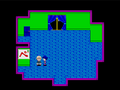
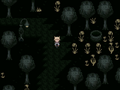
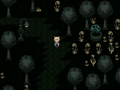
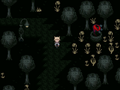
Seishonen's Painting
Location: Urotsuki's Dream Apartments : Seishonen's Room
A painting containing mostly japanese characters can be found in Seishonen's Room. The contents of this painting change depending on the current value of variable #44, as shown in the following pictures.
As this event is easy to access, it's recommended to check this event to identify the possible values of variable 44.
Variable #44 has a value between 0 and 61.
Variable #44 has a value of 62.
Variable #44 has a value between 63 and 126.
Variable #44 has a value between 127 and 191.
Variable #44 has a value between 192 and 236.
Variable #44 has a value between 237 and 255.


Eyeball NPC
Location: Grass World
Descending the staircase from the Gray Road, you'll come to a small room with a one-eyed creature sitting on a couch. Whenever you enter this room, it may have different poses depending on the current value of variable #44. If the value is less than 20, it will be lying on the couch. If the value is between 20 and 179, it will be sitting on the couch, awake. If the value is between 180 and 229, it will be sitting on the couch, but sleeping. If the value is between 230 and 255, it will be sitting on the couch, sleeping, but with his head even lower.

Variable #44 has a value between 0 and 19.

Variable #44 has a value between 20 and 179.
Variable #44 has a value between 180 and 229.

Variable #44 has a value between 230 and 255.


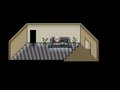
Snowy Path
Location: Riverside Waste Facility
If the variable 44 has values between 230 and 255 (9.8%), the path found before reaching the Undersea Temple will be covered with snow, the rain will be replaced with snow and the wooden arc will have a christmas hat. Getting this event unlocks the wallpaper #264.
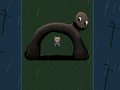
Variable #44 has a value between 0 and 229.
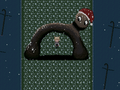
Variable #44 has a value between 230 and 255.


Butcher's Wrath
Location: Mutant Pig Farm
If you have visited the area at least 15 times, there is a chance that, as you explore, the area will take on a red tint, with the background's movement and music accelerated. Additionally, the area will shake periodically with static flashes occurring. This event is more likely to happen when the value of the variable 44 is higher.
Every step you take in this area triggers an event, which generates two random numbers. One between 1 and 999.999 (X), and other between 600 and 800 (Y). Then, the event copies the current value of the variable 44 (V), substracts 257 and multiplies it by -1. Then, it multiplies the previous result with the random value Y. Finally, the random value X gets divided by the product of the previous multiplication. If the remainder of this division equals 0, the event gets triggered.
To sum up the equation:
<math> X / ( - ( V - 257 ) * Y ) = 0 </math>
Due to how this works, if variable 44 has a higher value, the product of the multiplication with the random value Y will be a lower number, increasing the chances of this number being a divider of the random value X.
Aditionally, the event will always trigger if the value of variable 44 is 257, but it's impossible to get this value without manually changing the variable.
Having Debug Mode activated completely disables the event.
When the rest of the division equals 0.

Removed Events
Big Red
Location: Abandoned Factory

Description: This event is accessed by reaching the deepest area of the Abandoned Factory and using the ladder to the northeast, then going down the only feasible path that eventually leads to a sewer with a blob-like creature wading in the water. Upon walking past this screen, Urotsuki will suddenly find herself face-to-face with a large red monster (not unlike Yume Nikki's Big Red) and then swallowed whole. Afterwards, she will be transported to a world very similar to Yume Nikki's Windmill World.
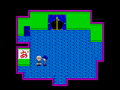
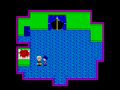
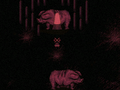
The Creature in the Well
Location: Abandoned Apartments
This creature is found in a well located in the first area of the Abandoned Apartments. It will only appear if the value of the variable 44 is between 170 and 255 (33%). If the variable has a value between 250 and 255, the creature will be red instead. Seeing this creature unlocks the wallpaper #245.
Variable #44 has a value between 0 and 169.
Variable #44 has a value between 170 and 249.
Variable #44 has a value between 250 and 255.


Drowning
Location: Depths

Description: This event is triggered by interacting with the brown teleport node. Initially, Urotsuki will be sinking deep into the ocean as a view of the cliffside and the flora floats by. After a while, her face will darken and she will slump to the side as if no longer conscious, and the screen fades to black. After a few seconds, however, there will be three bright flashes, and Urotsuki will light back up again as she sinks into the very bottom of the ocean. When she wakes up, she will be in an area with many fish lying on the ground, and what appears to be a massive pile of wreckage in the forefront. This event unlocks a wallpaper, as well as granting access to one of the ten Eggs.
Grayscale
Location: Scenic Outlook

Description: Previous versions of Valentine Land featured a way to get to the center of the plus-shaped area, which lead to the outside part of the bug shrine. Interacting with the gray pole here would transport you to a looping, gray hallway with a statue seen in other locations. Interacting with it leads to a cutscene in which Urotsuki is taken to all of the places featuring the structure before finally stopping at another location with a gray statue bearing the resemblance of her. Touching it turned the real her gray, and then she would wake up.
It Came From Behind
Location: Neon City

Description: While exploring the Neon City, there is a 1/2500 chance that "It Came From Behind" will appear, a black and red monster that merely floats by while making a small melody. It cannot interact with the player in any way, and unlocks a Kura Puzzle upon seeing it. The event is a reference to Takofuusen from the original Yume Nikki.
Kaokai
Location: Library

Description: This event was only present in some of the earliest versions of the game, around version 0.035. In the Library, there was a door on the wall that would take you to a small room, then a hallway featuring what appear to be monochromatic dolls while ominous music plays (an early mix of ym2-20-chiukoushin). Going through the door on the other end leads to a sole, bloody bookcase with very strange music that can still be heard in game (ym2-18_nounai_matusyou). Interacting with it causes the screen to go back, and then a red face appears after a few seconds, accompanied by a strange horse sound, causing the player to wake up. This event is named after the file name of the face's picture, which is surprisingly still kept in the game's files despite being entirely removed more than a decade ago due to it getting a bad reception. Video here.
Not!Uboa
Location: Hidden Shoal

Description: Older versions of the cone-shaped house in the Hidden Shoal featured a larger room with a crude art style bearing a slight resemblance to that of Poniko's from the original Yume Nikki. Interacting with the light switch has a 1/45 chance of starting an event known as Not!Uboa, due to its similarities to the event from the original game. Interacting with the red monster that has replaced the blond girl sends the player to a black screen with the people from the posters surrounding them, before a gunshot is heard and Urotsuki wakes up. The map can still be found by using the Debug Mode.
Red Bug Maze
Location: Bug Maze

Description: This event only happens when you use the Hand Hub entrance, and has been removed of 0.106g. Upon entering, there’s a random chance you’ll enter a creepier version of the maze. The entire maze turns red and the music changes to a low, disturbing gurgling noise. The maze becomes filled with Evil Bugs that block any portals to other worlds. Getting caught by one transports you to an isolated area with a Venus flytrap, the same place you get transported to if you get caught by the Bug Girl at the Scenic Outlook
Starry Night Event
Location: Planetarium

Description: Located on the second floor of the Planetarium is a theatre filled with comfy seats. Urotsuki can take a seat in one of them to view the starry night sky above.
Where Are You Going?
Location: Crazed Faces Maze
Description: Based on the "Who are you running from?" Gameboy Camera Easter Egg, this event was implemented in version 0.114g Patch 4, and removed the version after. Upon entering the unblocked path next to the clown face, a montage of creepy faces with text reading "Where are you going?" is shown before going away. This was not accessible from the red version of the world.