SalmSamuel (talk | contribs) mNo edit summary |
m (updated connections, images, features) |
||
| Line 1: | Line 1: | ||
{{MissingInfo| | {{MissingInfo|Update map.}} | ||
{{Locationbox | {{Locationbox | ||
|headercolor = #007F00 | |headercolor = #007F00 | ||
| Line 7: | Line 7: | ||
|JapaneseName = うろ蛇の世界 | |JapaneseName = うろ蛇の世界 | ||
|VersionAdded = 0.122 patch 1 | |VersionAdded = 0.122 patch 1 | ||
|VersionsUpdated = 0.123b | |VersionsUpdated = 0.123b,0.123b patch 3 | ||
|Effects = None | |Effects = None | ||
|Wallpapers = None | |Wallpapers = None | ||
| Line 13: | Line 13: | ||
|Map Type = | |Map Type = | ||
|NPCS = None | |NPCS = None | ||
|Connections = {{Connection|Emotions Maze|one_way_type=NoEntry}}, {{Connection|Epsilon District}}, {{Connection|Pale Plateau|isolation_type=Return}},{{Connection|Serpent Ruins A| | |Connections = {{Connection|Emotions Maze|one_way_type=NoEntry}},{{Connection|Epsilon District}},{{Connection|Pale Plateau|isolation_type=Return}},{{Connection|Serpent Ruins A|chance_description=Variable 44 is equal to or greater than 214|chance_percentage=16%}} | ||
|RemovedConnections = {{Connection|Zeta District|is_removed=true}},{{Connection|Pointing Labyrinth|one_way_type=NoReturn|is_removed=true}} | |||
|BGM = {{BGM|title=delta_song_7 (slow)|filename=delta_song_7(778B).ogg|label=Main Area|soundroom=778B}}, {{BGM|title=delta_song_7|filename=delta_song_7(778C).ogg|label=Empty Area|soundroom=778C}}, {{BGM|title=sound3e|filename=Sound3e fd.ogg|label=Cave|soundroom=185P}}, | |BGM = {{BGM|title=delta_song_7 (slow)|filename=delta_song_7(778B).ogg|label=Main Area|soundroom=778B}}, {{BGM|title=delta_song_7|filename=delta_song_7(778C).ogg|label=Empty Area|soundroom=778C}}, {{BGM|title=sound3e|filename=Sound3e fd.ogg|label=Cave|soundroom=185P}}, | ||
|Map ID = 2600, 2738, 3016 | |Map ID = 2600, 2738, 3016 | ||
| Line 27: | Line 27: | ||
==Features== | ==Features== | ||
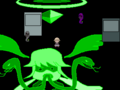
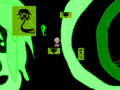
After entering from Emotions Maze, Urotsuki will be placed in a | After entering from Emotions Maze, Urotsuki will be placed in a desolate zone that features a serpentine Urotsuki background. Four snakes can be found wandering this section, and interacting with a random one will bring you to the main area. | ||
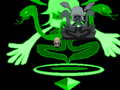
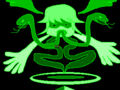
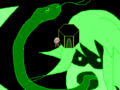
The main area of Serpent Ruins B is also a looping void filled with serpentine imagery. The background of the world features Urotsuki with a snake coming out of her mouth. Similar drawings are shown on murals throughout the world, as well as some grey structures dotted about, resembling either this world or [[Yume 2kki:Serpent Ruins A|Serpent Ruins A's]] panorama. A couple of green snakes wander the area. | The main area of Serpent Ruins B is also a looping void filled with serpentine imagery. The background of the world features Urotsuki with a snake coming out of her mouth. Similar drawings are shown on murals throughout the world, as well as some grey structures dotted about, resembling either this world or [[Yume 2kki:Serpent Ruins A|Serpent Ruins A's]] panorama. A couple of green snakes wander the area. | ||
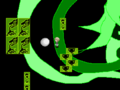
Going directly north | Interacting with the snake Urotsuki arrived at will bring her back to the first zone. Going directly north from the main entrance leads to a building with an opening, which only appears if [[Yume 2kki:Randomizers#Per Dream Session|Variable #44]] is 214 or above. Walking in transports Urotsuki to Serpent Ruins A. Southwest of the main entrance and northwest of the building is a white sphere leading to the '''Cave'''. | ||
West of the main entrance are two sculptures of Urotsuki facing each other. | West of the main entrance are two sculptures of Urotsuki facing each other. Further south is a Light Lady between two murals. Interacting with her teleports Urotsuki to [[Yume 2kki:Epsilon District|Epsilon District]] <!-- with many Light Ladies and buildings. A coned-off donut shop can be found here. By going all the way southeast, a ladder to a sewer can be found. By heading northeast through the mostly linear sewer, Urotsuki can climb a ladder to reach [[Yume 2kki:Zeta District|Zeta District]]. --> | ||
Further | |||
===Cave=== | ===Cave=== | ||
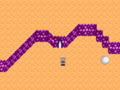
The Cave is a small rocky area. An opening in the wall leads to an isolated section of [[Yume 2kki:Pale Plateau|Pale Plateau]], and the white sphere returns Urotsuki to the main area of the world. | The Cave is a small rocky area. An opening in the wall leads to an isolated section of [[Yume 2kki:Pale Plateau|Pale Plateau]] that has two [[Yume 2kki:Menu Themes|Menu Themes]], and the white sphere returns Urotsuki to the main area of the world. | ||
==Directions== | ==Directions== | ||
*The Nexus → [[Yume 2kki:Abandoned Campsite|Abandoned Campsite]] → [[Yume 2kki:Pointing Labyrinth|Pointing Labyrinth]] → [[Yume 2kki:Serpent Ruins A|Serpent Ruins A]] → [[Yume 2kki:Mourning Void|Mourning Void]] → [[Yume 2kki:Dream Route|Dream Route]] → [[Yume 2kki:Bikini Beach|Bikini Beach]] → [[Yume 2kki:Emotions Maze|Emotions Maze]] → '''Serpent Ruins B''' | *The Nexus → [[Yume 2kki:Abandoned Campsite|Abandoned Campsite]] → [[Yume 2kki:Pointing Labyrinth|Pointing Labyrinth]] → [[Yume 2kki:Serpent Ruins A|Serpent Ruins A]] → [[Yume 2kki:Mourning Void|Mourning Void]] → [[Yume 2kki:Dream Route|Dream Route]] → [[Yume 2kki:Bikini Beach|Bikini Beach]] → [[Yume 2kki:Emotions Maze|Emotions Maze]] → '''Serpent Ruins B''' | ||
After paying 500夢 to the Light Lady in [[Yume 2kki:Abandoned Campsite|Abandoned Campsite]] per visit: | After paying 500夢 to the Light Lady in [[Yume 2kki:Abandoned Campsite|Abandoned Campsite]] per visit: | ||
*The Nexus → [[Yume 2kki:Abandoned Campsite|Abandoned Campsite]] → [[Yume 2kki:Mourning Void|Mourning Void]] → [[Yume 2kki:Dream Route|Dream Route]] → [[Yume 2kki:Bikini Beach|Bikini Beach]] → [[Yume 2kki:Emotions Maze|Emotions Maze]] → '''Serpent Ruins B''' | *The Nexus → [[Yume 2kki:Abandoned Campsite|Abandoned Campsite]] → [[Yume 2kki:Mourning Void|Mourning Void]] → [[Yume 2kki:Dream Route|Dream Route]] → [[Yume 2kki:Bikini Beach|Bikini Beach]] → [[Yume 2kki:Emotions Maze|Emotions Maze]] → '''Serpent Ruins B''' | ||
==Trivia== | ==Trivia== | ||
*Before version 0.123b, the main area was connected to Emotions Maze, and there was a woman wandering near two murals that brought Urotsuki to Zeta District. | *Before version 0.123b, the main area was connected to Emotions Maze, and there was a woman wandering near two murals that brought Urotsuki to Zeta District. The appearance of the Cave was updated to match the Amethyst Caves in [[Yume 2kki:Dream Route|Dream Route]]. | ||
*Before version 0.123b patch 3, there was a Light Lady that showed a close-up of her face before trapping Urotsuki in the [[Yume 2kki:Pointing Labyrinth|Pointing Labyrinth]]. The building that used to be a one-way connection to Serpent Ruins A was replaced with a two-way, chance-based connection. | |||
==Gallery== | ==Gallery== | ||
<gallery> | <gallery> | ||
File:Serpent Ruins B | File:Serpent Ruins B entrance.png|Entrance from the Emotions Maze. | ||
File:Serpent Ruins B | File:Serpent Ruins B entrance2.png | ||
File:Serpent Ruins B | File:Serpent Ruins B entrance3.png | ||
File:Serpent Ruins B entrance4.png | |||
File:Serpent Ruins B 2.png|The main area. | |||
File:Serpent Ruins B 3.png|The chance-based connection to Serpent Ruins A. | |||
File:Serpent Ruins B 6.png|The orb warp to the Cave. | File:Serpent Ruins B 6.png|The orb warp to the Cave. | ||
File:Serpent Ruins B 7.png | File:Serpent Ruins B 7.png | ||
</gallery> | </gallery> | ||
Revision as of 08:07, 17 April 2024
| This page is missing information. You can help YumeWiki by expanding it. Details: Update map. |
| Serpent Ruins B | |
|---|---|

| |
| Basic Info | |
| Japanese Name(s) |
うろ蛇の世界 |
| Effects | None |
| Events | None |
| Notable NPCs | None |
| Other | |
| Connecting Areas | Emotions Maze ⛔ Epsilon District Pale Plateau 🚩 Serpent Ruins A 🍀 |
| Removed Connections | Zeta District Pointing Labyrinth ➡️ |
| BGM | 🔊 delta_song_7 (slow) – Main Area (No. 778B) 🔊 delta_song_7 – Empty Area (No. 778C) 🔊 sound3e – Cave (No. 185P) |
| Map ID | 2600, 2738, 3016 |
| Version Added | 0.122 patch 1 |
| Last Updated | 0.123b patch 3 |
| Primary Author | delta_judgment |
| Contributing Author(s) | Nabisae |

Serpent Ruins B is an area accessible by interacting with the green snake in Emotions Maze.
Features
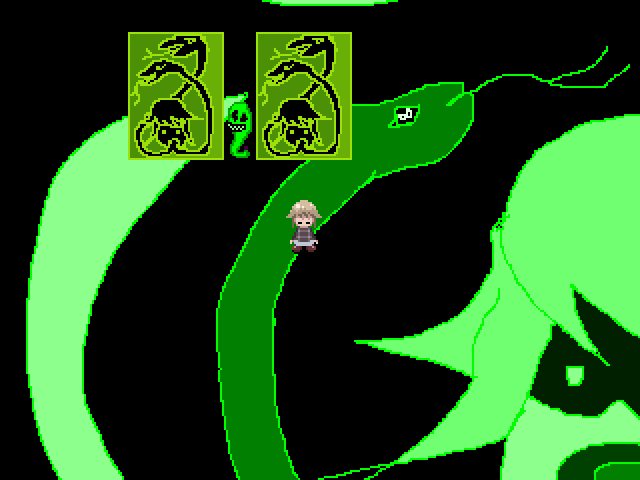
After entering from Emotions Maze, Urotsuki will be placed in a desolate zone that features a serpentine Urotsuki background. Four snakes can be found wandering this section, and interacting with a random one will bring you to the main area.
The main area of Serpent Ruins B is also a looping void filled with serpentine imagery. The background of the world features Urotsuki with a snake coming out of her mouth. Similar drawings are shown on murals throughout the world, as well as some grey structures dotted about, resembling either this world or Serpent Ruins A's panorama. A couple of green snakes wander the area.
Interacting with the snake Urotsuki arrived at will bring her back to the first zone. Going directly north from the main entrance leads to a building with an opening, which only appears if Variable #44 is 214 or above. Walking in transports Urotsuki to Serpent Ruins A. Southwest of the main entrance and northwest of the building is a white sphere leading to the Cave.
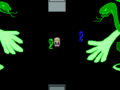
West of the main entrance are two sculptures of Urotsuki facing each other. Further south is a Light Lady between two murals. Interacting with her teleports Urotsuki to Epsilon District
Cave
The Cave is a small rocky area. An opening in the wall leads to an isolated section of Pale Plateau that has two Menu Themes, and the white sphere returns Urotsuki to the main area of the world.
Directions
- The Nexus → Abandoned Campsite → Pointing Labyrinth → Serpent Ruins A → Mourning Void → Dream Route → Bikini Beach → Emotions Maze → Serpent Ruins B
After paying 500夢 to the Light Lady in Abandoned Campsite per visit:
- The Nexus → Abandoned Campsite → Mourning Void → Dream Route → Bikini Beach → Emotions Maze → Serpent Ruins B
Trivia
- Before version 0.123b, the main area was connected to Emotions Maze, and there was a woman wandering near two murals that brought Urotsuki to Zeta District. The appearance of the Cave was updated to match the Amethyst Caves in Dream Route.
- Before version 0.123b patch 3, there was a Light Lady that showed a close-up of her face before trapping Urotsuki in the Pointing Labyrinth. The building that used to be a one-way connection to Serpent Ruins A was replaced with a two-way, chance-based connection.
Gallery
Entrance from the Emotions Maze.
The main area.
The chance-based connection to Serpent Ruins A.
The orb warp to the Cave.


- 007F00
- E0FFE0