>GreenToxic No edit summary |
>GreenToxic (Casi, casi.) |
||
| Line 1: | Line 1: | ||
{{Locationbox | {{Locationbox | ||
|image = | |image = MonoAnew.png | ||
|caption = 白黒世界 | |caption = 白黒世界 | ||
|Effects = None | |Effects = None | ||
|Map Type = Multiple Maps, Large, Looping and Normal | |Map Type = Multiple Maps, Large, Looping and Normal | ||
|Events = White Desert A | |Events = White Desert A | ||
|NPCS = White Desert A | [[Events#Monoko|Monoko's Full Screen Event]] | ||
|Connections = White Desert A | [[Events#Monoe|Monoe's Tunnel]] | ||
[[Events#Severed Heads in the Sky|Severed Heads in the Sky]] | |||
[[Events#Takofuusen|Takofuusen]] | |||
Uboa's Trap | |||
[[Events#Uboa|Uboa]] | |||
|NPCS = White Desert A | |||
[[Monoko]] | |||
[[Monoe]] | |||
[[Dave Spector]] | |||
[[Eye People]] | |||
[[Takofuusen]] | |||
[[Severed Heads]] | |||
White Desert B | |||
[[The Thing with the Quivering Jaw]] | |||
[[Brain Creature]] | |||
[[Roary Straw]] | |||
Uboa's Trap | |||
[[Uboa]] | |||
[[Bloody Touching Monster]] | |||
|Connections = White Desert A | |||
[[Block World]] | |||
White Desert B | |||
[[FC Dungeon|FC Dungeon (One Way Arrive)]] | |||
[[Dense Woods|Dense Woods B (inside)]] | |||
Uboa's Trap | |||
[[The_Pink_Sea#Poniko.27s_House|Poniko's House (One Way Arrive)]] | |||
|BGM = SYA | |BGM = SYA | ||
|Chipset / Panorama = モノ_01 (Chipset) | |Chipset / Panorama = モノ_01 (Chipset) | ||
モノ (Tileset) | |||
真っ白, モノ背景_001 (02, 03, 04, 05, 06a, 06b, 07a, 07b) (Panorama) | |||
|audio file name = [[File:SYA_sfx.ogg|noicon]] | |audio file name = [[File:SYA_sfx.ogg|noicon]] | ||
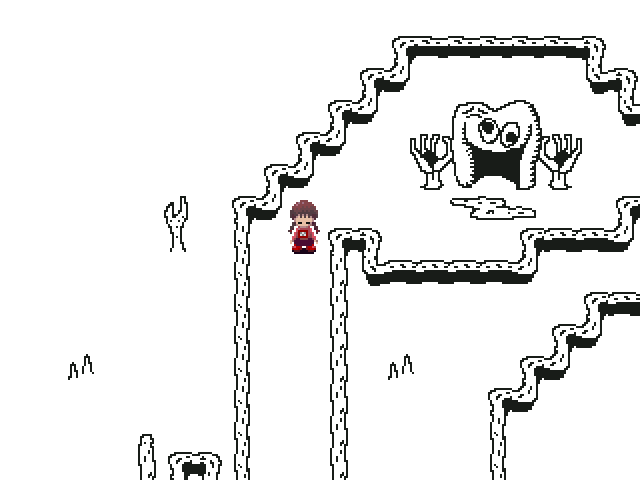
|audio name = White Desert BGM}} | |audio name = White Desert BGM}}The '''White Desert''' (モノ, Mono) is an area reachable from [[Mafurako]] in [[Block World]]. It is populated by a large number of notable [[List of Characters|NPCs]], including [[Monoko]], [[Monoe]], [[Takofuusen]], and [[The Thing with the Quivering Jaw]]. It is such a huge area that it is divided into three sections: White Desert A, White Desert B, and Uboa's Trap. Despite its giant size, it does not contain any [[Effects|effects]], although it does have many notable [[Events|events]]. | ||
''' | |||
==Points of Interest== | ==Points of Interest== | ||
===White Desert A=== | ===White Desert A=== | ||
The desert's name is based off of its color - or rather, its lack thereof: | The desert's name is based off of its color - or rather, its lack thereof: everything in the White Desert is entirely [[Monochrome|black and white]], save for striking bits of red. Various limb-like objects protrude out of the surface, some moving when interacted with effects, similarly to [[Eyeball World]], in which animated hands and eyes are on the ground. Everything also has a distinct cartoon-like art style that is also used for the [[The_Sewers#The_Sewer_Drawings|Drawings in the Sewers]] event. | ||
The black gate in Block World makes the player come out of a smiling tooth's mouth, with two arms next to it. These arms display the standard reactions to the [[Effects#Stoplight_.2F_Traffic_Light_.EF.BC.88.E3.81.97.E3.82.93.E3.81.94.E3.81.86.EF.BC.89|Traffic Light]] effect, and can be stabbed. The whole time the player is in this main map, there is a '''1/3600''' chance of the [[Takofuusen]] event occurring, which is rolled every half second. Near this entrance is the '''Eye Box''', which has a '''1/30''' chance of teleporting the player to a small area filled with [[Eye People]]; getting back is done the same way. | |||
[[Monoko]] can be found in a tunnel that has a horizontal path go through, using the Traffic Light effect will make her show her other appearance. | |||
Killing the [[Dave Spector]] near the circular path tunnel will allow the player to access two places from that tunnel: going to the west entrance leads you to a large looping area with [[Monoe]] inside; going to the east entrance leads you to a path that has huge body parts coming out of the ground and a small house at the end which triggers the [[Severed Heads]] in the Sky event. | Killing the [[Dave Spector]] near the circular path tunnel will allow the player to access two places from that tunnel: going to the west entrance leads you to a large looping area with [[Monoe]] inside; going to the east entrance leads you to a path that has huge body parts coming out of the ground and a small house at the end which triggers the [[Severed Heads]] in the Sky event. | ||
Near the entrance from Block World is the Eye Box, which has a '''1/30''' chance of teleporting the player to a small area filled with [[Eye People]]; getting back is done the same way. Not too far from there is a smiling tooth with two grasping hands that takes the player to Block World. | |||
===White Desert B=== | ===White Desert B=== | ||
The [[Dense Woods]] manhole leads to [[Roary Straw]] which has its appearance changed by how long you have been walking on the infinitely looping road. Climb up to the surface and you will be in a place that is surrounded by mountains with an entrance resembling a man's head. You can enter its right ear. | The [[Dense Woods]] manhole leads to [[Roary Straw]] which has its appearance changed by how long you have been walking on the infinitely looping road. Climb up to the surface and you will be in a place that is surrounded by mountains with a weird antennae-like objects and an entrance resembling a man's head. You can enter its right ear. | ||
Entering the ear, you will be in a cave which has a single pathway. In the middle there is a huge monster which is known as the [[Brain Creature]]. Pressing and holding the up arrow key will make the camera pan up so you can see its full appearance. If you keep walking along the path you will come out from a Buddha's left ear, and meet a giant monster called [[The Thing with the Quivering Jaw]]. | Entering the ear, you will be in a cave which has a single pathway. In the middle there is a huge monster which is known as the [[Brain Creature]]. Pressing and holding the up arrow key will make the camera pan up so you can see its full appearance. If you keep walking along the path you will come out from a Buddha's left ear, and meet a giant monster called [[The Thing with the Quivering Jaw]]. | ||
If you came from the [[FC Dungeon]], you will arrive at the Underground Lagoon which has a moving shadow arm. | If you came from the [[FC Dungeon]], you will arrive at a small location known as the '''Underground Lagoon''', which has a moving shadow arm coming out of an eye and a few stubs coming out of the wall. Using the [[Effects#Cat_.EF.BC.88.E3.81.AD.E3.81.93.EF.BC.89|Cat]] effect will make them move up and down constantly, while using the Traffic Light makes them stay up and down, alternating. In the far corner of the map lies a stairway that leads to the outside of the ring of mountains, which has nothing but a floating stair path and a tunnel near the entrance that has a path you can follow. Following the path will send you through a one way teleport to the White Desert A's tunnel near the southern corner of the map. | ||
From outside of the mountains, you can see the red tentacle from Roary Straw, but can't see the entrance that looks like a head in the center. The outside portion of the White Desert B is potentially the most difficult location to reach without a walkthrough because it requires you to go through two different mazes: the [[Teleport Maze]] and the [[FC Dungeon]]. | |||
[[File:undergroundl.png|frame|left|The White DesertUnderground Lagoon.]][[File:whitedesertbhead.png|frame|right|White Desert B.]] | |||
===Uboa's Trap=== | |||
This small, looping area can only be reached by interacting with [[Uboa]] in [[The_Pink_Sea#Poniko.27s_House|Poniko's House]], and there is no way to get back. The background contains a large creature known as the [[Bloody Touching Monster]], scrolling by, groping a few hills and spurting out blood. The player walks through a sort of white liquid that can be traversed through faster by using the [[Effects#Frog_.28.E3.81.8B.E3.81.88.E3.82.8B.EF.BC.89|Frog]] or [[Effects#Bicycle_.EF.BC.88.E3.81.98.E3.81.A6.E3.82.93.E3.81.97.E3.82.83.EF.BC.89|Bicycle]] effects. Just below this liquid near the starting point of the map is Uboa itself, wearing a rather odd expression on its face. The only way to escape is by waking up or using the [[Effects#Medamaude_.2F_Eye_Palm.EF.BC.88.E3.82.81.E3.81.A0.E3.81.BE.E3.81.86.E3.81.A7.29|Eye Palm]] effect. | |||
[[File:Bloodytouch.png|frame|center|The Uboa event.]] | |||
==Connections== | ==Connections== | ||
| Line 36: | Line 83: | ||
**'''White Desert A''' ''- Interact with [[Mafurako]] until she takes you to the black gate'' | **'''White Desert A''' ''- Interact with [[Mafurako]] until she takes you to the black gate'' | ||
***Monoko's Tunnel ''- Enter the long tunnel on the horizontal path'' | ***Monoko's Tunnel ''- Enter the long tunnel on the horizontal path'' | ||
***Monoe's Tunnel ''- Kill the [[Dave Spector]] near the circular path with the [[Effects# | ***Monoe's Tunnel ''- Kill the [[Dave Spector]] near the circular path with the [[Effects#Knife_.2F_Kitchen_Knife.EF.BC.88.E3.81.BB.E3.81.86.E3.81.A1.E3.82.87.E3.81.86.EF.BC.89|Kitchen Knife]] effect, then enter the tunnel from the west'' | ||
***The White Desert Path ''- Kill the Dave Spector | ***The White Desert Path ''- Kill the same Dave Spector, then enter the tunnel from the east'' | ||
***The Eye Box ''- '''1/30''' chance of being transported when you stab the Eye Box with the | ***The Eye Box ''- '''1/30''' chance of being transported when you stab the Eye Box with the Kitchen Knife'' | ||
*[[Dense Woods#Dense Woods B|Dense Woods B (The Road)]] | *[[Dense Woods#Dense Woods B|Dense Woods B (The Road)]] | ||
| Line 48: | Line 95: | ||
***'''White Desert B''' | ***'''White Desert B''' | ||
****'''White Desert A''' (One Way) ''- Follow the path from the steps into the tunnel'' | ****'''White Desert A''' (One Way) ''- Follow the path from the steps into the tunnel'' | ||
*The [[The Pink Sea|Pink Sea]] | |||
**'''Uboa's Trap''' (One Way) ''- Interact with [[Uboa]] in [[Poniko]]'s House'' | |||
==Gallery== | ==Gallery== | ||
White Desert B.png|White Desert A Map | White Desert B.png|White Desert A Map | ||
White Path Map.png|Map of the White Desert Path area | White Path Map.png|Map of the White Desert Path area | ||
Monoe's Tunnel.png|Monoe's Tunnel | Monoe's Tunnel.png|Monoe's Tunnel | ||
Monoko's Tunnel.png|Monoko's Tunnel | Monoko's Tunnel.png|Monoko's Tunnel | ||
| Line 59: | Line 108: | ||
File:Yn-tako.png|The Takofuusen Event | File:Yn-tako.png|The Takofuusen Event | ||
White Desert A.png|White Desert B Map | White Desert A.png|White Desert B Map | ||
White Desert Underground Area Map-(1).jpg|White Desert B (inside) and Underground Lagoon Map | |||
Bloodytouch.png|Uboa's Trap | |||
uboatrapworld.png|Uboa's Trap Map | |||
モノ_01.png|The Tileset | モノ_01.png|The Tileset | ||
[[Category:Locations]] | [[Category:Locations]] | ||
Revision as of 00:40, 10 August 2019
| White Desert | |
|---|---|
 白黒世界 | |
| Basic Info | |
| Effects | None |
| Events | White Desert A
Monoko's Full Screen Event Monoe's Tunnel Severed Heads in the Sky Takofuusen Uboa's Trap Uboa |
| Notable NPCs | White Desert A
Monoko Monoe Dave Spector Eye People Takofuusen Severed Heads White Desert B The Thing with the Quivering Jaw Brain Creature Roary Straw Uboa's Trap Uboa Bloody Touching Monster |
| Other | |
| Connecting Areas | White Desert A
Block World White Desert B FC Dungeon (One Way Arrive) Dense Woods B (inside) Uboa's Trap Poniko's House (One Way Arrive) |
| BGM | SYA |
| Map ID | Missing |
| Map Type | Multiple Maps, Large, Looping and Normal |
The White Desert (モノ, Mono) is an area reachable from Mafurako in Block World. It is populated by a large number of notable NPCs, including Monoko, Monoe, Takofuusen, and The Thing with the Quivering Jaw. It is such a huge area that it is divided into three sections: White Desert A, White Desert B, and Uboa's Trap. Despite its giant size, it does not contain any effects, although it does have many notable events.
Points of Interest
White Desert A
The desert's name is based off of its color - or rather, its lack thereof: everything in the White Desert is entirely black and white, save for striking bits of red. Various limb-like objects protrude out of the surface, some moving when interacted with effects, similarly to Eyeball World, in which animated hands and eyes are on the ground. Everything also has a distinct cartoon-like art style that is also used for the Drawings in the Sewers event.
The black gate in Block World makes the player come out of a smiling tooth's mouth, with two arms next to it. These arms display the standard reactions to the Traffic Light effect, and can be stabbed. The whole time the player is in this main map, there is a 1/3600 chance of the Takofuusen event occurring, which is rolled every half second. Near this entrance is the Eye Box, which has a 1/30 chance of teleporting the player to a small area filled with Eye People; getting back is done the same way.
Monoko can be found in a tunnel that has a horizontal path go through, using the Traffic Light effect will make her show her other appearance.
Killing the Dave Spector near the circular path tunnel will allow the player to access two places from that tunnel: going to the west entrance leads you to a large looping area with Monoe inside; going to the east entrance leads you to a path that has huge body parts coming out of the ground and a small house at the end which triggers the Severed Heads in the Sky event.
Near the entrance from Block World is the Eye Box, which has a 1/30 chance of teleporting the player to a small area filled with Eye People; getting back is done the same way. Not too far from there is a smiling tooth with two grasping hands that takes the player to Block World.
White Desert B
The Dense Woods manhole leads to Roary Straw which has its appearance changed by how long you have been walking on the infinitely looping road. Climb up to the surface and you will be in a place that is surrounded by mountains with a weird antennae-like objects and an entrance resembling a man's head. You can enter its right ear.
Entering the ear, you will be in a cave which has a single pathway. In the middle there is a huge monster which is known as the Brain Creature. Pressing and holding the up arrow key will make the camera pan up so you can see its full appearance. If you keep walking along the path you will come out from a Buddha's left ear, and meet a giant monster called The Thing with the Quivering Jaw.
If you came from the FC Dungeon, you will arrive at a small location known as the Underground Lagoon, which has a moving shadow arm coming out of an eye and a few stubs coming out of the wall. Using the Cat effect will make them move up and down constantly, while using the Traffic Light makes them stay up and down, alternating. In the far corner of the map lies a stairway that leads to the outside of the ring of mountains, which has nothing but a floating stair path and a tunnel near the entrance that has a path you can follow. Following the path will send you through a one way teleport to the White Desert A's tunnel near the southern corner of the map.
From outside of the mountains, you can see the red tentacle from Roary Straw, but can't see the entrance that looks like a head in the center. The outside portion of the White Desert B is potentially the most difficult location to reach without a walkthrough because it requires you to go through two different mazes: the Teleport Maze and the FC Dungeon.


Uboa's Trap
This small, looping area can only be reached by interacting with Uboa in Poniko's House, and there is no way to get back. The background contains a large creature known as the Bloody Touching Monster, scrolling by, groping a few hills and spurting out blood. The player walks through a sort of white liquid that can be traversed through faster by using the Frog or Bicycle effects. Just below this liquid near the starting point of the map is Uboa itself, wearing a rather odd expression on its face. The only way to escape is by waking up or using the Eye Palm effect.
Connections
- Block World
- White Desert A - Interact with Mafurako until she takes you to the black gate
- Monoko's Tunnel - Enter the long tunnel on the horizontal path
- Monoe's Tunnel - Kill the Dave Spector near the circular path with the Kitchen Knife effect, then enter the tunnel from the west
- The White Desert Path - Kill the same Dave Spector, then enter the tunnel from the east
- The Eye Box - 1/30 chance of being transported when you stab the Eye Box with the Kitchen Knife
- White Desert A - Interact with Mafurako until she takes you to the black gate
- Dense Woods B (The Road)
- White Desert B (Confined)
- The Place Where The Thing with the Quivering Jaw is
- White Desert B (Confined)
- FC World Dungeon
- White Desert Underground Lagoon
- White Desert B
- White Desert A (One Way) - Follow the path from the steps into the tunnel
- White Desert B
- White Desert Underground Lagoon
Gallery
White Desert B.png|White Desert A Map White Path Map.png|Map of the White Desert Path area Monoe's Tunnel.png|Monoe's Tunnel Monoko's Tunnel.png|Monoko's Tunnel The Eye Box.png|Inside the Eye Box Wd1.jpg|The Severed Heads In The Sky Event File:Yn-tako.png|The Takofuusen Event White Desert A.png|White Desert B Map White Desert Underground Area Map-(1).jpg|White Desert B (inside) and Underground Lagoon Map Bloodytouch.png|Uboa's Trap uboatrapworld.png|Uboa's Trap Map モノ_01.png|The Tileset