No edit summary |
Roninnozlo (talk | contribs) (→Features: Filled out what little information there is on Streetlight World.) |
||
| Line 7: | Line 7: | ||
|Wallpapers = | |Wallpapers = | ||
|NPCS = None | |NPCS = None | ||
|Connections = {{Connection|Hospital}}, {{Connection|Subway}} | |Connections = {{Connection|Hospital|one_way_type=NoEntry}}, {{Connection|Subway}} | ||
|BGM = | |BGM = | ||
|Map ID = 0206 | |Map ID = 0206 | ||
| Line 15: | Line 15: | ||
==Features== | ==Features== | ||
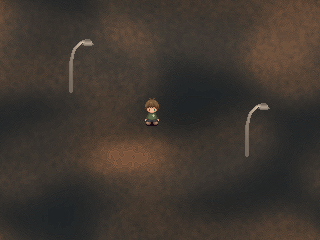
Streetlight World is a small, dark, and empty world featuring just streetlights and a gateway to the [[Someday:Subway|Subway]] directly south of where you enter. | |||
The only notable part of Streetlight World is how it is the only world with a Subway connection whose station is left of [[Someday:Nice Town|Nice Town]]'s, making it the only way to access it before you heal the glitched tile separating it from the rest of the Subway. This is also the only time it is free to use the Subway. | |||
==Directions== | ==Directions== | ||
Revision as of 18:08, 9 February 2024
| Streetlight World | |
|---|---|

| |
| Basic Info | |
| Effects | None |
| Events | None |
| Notable NPCs | None |
| Other | |
| Connecting Areas | Hospital ⛔ Subway |
| BGM | Missing |
| Map ID | 0206 |
The Streetlight World is an area accessible from using a phone in the Hospital.
Features
Streetlight World is a small, dark, and empty world featuring just streetlights and a gateway to the Subway directly south of where you enter.
The only notable part of Streetlight World is how it is the only world with a Subway connection whose station is left of Nice Town's, making it the only way to access it before you heal the glitched tile separating it from the rest of the Subway. This is also the only time it is free to use the Subway.
Directions
The Nexus → Mountain World → Fog World → Hospital → Streetlight World
Gallery
... more about "Streetlight World"
- 40352d
- d7c9b8
Has subobject"Has subobject" is a predefined property representing a container construct and is provided by Semantic MediaWiki.