mNo edit summary |
mNo edit summary |
||
| Line 32: | Line 32: | ||
By [[Yume 2kki:Effects#Chainsaw|chainsawing]] the boards on the eastern tower's lowest doorway, it is possible to access the '''Old Day & Night Towers''' (旧昼夜, ''Kyū Chūya'', Old Day & Night). Following the path up through the doorway on the right tower leads to the corresponding doorway on the left tower, where there is a ladder leading down to a gap which can be traversed with the [[Yume 2kki:Effects#Fairy.2FYousei|Fairy]] or [[Yume 2kki:Effects#Spacesuit|Spacesuit]] effects. On the other side of the gap, walking up to the tile protruding from the tower causes the time of day to change. There used to be a door here that would lead to [[Yume 2kki:Toy World B|Toy World B]]. | By [[Yume 2kki:Effects#Chainsaw|chainsawing]] the boards on the eastern tower's lowest doorway, it is possible to access the '''Old Day & Night Towers''' (旧昼夜, ''Kyū Chūya'', Old Day & Night). Following the path up through the doorway on the right tower leads to the corresponding doorway on the left tower, where there is a ladder leading down to a gap which can be traversed with the [[Yume 2kki:Effects#Fairy.2FYousei|Fairy]] or [[Yume 2kki:Effects#Spacesuit|Spacesuit]] effects. On the other side of the gap, walking up to the tile protruding from the tower causes the time of day to change. There used to be a door here that would lead to [[Yume 2kki:Toy World B|Toy World B]]. | ||
In the initial area, the topmost doorway on either tower will take you to a small, wrapping room with the [[Yume 2kki:Events#Mirror Urotsuki|Mirror Urotsuki]] event. Here, a "reflection" of Urotsuki will mimic your movements. | In the initial area, the topmost doorway on either tower will take you to a small, wrapping room with the [[Yume 2kki:Events#Mirror Urotsuki|Mirror Urotsuki]] event. Here, a "reflection" of [[Yume 2kki:Urotsuki|Urotsuki]] will mimic your movements. | ||
Interestingly, using different effects in this space will cause the reflection to react to them visually in different ways: | Interestingly, using different effects in this space will cause the reflection to react to them visually in different ways: | ||
| Line 48: | Line 48: | ||
There is a narrow bridge at the very middle, connecting the two towers, but the way is blocked by an NPC. He will react to various effects: | There is a narrow bridge at the very middle, connecting the two towers, but the way is blocked by an NPC. He will react to various effects: | ||
*He will grow a single huge eyeball if the [[Yume 2kki:Effects#Eyeball_Bomb|Eyeball Bomb]] effect is equipped. | *He will grow a single huge eyeball if the [[Yume 2kki:Effects#Eyeball_Bomb|Eyeball Bomb]] effect is equipped. | ||
*He will look around while the [[Yume 2kki:Effects#Boy|Boy]], Spacesuit, [[Yume 2kki:Effects#Rainbow|Rainbow]], Fairy, Glasses, [[Yume 2kki:Effects#Telephone|Telephone]], [[Yume 2kki:Effects#Twintails|Twintails]], [[Yume 2kki:Effects#Insect|Insect]], [[Yume 2kki:Effects#Maiko|Maiko]], [[Yume 2kki:Effects#Penguin|Penguin]], [[Yume 2kki:Effects#Plaster Cast|Plaster Cast]] [[Yume 2kki:Effects#Spring|Spring]], [[Yume 2kki:Effects#School Boy (Gakuran)|Gakuran]], Stretch, [[Yume 2kki:Effects#Trombone|Trombone]], [[Yume 2kki:Effects#Child|Child]], Haniwa, [[Yume 2kki:Effects#Cake|Cake]], [[Yume 2kki:Effects#Red Riding Hood|Red Riding Hood]], [[Yume 2kki:Effects#Bat|Bat]], [[Yume 2kki:Effects#Teru Teru Bōzu (Paper Doll)|Teru Teru Bōzu]], [[Yume 2kki:Effects#Tissue|Tissue]], [[Yume 2kki:Effects#Polygon|Polygon]], [[Yume 2kki:Effects#Grave|Grave]], [[Yume 2kki:Effects#Bunny Ears/Usamimi|Bunny Ears]], [[Yume 2kki:Effects#Drum|Drum]], or [[Yume 2kki:Effects#Dice|Dice]] effect is equipped. | *He will look around while the [[Yume 2kki:Effects#Bike/Motorcycle|Bike]], [[Yume 2kki:Effects#Boy|Boy]], Spacesuit, [[Yume 2kki:Effects#Rainbow|Rainbow]], Fairy, Glasses, [[Yume 2kki:Effects#Telephone|Telephone]], [[Yume 2kki:Effects#Twintails|Twintails]], [[Yume 2kki:Effects#Insect|Insect]], [[Yume 2kki:Effects#Maiko|Maiko]], [[Yume 2kki:Effects#Penguin|Penguin]], [[Yume 2kki:Effects#Plaster Cast|Plaster Cast]] [[Yume 2kki:Effects#Spring|Spring]], [[Yume 2kki:Effects#School Boy (Gakuran)|Gakuran]], Stretch, [[Yume 2kki:Effects#Trombone|Trombone]], [[Yume 2kki:Effects#Child|Child]], Haniwa, [[Yume 2kki:Effects#Cake|Cake]], [[Yume 2kki:Effects#Red Riding Hood|Red Riding Hood]], [[Yume 2kki:Effects#Bat|Bat]], [[Yume 2kki:Effects#Teru Teru Bōzu (Paper Doll)|Teru Teru Bōzu]], [[Yume 2kki:Effects#Tissue|Tissue]], [[Yume 2kki:Effects#Polygon|Polygon]], [[Yume 2kki:Effects#Grave|Grave]], [[Yume 2kki:Effects#Bunny Ears/Usamimi|Bunny Ears]], [[Yume 2kki:Effects#Drum|Drum]], or [[Yume 2kki:Effects#Dice|Dice]] effect is equipped. | ||
*He will bounce up and down if the [[Yume 2kki:Effects#Invisible|Invisible]] effect is equipped. | *He will bounce up and down if the [[Yume 2kki:Effects#Invisible|Invisible]] effect is equipped. | ||
*While the [[Yume 2kki:Effects#Marginal|Marginal]] effect is equipped, he will pace back and forth. | *While the [[Yume 2kki:Effects#Marginal|Marginal]] effect is equipped, he will pace back and forth. | ||
| Line 55: | Line 55: | ||
*The [[Yume 2kki:Effects#Lantern.2FTorch|Lantern]] or Chainsaw effect can be used to make him disappear, and he may drop 100 [[Yume 2kki:Money|夢 (money)]]. Killing this NPC or any Shadow Lady in the area will cause the benign Shadow Lady on the towers to become aggressive, spawn multiple shadow women in Toy World proper and also activate the Shadow Lady in the [[Yume 2kki:Dark Warehouse|Dark Warehouse]]. This can be reverted by getting caught by another in Toy World or the [[Yume 2kki:French Street|French Street]]. | *The [[Yume 2kki:Effects#Lantern.2FTorch|Lantern]] or Chainsaw effect can be used to make him disappear, and he may drop 100 [[Yume 2kki:Money|夢 (money)]]. Killing this NPC or any Shadow Lady in the area will cause the benign Shadow Lady on the towers to become aggressive, spawn multiple shadow women in Toy World proper and also activate the Shadow Lady in the [[Yume 2kki:Dark Warehouse|Dark Warehouse]]. This can be reverted by getting caught by another in Toy World or the [[Yume 2kki:French Street|French Street]]. | ||
Using the Glasses effect at the apex of either tower at night-time will reveal a ghostly image of Urotsuki and give you a wallpaper. Likewise, using the Wolf effect to howl at the moon will reward you with another wallpaper. | Using the Glasses effect at the apex of either tower at night-time will reveal a ghostly image of Urotsuki and give you a [[Yume 2kki:Wallpaper Guide|wallpaper]]. Likewise, using the Wolf effect to howl at the moon will reward you with another wallpaper. | ||
==Directions== | ==Directions== | ||
Latest revision as of 21:28, 27 May 2024
| Day and Night Towers | |
|---|---|

| |
| Basic Info | |
| Original Name(s) |
ブロック |
| Effects |
None |
| Collectibles |
WP #41 |
| Masks | Enraged Shadow Lady |
| Events | Mirror Urotsuki |
| Notable NPCs | Shadow Ladies |
| Other | |
| Connecting Areas |
Toy World |
| Removed Connections | |
| BGM | dine (No. 076) |
| Map ID | 0198, 0372, 0611 |
| Version Added | 0.083d |
| Author | kuraud |
The Day and Night Towers is an area accessible from Toy World.

Features
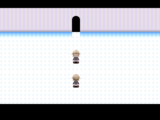
The Day and Night Towers are two symmetrical towers standing opposite of each other. At first, the western tower is in the "day" configuration, featuring grey stones against a light blue sky, with a red sun at the top, while the eastern tower is at "night" time, featuring a blue color scheme against a dark blue sky, with a golden moon surrounded by stars above. Entering or exiting any doorway will cause the towers to swap their current times of day.
Each tower has three doorways. On the western tower, the lowest doorway leads to an isolated ledge. Jumping down from the ledge leads to the Othello Board. Up the stairs from that doorway is a doorway leading to the Mini-Maze. On the eastern tower, the lowest doorway is blocked off by wooden boards and the doorway directly above it leads to the area atop the ladder inside the block tower in Toy World.
By chainsawing the boards on the eastern tower's lowest doorway, it is possible to access the Old Day & Night Towers (旧昼夜, Kyū Chūya, Old Day & Night). Following the path up through the doorway on the right tower leads to the corresponding doorway on the left tower, where there is a ladder leading down to a gap which can be traversed with the Fairy or Spacesuit effects. On the other side of the gap, walking up to the tile protruding from the tower causes the time of day to change. There used to be a door here that would lead to Toy World B.
In the initial area, the topmost doorway on either tower will take you to a small, wrapping room with the Mirror Urotsuki event. Here, a "reflection" of Urotsuki will mimic your movements. Interestingly, using different effects in this space will cause the reflection to react to them visually in different ways:
- Wolf - makes your reflection use the Red Riding Hood effect, and vice versa.
- Stretch - makes your reflection use the Child effect, and vice versa.
- Biker Wolf - makes your reflection copy you, but with a snazzy pair of goggles on her head.
- Haniwa - doesn't make your reflection copy you, but it will make her blur as she tries to walk around with you.
- Glasses - causes your reflection's face to vanish and makes an eye appear on her chest.
If you are wearing the Shadow Lady mask from the Mask Shop or Deluxe Mask Shop, you can interact with your reflection, who will be an enraged Shadow Lady. Doing so will allow you to swap places with your reflection, transforming into it. This will also unlock the Enraged Shadow Lady mask in Dream Wardrobe for quicker access in future dream sessions.
In addition to these passive interactions, it is possible to chainsaw your own reflection, which will wake you up, as well as earn you a wallpaper. Entering the archway at the top of the room will take you to the opposite tower you entered from.
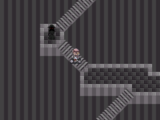
Outside, there are a few noteworthy things. The western tower features a benign Shadow Lady atop a ledge, while the eastern tower has an aggressive (although immobile due to a bug) one in the opposite spot. Either of these shadow women will teleport you to an apparently isolated area in the Red Brick Maze, containing cylinders. It's possible to escape this area by chainsawing the wall at the right.
There is a narrow bridge at the very middle, connecting the two towers, but the way is blocked by an NPC. He will react to various effects:
- He will grow a single huge eyeball if the Eyeball Bomb effect is equipped.
- He will look around while the Bike, Boy, Spacesuit, Rainbow, Fairy, Glasses, Telephone, Twintails, Insect, Maiko, Penguin, Plaster Cast Spring, Gakuran, Stretch, Trombone, Child, Haniwa, Cake, Red Riding Hood, Bat, Teru Teru Bōzu, Tissue, Polygon, Grave, Bunny Ears, Drum, or Dice effect is equipped.
- He will bounce up and down if the Invisible effect is equipped.
- While the Marginal effect is equipped, he will pace back and forth.
- Equipping the Crossing effect will make him look around, and his movement will speed up if the effect is used.
- The Wolf effect can be used to make him move out of the way (this will also make the Shadow Ladies shuffle around).
- The Lantern or Chainsaw effect can be used to make him disappear, and he may drop 100 夢 (money). Killing this NPC or any Shadow Lady in the area will cause the benign Shadow Lady on the towers to become aggressive, spawn multiple shadow women in Toy World proper and also activate the Shadow Lady in the Dark Warehouse. This can be reverted by getting caught by another in Toy World or the French Street.
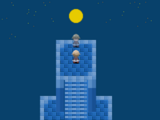
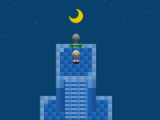
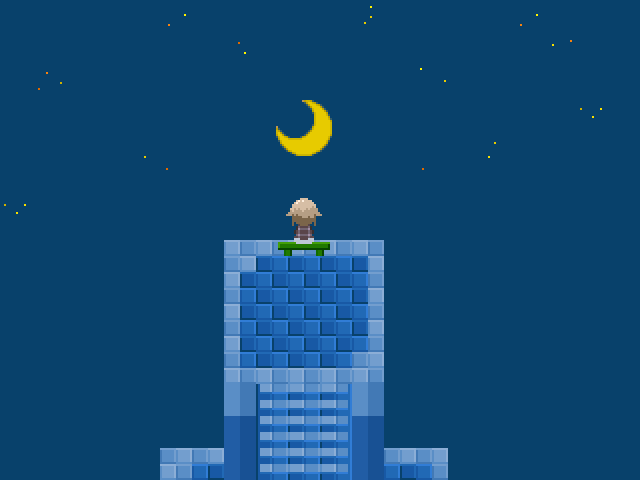
Using the Glasses effect at the apex of either tower at night-time will reveal a ghostly image of Urotsuki and give you a wallpaper. Likewise, using the Wolf effect to howl at the moon will reward you with another wallpaper.
Directions
- The Nexus → Toy World → Day and Night Towers
Trivia
- The shadow woman on the eastern tower cannot move from her location because her default movement pattern is missing altogether. Howling with Wolf will still make her run around for a moment, though.
- The moon shows up as a waxing crescent above the eastern tower, but shows up as a full moon over the western tower. The sun is always the same.
Gallery
Your reflection... or is it?
Glasses at top of western tower at night.
Glasses at top of eastern tower at night.
This shadow woman is rooted in place.
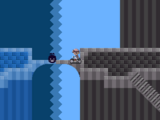
Bridge connecting the towers.


-3B-20https:-2F-2Fyume.wiki-2Fimages-2F2-2F2b-2F2kki-2DDNTbig.png)
- 2169b5
- 739ece