mNo edit summary |
|||
| Line 90: | Line 90: | ||
File:Dream Route set Bat here to skip.png|If you set a Bat marker here, you can fly here from the start of Route 3 and skip the entirety of the park and caves. | File:Dream Route set Bat here to skip.png|If you set a Bat marker here, you can fly here from the start of Route 3 and skip the entirety of the park and caves. | ||
File:Dream Route gate 3.png|Gate 3 and the woman that takes you to the beach. | File:Dream Route gate 3.png|Gate 3 and the woman that takes you to the beach. | ||
File:Amethystcavemapthatisyettobetranslatedfromjapanesesomeonepleasedothisformebecauseimnotajapanesespeakeranddontwanttofuckupthetranslation.jpg|Full map in Japanese of the Amethyst Cave. Endless hallways are denoted with red squares. | |||
</gallery> | </gallery> | ||
Revision as of 12:31, 5 April 2024
| This page is missing information. You can help YumeWiki by expanding it. Details: Add missing info, update connections |
| Dream Route | |
|---|---|
 Entrance to Mourning Void | |
| Basic Info | |
| Japanese Name(s) |
夢国道 |
| Effects | None |
| Events | None |
| Notable NPCs | None |
| Other | |
| Connecting Areas | Mourning Void Emotions Maze ➡️ |
| BGM | 🔊 yumepo1 – Route 1 (No. 017F) 🔊 yumepo1 – Route 2 (No. 017G) 🔊 yumepo1 – Gate 1 (No. 017H) 🔊 yumepo1 – Gate 2 (No. 017I) |
| Map ID | 2596 (Route 1) 2734 (Gate 1) 2731 (Route 2) 2735 (Gate 2) |
| Version Added | 0.122 patch 1 |
| Last Updated | 0.123b |
| Primary Author | delta_judgment |
| Contributing Author(s) | Nabisae |
Dream Route is an area accessible from the red flowers in Mourning Void.
Features
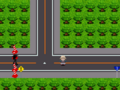
Dream Route is a long, linear path taking the form of a road. From the Mourning Void entrance, you start on the right side of Route 1 with cones blocking the northern path. The only way to continue is by going south, down the road.
Upon reaching Gate 1, you will find a small transition room with a purple checkered floor. Two Shadow Ladies sit at the back, seemingly doing nothing upon interaction. Ignoring them, you can step on the lower red tile from the Route 1 entrance to arrive at the left road, which is empty.
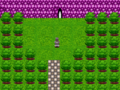
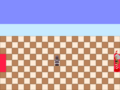
Continuing east at the gate leads to Route 2. It takes the form of a single road, stretching horizontally and lined with trees.
At the end of Route 2 is Gate 2, with an orange checkered floor. A Light Lady and a woman can be seen. Interacting with the Light Lady seems to do nothing, and interacting with the woman transforms you into her.
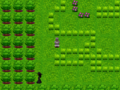
Ignoring them and continuing east leads to Route 3. To the east, an enraged Shadow Lady sits surrounded by cones and a sign. Ignoring her and continuing north leads through a passage to a massive, mostly linear park that features rows of trees, checkered paths, ponds, vending machines, and some benches. The park is filled with sprawling hedge mazes. If you encounter Shadow Ladies, it is usually best to ignore them. Upon entry, you can find a yellow-eyed Shadow Lady below a pond and some wandering women that make different beeps upon interaction. Interacting with this Shadow Lady while you have at least 800,000夢 on hand will result in her taking 500,000夢 and teleporting you to the entrance of the Amethyst Caves. If you do not have enough money, she will send you back to Mourning Void.
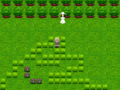
Approaching the end of the park, you will encounter a bunny-shaped patch of grass with some pink flowers in it. A Shadow Lady with yellow eyes can be seen in the southwest corner; ignore her and go north to find a Light Lady. This specific Light Lady is safe to interact with and will teleport the player to a small hedge maze that ends at a hole in a purple wall. Entering it takes you to the Amethyst Caves.
After exiting the Amethyst Caves and going through a passage, you will be placed at the end of Route 3, where you will again encounter a Shadow Lady by cones and a sign. The Bat effect can be used to set a warp point at the end of Route 3, so that the player can fly to it from the start of Route 3. This will allow the player to completely skip the hedge mazes and the caves if (and likely when) they have to return.
Continuing east leads to Gate 3, where you will find a woman in a swimsuit that warps you to a new connection.
Amethyst Caves
The Amethyst Caves are a massive area with purple gem-like walls. Some of the doorways lead to looping sections, and some of them send you back to previous zones. A Shadow Lady near the entrance will teleport you to the end for the mere cost of 300,000夢, only if you currently have at least 800,000夢. If you have even one 夢 less, she will bring you back to the other greedy lady at the start of the park.
After an arduous journey, the player can find a room with four exits in the cardinal directions. Continue north through the doorway to find a similar room, but it will now have a dot in the center, adding another if the correct doorway is entered. A list of the correct order of doorways can be viewed by clicking "Show/Hide" below. If the wrong doorway is used, you will be sent away and must find your way back. Because of this, the Bat effect can be used to set a marker before entering the dot room to have a way to quickly return. After completing the dot room, you will enter a room with four doorways. From left to right, use the second doorway, then return through the same doorway to find a gray stone-like object. If you walk into this stone, you will be trapped in an isolated area filled with more stones and a fiery, red sun-like background. The only way to escape the trap seems to be Eyeball Bombing or waking up. Avoid the stone and continue through the doorway to the end of Route 3.
- 1 dot - Right
- 2 dots - Left
- 3 dots - Right
- 4 dots - Right
- 5 dots - Left
- 6 dots - Right
- 7 dots - Left
- 8 dots - Left
- 9 dots - Up
Directions
- The Nexus → Abandoned Campsite → Pointing Labyrinth → Serpent Ruins A → Mourning Void → Dream Route
After paying 50,000夢 to the Light Lady in Abandoned Campsite per visit:
- The Nexus → Abandoned Campsite → Mourning Void → Dream Route
Trivia
- Before version 0.123b, on the east side of Gate 2, there used to be two cones and a woman with an orange mask on her face. Interacting with her took Urotsuki to Emotions Maze.
- This version included the addition of Route 3 and its mazes, as well as some NPCs in the Gates and a background for Route 1.
- Many of the walls in the caves feature impassable, invisible blocks accompanied by purple lines on the ground.
Gallery
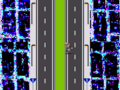
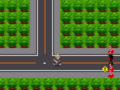
Route 1.
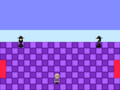
Gate 1.
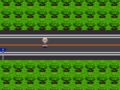
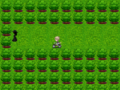
Route 2.
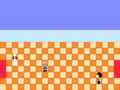
Gate 2.
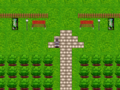
The start of Route 3, where you can fly to the end of Route 3 if you placed a Bat marker there.
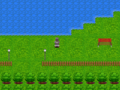
The Shadow Lady sends you back to Mourning Void if you interact with her and have less than 800,000夢.

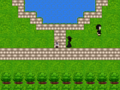
This specific Light Lady must be interacted with to reach another maze.
To the caves.
If you set a Bat marker here, you can fly here from the start of Route 3 and skip the entirety of the park and caves.
Gate 3 and the woman that takes you to the beach.
- Amethystcavemapthatisyettobetranslatedfromjapanesesomeonepleasedothisformebecauseimnotajapanesespeakeranddontwanttofuckupthetranslation.jpg
Full map in Japanese of the Amethyst Cave. Endless hallways are denoted with red squares.


- 0F6202
- E9FFFA