(added a second map) |
(Solve this blob's diabolical maze) |
||
| (4 intermediate revisions by 3 users not shown) | |||
| Line 7: | Line 7: | ||
|Wallpapers = | |Wallpapers = | ||
|NPCS = | |NPCS = | ||
|Connections = {{Connection|Snow Lake}}, {{Connection|Brutalist Warehouse|unlock_type=Locked}}, {{Connection|Weeping Monsters World|effects_needed=Soulfire | |Connections = {{Connection|Snow Lake}}, {{Connection|Brutalist Warehouse|unlock_type=Locked}}, {{Connection|Weeping Monsters World|effects_needed=Soulfire}} | ||
|BGM = {{BGM|title=millieamp_roaches|filename=CU millieamp roaches 100.ogg|soundroom=16|author=MillieAmp}} | |BGM = {{BGM|title=millieamp_roaches|filename=CU millieamp roaches 100.ogg|soundroom=16|author=MillieAmp}} | ||
{{BGM|title=eviled_running|filename=CU eviled running 120.ogg|soundroom=33|author=eviled}} | {{BGM|title=eviled_running|filename=CU eviled running 120.ogg|soundroom=33|author=eviled}} | ||
| Line 19: | Line 19: | ||
|Contributing = | |Contributing = | ||
}} | }} | ||
'''Septic''' is an area accessible from the ladder | '''Septic''' is an area accessible from jumping down the ladder in the water in [[Collective Unconscious:Snow Lake|Snow Lake]]. | ||
{{LocationMap|filename=CU Septic Map.png|caption=Map of Septic}} | {{LocationMap|filename=CU Septic Map.png|caption=Map of Septic}} | ||
{{LocationMap|filename=SepticMap-Annotated.png|caption=Map of Septic | {{LocationMap|filename=SepticMap-Annotated.png|caption=Map of Septic with highlighted routes}} | ||
==Features== | ==Features== | ||
Septic is a very large, dark, and labyrinthine spirit world. Despite being only a short distance from the [[Collective Unconscious:Nexus|Nexus]], Septic can require some skill to navigate successfully, and collecting various [[Collective Unconscious:Eidola|eidola]] beforehand is recommended to make the trip to [[Collective Unconscious:Weeping Monsters World|Weeping Monsters World]] easier.<ref group="Note">Specifically, [[Collective Unconscious:Eidola#Rodentia|Rodentia]], [[Collective Unconscious:Eidola#Lumen|Lumen]], and [[Collective Unconscious:Eidola#Spectral|Spectral]] are eidola with utility in Septic. [[Collective Unconscious:Eidola#Soulfire|Soulfire]] and [[Collective Unconscious:Eidola#Climate|Climate]] can also be used; both are inferior to Lumen for increasing visibility, but Soulfire is required in Weeping Monsters World to gain access to its main area.</ref> | |||
Visibility in Septic is limited to a small radius around [[Collective Unconscious:Minnatsuki|Minnatsuki]]. This radius can be increased or decreased depending on the currently equipped eidolon. [[Collective Unconscious:Eidola#Lumen|Lumen]] offers the largest visibility radius of any eidolon. [[Collective Unconscious:Eidola#Soulfire|Soulfire]], [[Collective Unconscious:Eidola#Spectral|Spectral]], and [[Collective Unconscious:Eidola#Climate|Climate]] can also be used to increase visibility, but to a lesser extent. Transforming into a rat using the [[Collective Unconscious:Eidola#Rodentia|Rodentia]] eidolon will greatly reduce visibility. | |||
=== Entrance Platforms === | |||
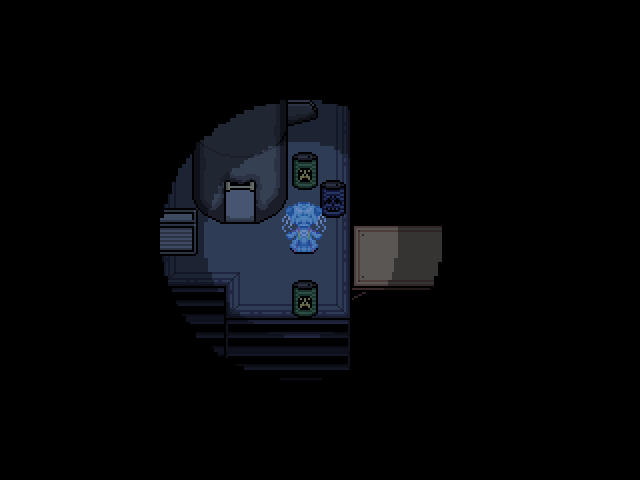
Entering from Snow Lake leads to a short, single-screen map with an underwater ladder. Climbing down this ladder leads to the entrance subarea of Septic: a small network of platforms in a dark void. There is a blue NPC in the southwest corner of this subarea that makes a sound when interacted with and can be killed with Soulfire. In the southeastern corner of this subarea is a tower with a ladder inside that is similar to the entrance from Snow Lake. Climbing the ladder inside of this tower to the very top, where a face is visible, teleports Minnatsuki to the main area. | |||
=== Main Area === | |||
The bulk of Septic consists of platforms and bridges over green sewage. Traveling east from the entrance to the main area from the entrance platforms, a smiling creature resembling a cartoon poop drawing may be seen swimming in the water. The main area starts to branch into many intersecting paths at the first bridge that can be seen crossing the sewage. | |||
==== Brutalist Warehouse ==== | |||
Traveling east across the first bridge and taking the south bridge on the next island leads to a section of Septic where [[Collective Unconscious:Brutalist Warehouse|Brutalist Warehouse]] can be accessed. From the second bridge, walking to the south edge of the island and west across another bridge leads to another island where a vending machine and a winged NPC can be found. Alternatively, walking to the south edge of the island, walking east, and crossing the bridge to the south leads to another fork. Going east at the fork eventually leads to a door where a [[Collective Unconscious:Content Contribution#Closed Connections|closed connection]] sign can be seen next to a hanging bucket. Going west at the fork and crossing the next two bridges leads to a door with a card reader that serves as the entrance to Brutalist Warehouse. This door is initially locked, and it will become a permanent connection only after Minnatsuki has entered Brutalist Warehouse from elsewhere and obtained a keycard. | |||
==== Puzzle Bridges ==== | |||
Traveling east across the first bridge, taking the north bridge on the next island, taking the bridge to the west, and continuing to the west eventually leads to a door.<ref group="Note">This door can also be reached by going north from the first bridge, using the Rodentia eidolon to crawl through a hunk of cheese blocking the next bridge, and going west.</ref> Behind this door is a small locker room with a cat-like creature inside of it. This NPC is normally docile, but it will chase and kill Minnatsuki if they are currently in the Rodentia eidolon's rat form, returning them to [[Collective Unconscious:Minnatsuki's Room|their room]]. Leaving this locker room through the opposite door in the northeast corner of the room leads to another platform.<ref group="Note">This platform can also be reached by traveling east across the first bridge, then using either Lumen or Spectral to cross the gap in the bridges on the east side of the next island.</ref> Traveling south from the door and taking the passage to the east leads to another bridge that is marked by a graffiti arrow. This arrow marks the beginning of a short puzzle where Minnatsuki must cross several bridges in a row as indicated by the arrows painted in the ground. Failing to follow the arrows will lead Minnatsuki to a dead end (or, sometimes, to the Brutalist Warehouse section of Septic) marked by a large X, accompanied by a loud sound effect. | |||
After following enough arrows, a sound effect will play to indicate that Minnatsuki has reached the end of the puzzle, where there is a door leading to a locker room. This locker room contains a vending machine, and it also contains a door leading to the Gateway World House. In contrast with the rest of Septic, this is a bright green bedroom with a television, a bed (that can be slept in), and an NPC. | |||
==== Tall Ladder ==== | |||
Traveling east across the first bridge, taking the north bridge on the next island, and then taking the second bridge to the east eventually leads to another door. This door leads to a subarea with platforms similar to those in the entrance subarea, though the map is much more brightly lit. Here, there is a tower with a ladder that breaks through its top, continuing up for a long distance. It is currently blocked about halfway up by a closed connection sign that plays a loud buzzer sound when interacted with. | |||
=== Chaser Maze (to Weeping Monsters World) === | |||
In the main area, traveling east across the first bridge, taking the north bridge on the next island, taking the bridge to the west, and then traveling north leads to another door. This door leads to a small locker room that is largely obscured by pipes. Leaving the locker room through the opposite door leads to a subarea where more pipes can be seen overhead, and the sounds of rushing water can be heard in the background. Though this subarea has increased brightness, visibility does not improve. | |||
This subarea serves as the access to Weeping Monsters World, but it is guarded by a uniquely aggressive chaser - a black blob with a red outline - that attempts to catch Minnatsuki. This chaser is unique in that, despite moving quite slowly (being trivial to outmaneuver at Minnatsuki's running speed), it can attempt to cut Minnatsuki off or catch them unaware by teleporting around the map. These teleports occur at several fixed points throughout the map and are indicated by the sound of the chaser laughing. If caught by this chaser, Minnatsuki will be teleported to a small, isolated island in Septic that can only be escaped by using the Return ability in the menu or by using the [[Collective Unconscious:Eidola#Umbra|Umbra]] eidolon to return to the Nexus. | |||
Using either the Lumen or Spectral eidola in this section is highly recommended for avoiding the chaser. The choice of which to use is up to preference. Spectral is unique in that it turns the overhead pipes transparent, improving visibility. However, the map is still easily navigable while the pipes are opaque, and the chaser is wide enough to be detected by its red outlines underneath the pipes, meaning that Lumen's superior visibility radius can be preferable. Both eidola allow Minnatsuki to cross gaps in broken bridges that the chaser cannot, providing some safety and simplifying routes through the area. It is also recommended to "stutter step," tapping the movement keys in the direction you're moving (as opposed to holding them down) in order to provide more time to react to the chaser's sudden appearances. The chaser is most dangerous when cornering Minnatsuki, so it's best to remain aware of the maze around you and to retrace your steps to safe territory when uncertain to avoid dead ends. ''Remember: there is only one chaser in the maze! Listen for the sound of it teleporting and plan your next steps accordingly.'' | |||
The maze is divided into two distinct sections. The first section has three pairs of doors; one door (the only door to be partially obscured by a pipe) leads to a dead end section where the chaser can easily catch Minnatsuki, while another pair links two sides of a broken bridge (which can also be crossed using the Lumen or Spectral eidola). The goal of this section is to reach a door that is immediately to the right of a sewer grate, which leads to the second part of the maze; this door is in the southeastern corner of the area. From the locker room, this door can be reached without using Lumen or Spectral by crossing the first bridge to the east, crossing the bridge to the north, and then continuing west; at the next fork, there will be a door to the north that leads to the other side of the broken bridge. From here, going across the bridge to the west, then traveling south and to the east on the next bridge leads to the door to the second section. | |||
The second section of the maze is much more labyrinthine, and the chaser is more of a factor. The goal is to reach a door on the east side of the maze while avoiding the chaser's more frequent teleports. Be aware that the chaser will teleport behind Minnatsuki moments after entering this section; at the first fork, it is recommended to continue north, as there are several dead ends further to the west where Minnatsuki can be cornered. Continuing north, a broken bridge will come into view, which provides a strong routing alternative if using Lumen or Spectral. From this point, the goal is to continue directly east when possible; if not using Lumen or Spectral, there is another path to the east to the north of the broken bridge, and there are several loops in the path that the chaser can be lured around to slip by it when necessary. If the chaser is blocking the only path forward (particularly when crossing the broken bridge), it is also possible to retrace your steps, wait for it to teleport, and then try that path again. Depending on the path used, it is possible to come face-to-face with a large block of cheese, which can be crawled through using the Rodentia eidolon. Once the door at the eastern end of the maze is entered, the chaser will no longer pursue Minnatsuki. | |||
Beyond the chaser maze is a short bridge that spans a mouth-like sewer inlet. The door at the end of this bridge leads to an industrial staircase; at the end of the catwalks is a fish NPC that will teleport Minnatsuki to Weeping Monsters World. | |||
==Directions== | ==Directions== | ||
| Line 36: | Line 68: | ||
</gallery> | </gallery> | ||
== Notes == | |||
<references group="Note" /> | |||
[[Category:Collective Unconscious Locations]] | [[Category:Collective Unconscious Locations]] | ||
Latest revision as of 19:29, 14 August 2024
| Septic | |||||||||||||||||
|---|---|---|---|---|---|---|---|---|---|---|---|---|---|---|---|---|---|

| |||||||||||||||||
| Basic Info | |||||||||||||||||
| Eidola | None | ||||||||||||||||
| Events | None | ||||||||||||||||
| Notable NPCs | None | ||||||||||||||||
| Other | |||||||||||||||||
| Connecting Areas | Snow Lake Brutalist Warehouse 🔒 Weeping Monsters World ✨ | ||||||||||||||||
| BGM | 🔊 millieamp_roaches (No. 16) 🔊 eviled_running (No. 33) | ||||||||||||||||
| Map ID | 0043, 0044, 0048 | ||||||||||||||||
| Version Added | 0.1.0 | ||||||||||||||||
| Author | eviled | ||||||||||||||||
| |||||||||||||||||
.png)
.png)
.png)
Septic is an area accessible from jumping down the ladder in the water in Snow Lake.
Features
Septic is a very large, dark, and labyrinthine spirit world. Despite being only a short distance from the Nexus, Septic can require some skill to navigate successfully, and collecting various eidola beforehand is recommended to make the trip to Weeping Monsters World easier.[Note 1]
Visibility in Septic is limited to a small radius around Minnatsuki. This radius can be increased or decreased depending on the currently equipped eidolon. Lumen offers the largest visibility radius of any eidolon. Soulfire, Spectral, and Climate can also be used to increase visibility, but to a lesser extent. Transforming into a rat using the Rodentia eidolon will greatly reduce visibility.
Entrance Platforms
Entering from Snow Lake leads to a short, single-screen map with an underwater ladder. Climbing down this ladder leads to the entrance subarea of Septic: a small network of platforms in a dark void. There is a blue NPC in the southwest corner of this subarea that makes a sound when interacted with and can be killed with Soulfire. In the southeastern corner of this subarea is a tower with a ladder inside that is similar to the entrance from Snow Lake. Climbing the ladder inside of this tower to the very top, where a face is visible, teleports Minnatsuki to the main area.
Main Area
The bulk of Septic consists of platforms and bridges over green sewage. Traveling east from the entrance to the main area from the entrance platforms, a smiling creature resembling a cartoon poop drawing may be seen swimming in the water. The main area starts to branch into many intersecting paths at the first bridge that can be seen crossing the sewage.
Brutalist Warehouse
Traveling east across the first bridge and taking the south bridge on the next island leads to a section of Septic where Brutalist Warehouse can be accessed. From the second bridge, walking to the south edge of the island and west across another bridge leads to another island where a vending machine and a winged NPC can be found. Alternatively, walking to the south edge of the island, walking east, and crossing the bridge to the south leads to another fork. Going east at the fork eventually leads to a door where a closed connection sign can be seen next to a hanging bucket. Going west at the fork and crossing the next two bridges leads to a door with a card reader that serves as the entrance to Brutalist Warehouse. This door is initially locked, and it will become a permanent connection only after Minnatsuki has entered Brutalist Warehouse from elsewhere and obtained a keycard.
Puzzle Bridges
Traveling east across the first bridge, taking the north bridge on the next island, taking the bridge to the west, and continuing to the west eventually leads to a door.[Note 2] Behind this door is a small locker room with a cat-like creature inside of it. This NPC is normally docile, but it will chase and kill Minnatsuki if they are currently in the Rodentia eidolon's rat form, returning them to their room. Leaving this locker room through the opposite door in the northeast corner of the room leads to another platform.[Note 3] Traveling south from the door and taking the passage to the east leads to another bridge that is marked by a graffiti arrow. This arrow marks the beginning of a short puzzle where Minnatsuki must cross several bridges in a row as indicated by the arrows painted in the ground. Failing to follow the arrows will lead Minnatsuki to a dead end (or, sometimes, to the Brutalist Warehouse section of Septic) marked by a large X, accompanied by a loud sound effect.
After following enough arrows, a sound effect will play to indicate that Minnatsuki has reached the end of the puzzle, where there is a door leading to a locker room. This locker room contains a vending machine, and it also contains a door leading to the Gateway World House. In contrast with the rest of Septic, this is a bright green bedroom with a television, a bed (that can be slept in), and an NPC.
Tall Ladder
Traveling east across the first bridge, taking the north bridge on the next island, and then taking the second bridge to the east eventually leads to another door. This door leads to a subarea with platforms similar to those in the entrance subarea, though the map is much more brightly lit. Here, there is a tower with a ladder that breaks through its top, continuing up for a long distance. It is currently blocked about halfway up by a closed connection sign that plays a loud buzzer sound when interacted with.
Chaser Maze (to Weeping Monsters World)
In the main area, traveling east across the first bridge, taking the north bridge on the next island, taking the bridge to the west, and then traveling north leads to another door. This door leads to a small locker room that is largely obscured by pipes. Leaving the locker room through the opposite door leads to a subarea where more pipes can be seen overhead, and the sounds of rushing water can be heard in the background. Though this subarea has increased brightness, visibility does not improve.
This subarea serves as the access to Weeping Monsters World, but it is guarded by a uniquely aggressive chaser - a black blob with a red outline - that attempts to catch Minnatsuki. This chaser is unique in that, despite moving quite slowly (being trivial to outmaneuver at Minnatsuki's running speed), it can attempt to cut Minnatsuki off or catch them unaware by teleporting around the map. These teleports occur at several fixed points throughout the map and are indicated by the sound of the chaser laughing. If caught by this chaser, Minnatsuki will be teleported to a small, isolated island in Septic that can only be escaped by using the Return ability in the menu or by using the Umbra eidolon to return to the Nexus.
Using either the Lumen or Spectral eidola in this section is highly recommended for avoiding the chaser. The choice of which to use is up to preference. Spectral is unique in that it turns the overhead pipes transparent, improving visibility. However, the map is still easily navigable while the pipes are opaque, and the chaser is wide enough to be detected by its red outlines underneath the pipes, meaning that Lumen's superior visibility radius can be preferable. Both eidola allow Minnatsuki to cross gaps in broken bridges that the chaser cannot, providing some safety and simplifying routes through the area. It is also recommended to "stutter step," tapping the movement keys in the direction you're moving (as opposed to holding them down) in order to provide more time to react to the chaser's sudden appearances. The chaser is most dangerous when cornering Minnatsuki, so it's best to remain aware of the maze around you and to retrace your steps to safe territory when uncertain to avoid dead ends. Remember: there is only one chaser in the maze! Listen for the sound of it teleporting and plan your next steps accordingly.
The maze is divided into two distinct sections. The first section has three pairs of doors; one door (the only door to be partially obscured by a pipe) leads to a dead end section where the chaser can easily catch Minnatsuki, while another pair links two sides of a broken bridge (which can also be crossed using the Lumen or Spectral eidola). The goal of this section is to reach a door that is immediately to the right of a sewer grate, which leads to the second part of the maze; this door is in the southeastern corner of the area. From the locker room, this door can be reached without using Lumen or Spectral by crossing the first bridge to the east, crossing the bridge to the north, and then continuing west; at the next fork, there will be a door to the north that leads to the other side of the broken bridge. From here, going across the bridge to the west, then traveling south and to the east on the next bridge leads to the door to the second section.
The second section of the maze is much more labyrinthine, and the chaser is more of a factor. The goal is to reach a door on the east side of the maze while avoiding the chaser's more frequent teleports. Be aware that the chaser will teleport behind Minnatsuki moments after entering this section; at the first fork, it is recommended to continue north, as there are several dead ends further to the west where Minnatsuki can be cornered. Continuing north, a broken bridge will come into view, which provides a strong routing alternative if using Lumen or Spectral. From this point, the goal is to continue directly east when possible; if not using Lumen or Spectral, there is another path to the east to the north of the broken bridge, and there are several loops in the path that the chaser can be lured around to slip by it when necessary. If the chaser is blocking the only path forward (particularly when crossing the broken bridge), it is also possible to retrace your steps, wait for it to teleport, and then try that path again. Depending on the path used, it is possible to come face-to-face with a large block of cheese, which can be crawled through using the Rodentia eidolon. Once the door at the eastern end of the maze is entered, the chaser will no longer pursue Minnatsuki.
Beyond the chaser maze is a short bridge that spans a mouth-like sewer inlet. The door at the end of this bridge leads to an industrial staircase; at the end of the catwalks is a fish NPC that will teleport Minnatsuki to Weeping Monsters World.
Directions
Nexus → Snow Lake → Septic
Gallery
Notes
- ↑ Specifically, Rodentia, Lumen, and Spectral are eidola with utility in Septic. Soulfire and Climate can also be used; both are inferior to Lumen for increasing visibility, but Soulfire is required in Weeping Monsters World to gain access to its main area.
- ↑ This door can also be reached by going north from the first bridge, using the Rodentia eidolon to crawl through a hunk of cheese blocking the next bridge, and going west.
- ↑ This platform can also be reached by traveling east across the first bridge, then using either Lumen or Spectral to cross the gap in the bridges on the east side of the next island.
 (Map of Septic, https://yume.wiki/images/8/83/CU Septic Map.png) + and
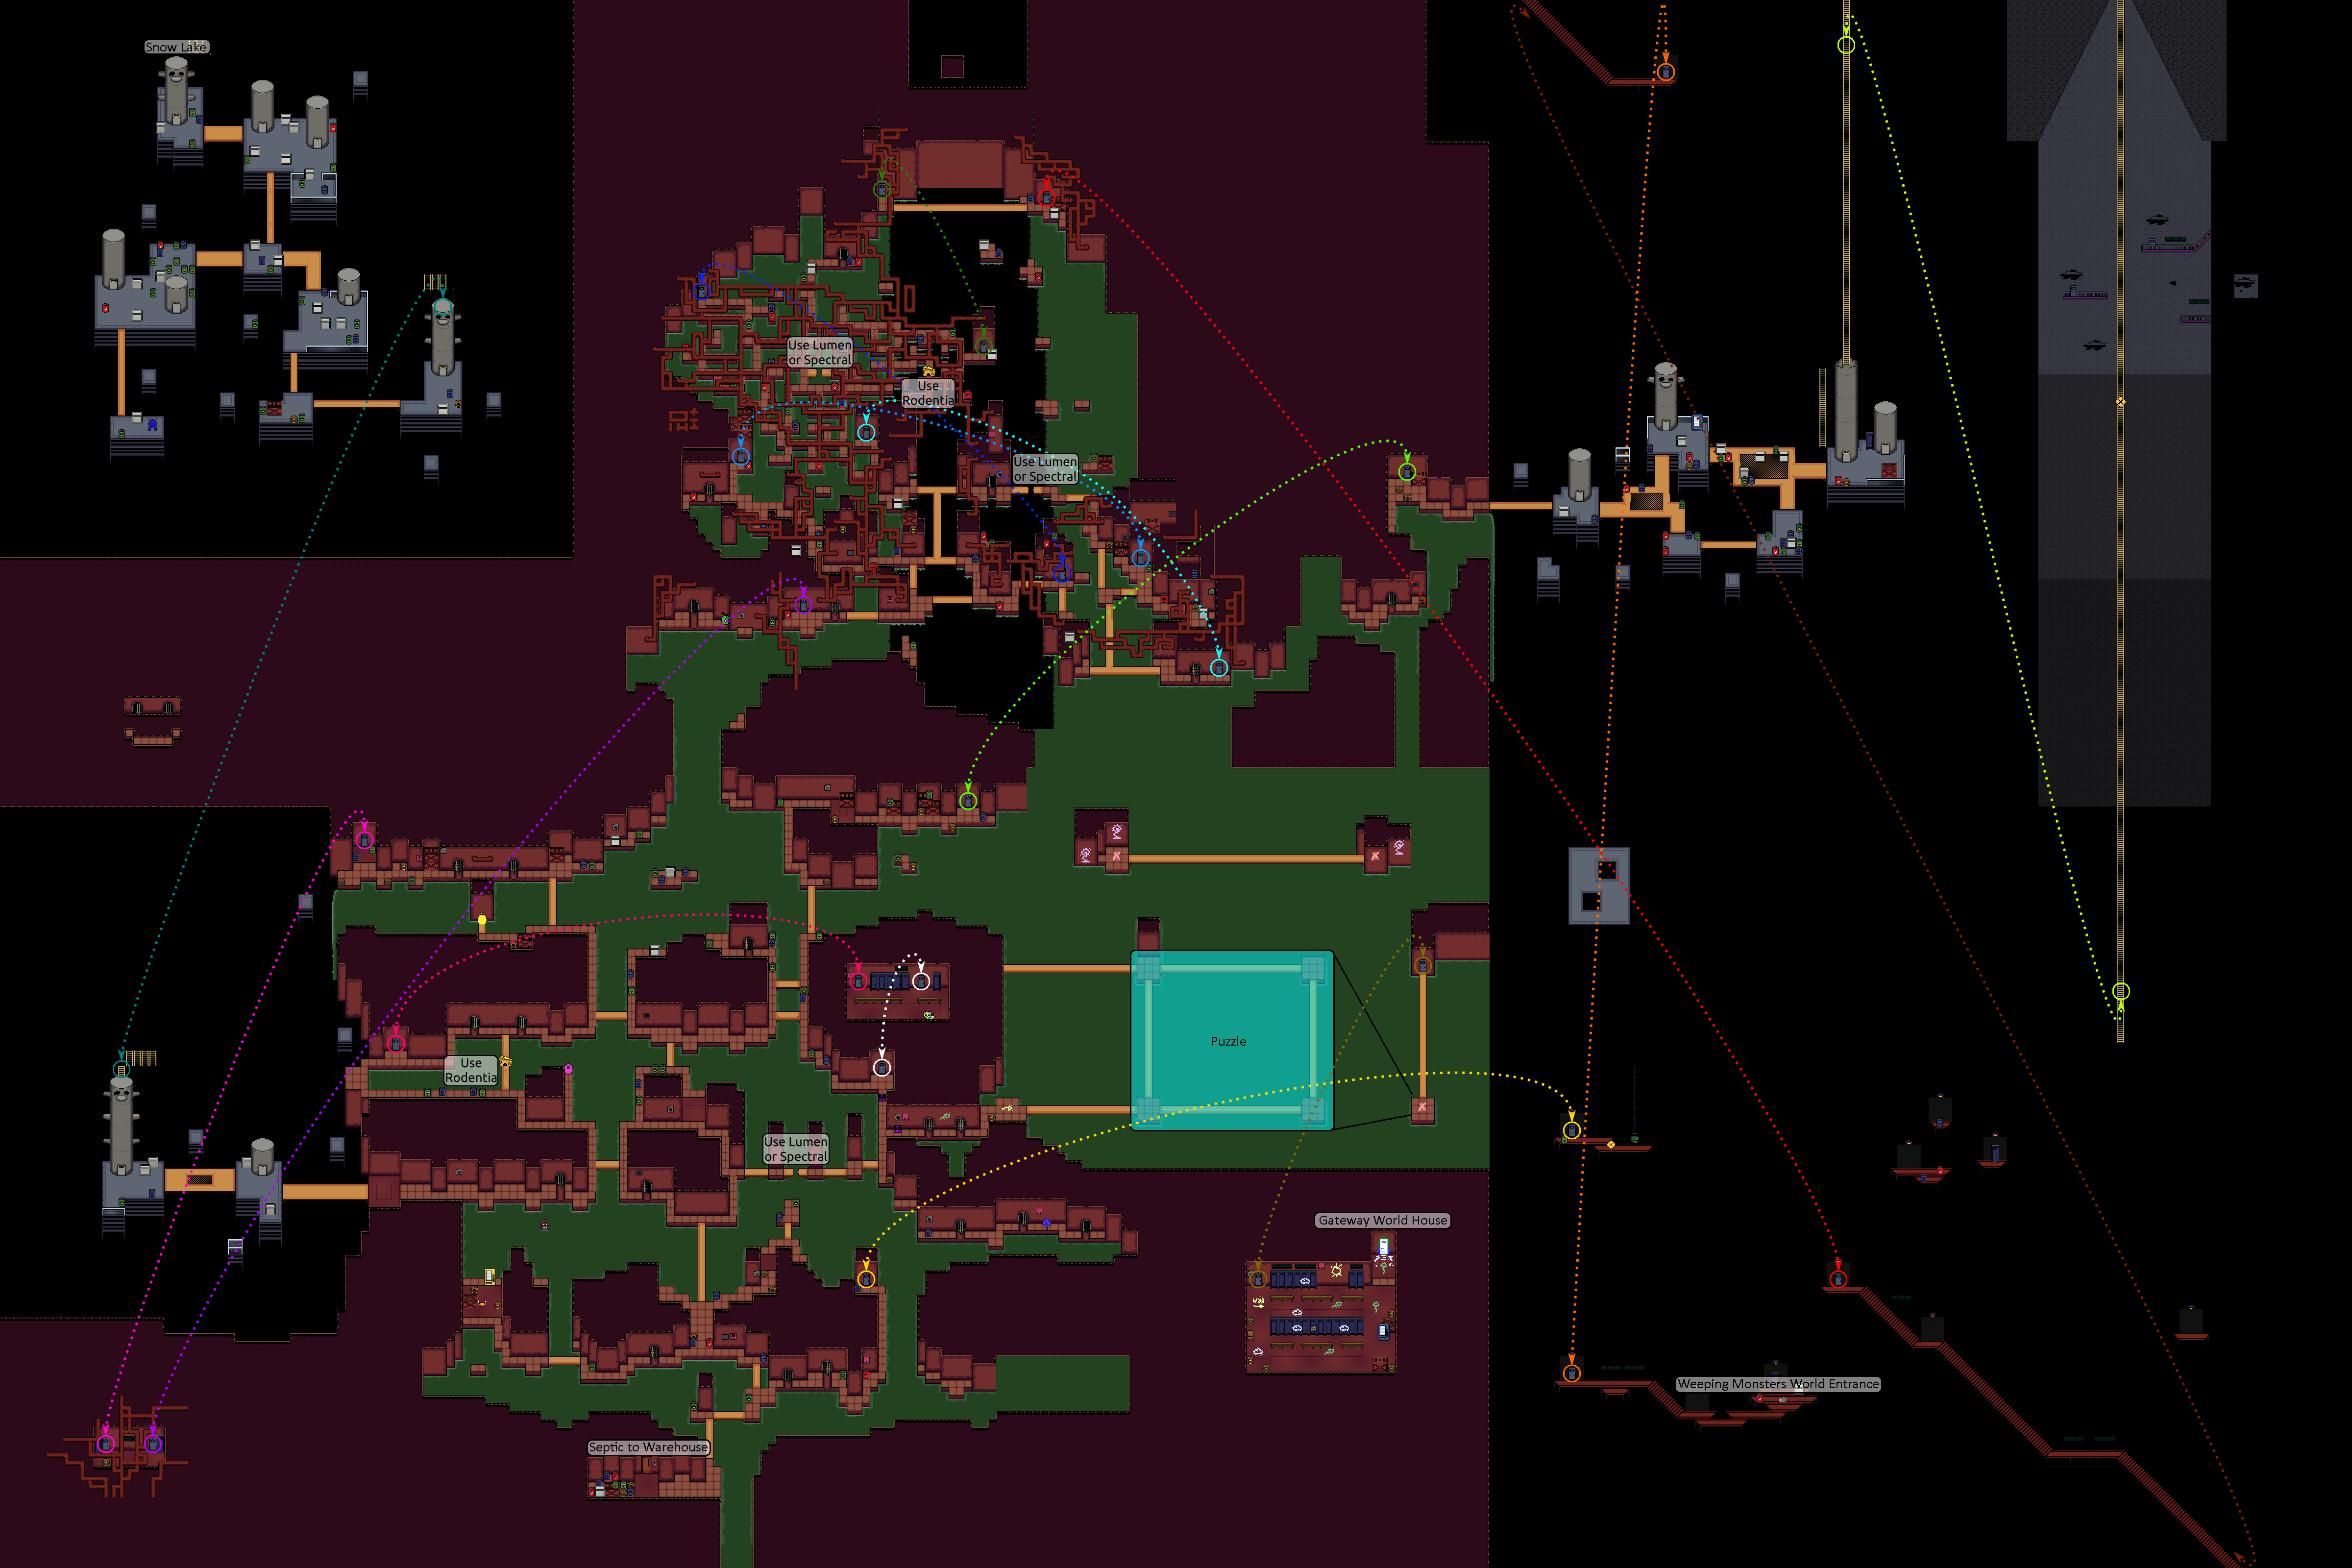
 (Map of Septic with highlighted routes, https://yume.wiki/images/f/f0/SepticMap-Annotated.png) +
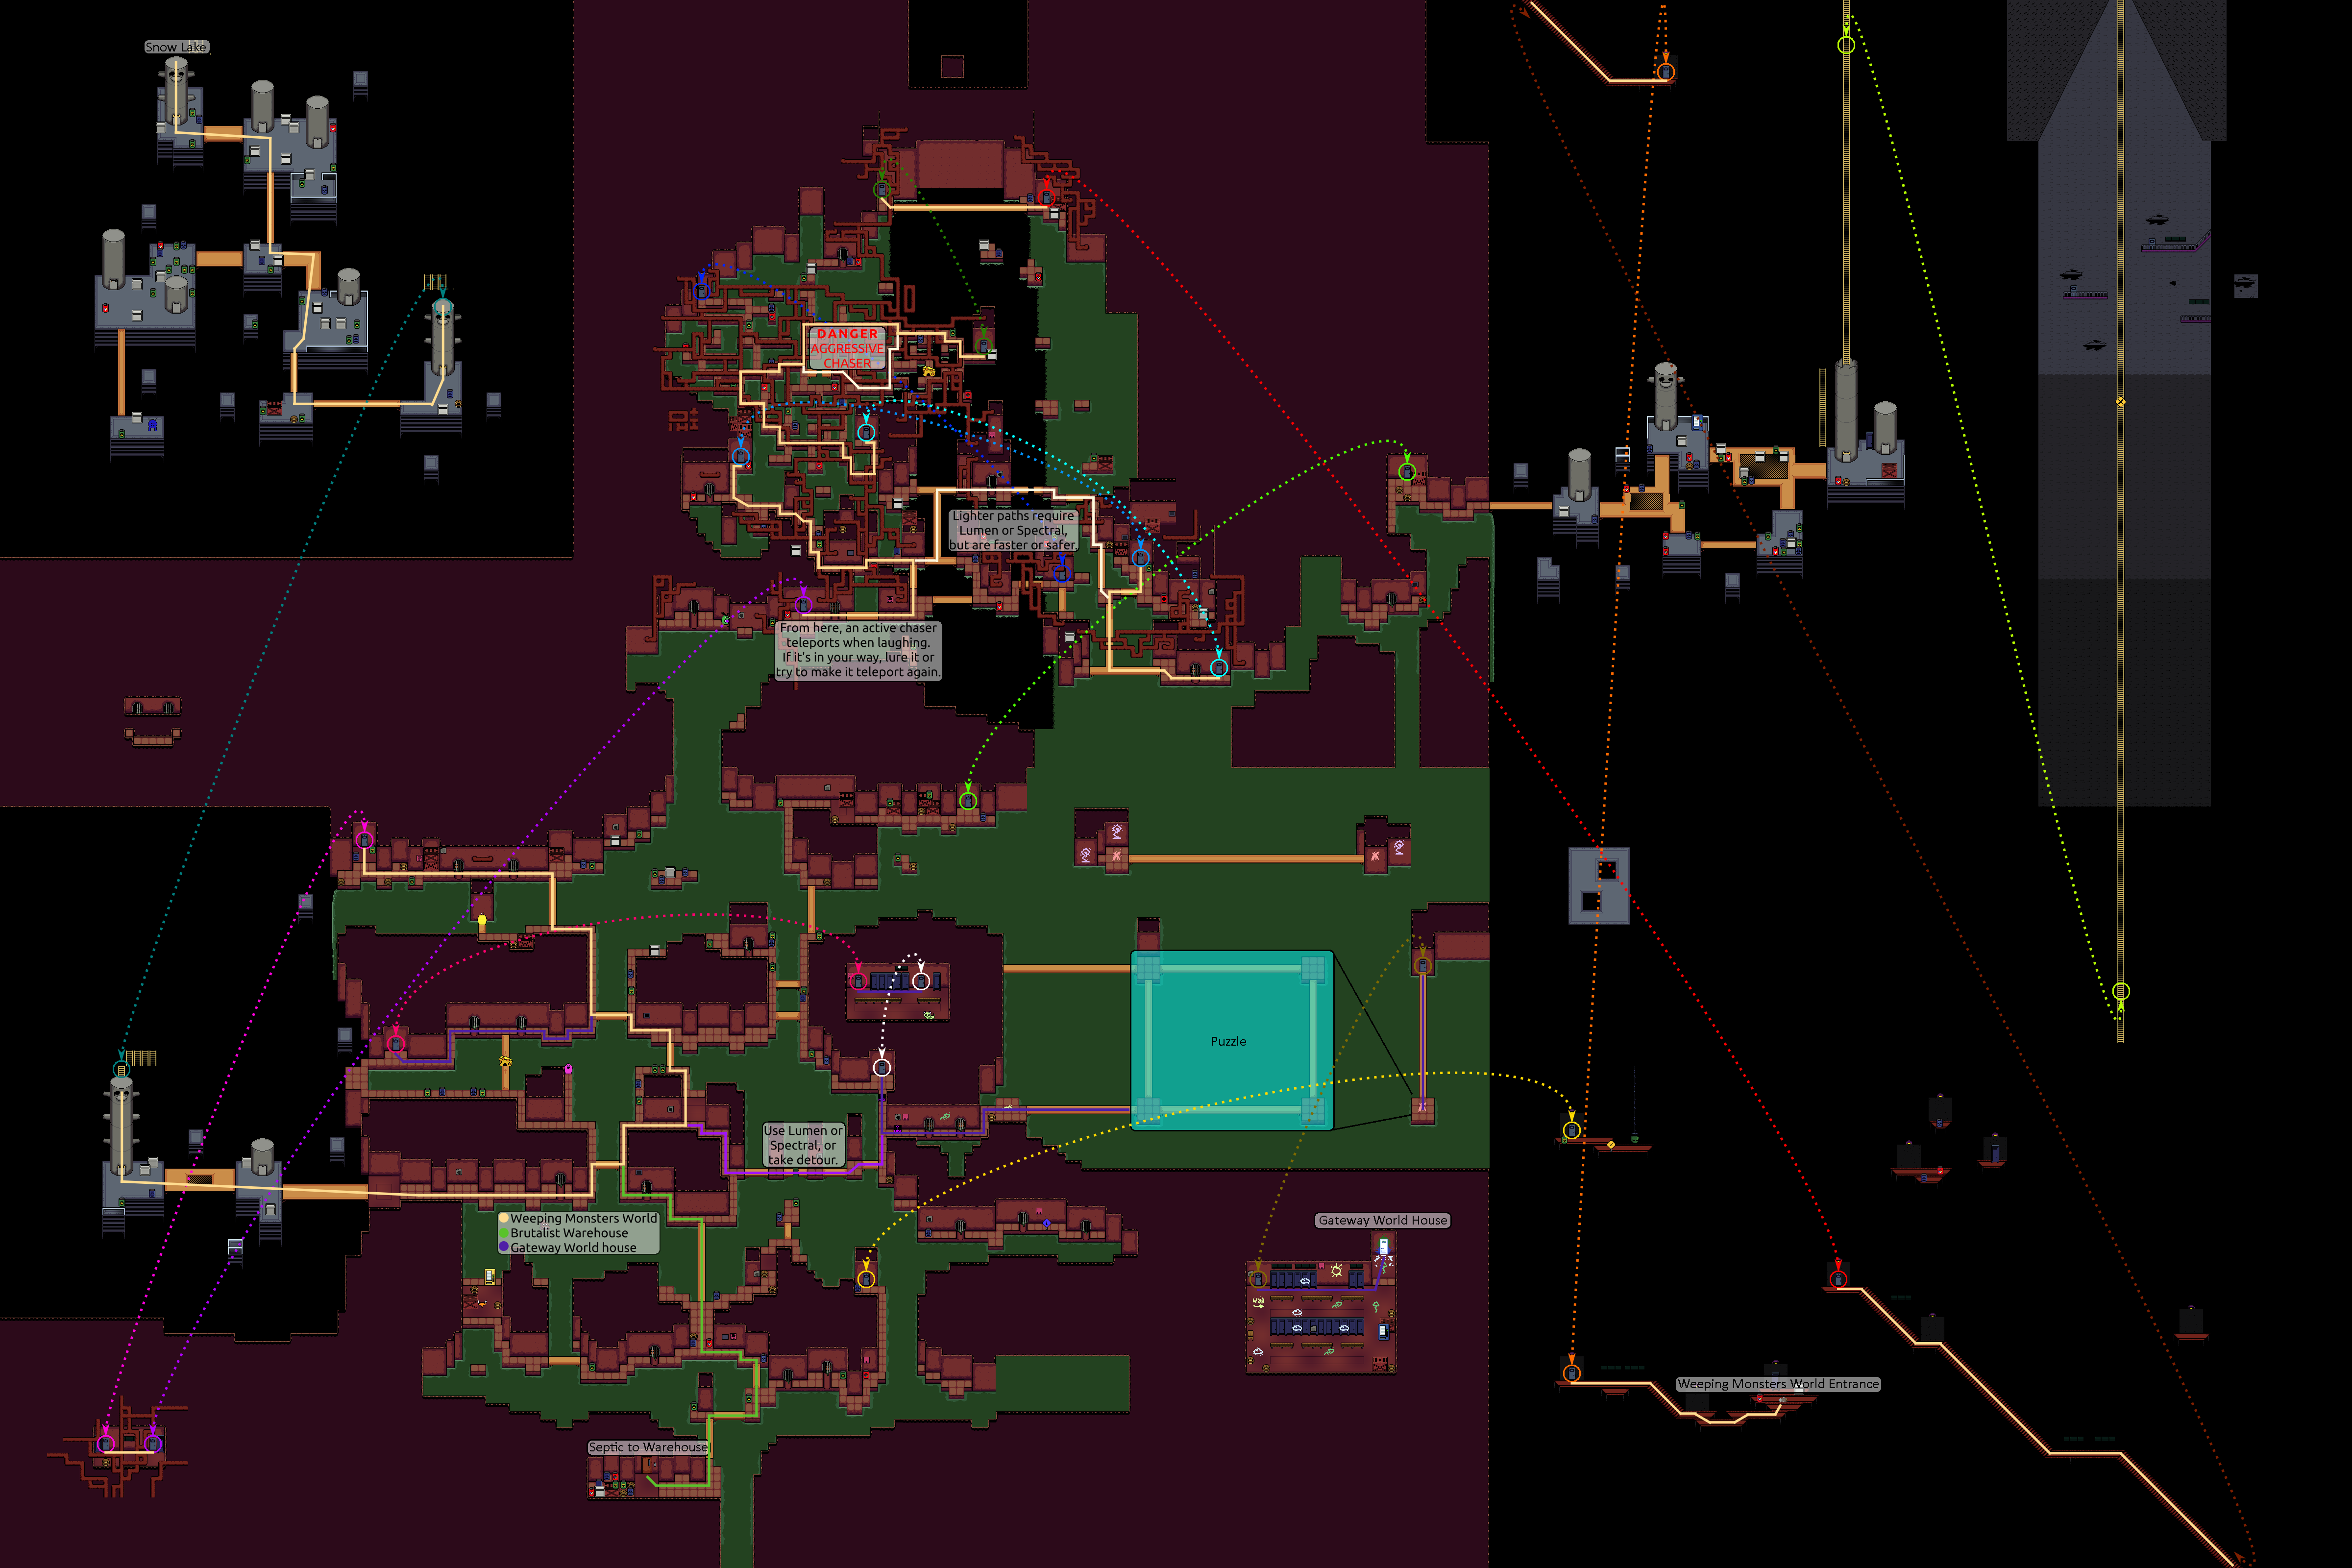
- 1B1D29
- 556B9B