(add bgm) |
No edit summary |
||
| (26 intermediate revisions by 10 users not shown) | |||
| Line 4: | Line 4: | ||
|image = cu_uncanny_world.png | |image = cu_uncanny_world.png | ||
|Effects = | |Effects = | ||
|Events = Fourth Wall Break | |Events = Fourth Wall Break, Don's Advent | ||
| | |Collectibles = "[[Collective Unconscious:Visages#RTP Minna|RTP Minna]]" Visage | ||
|NPCS = Danny | |NPCS = Danny, Don, Gomez | ||
|Connections = {{Connection|Sunset Woods}} | |Connections = {{Connection|Sunset Woods}}, {{Connection|Polluted Shore|one_way_type=NoReturn}}, {{Connection|Soapy Baths|one_way_type=NoReturn}} | ||
|BGM = {{BGM|title=millieamp_ancestors|filename=CU millieamp ancestors 80.ogg|soundroom=0-1|author=MillieAmp|label=Over the Top}} | |BGM = {{BGM|title=millieamp_ancestors|filename=CU millieamp ancestors 80.ogg|soundroom=0-1|author=MillieAmp|label=Over the Top|speed=80}} | ||
{{BGM|title=millieamp_oops_you_bwoke_it|filename=CU millieamp oops you bwoke it 100.ogg|soundroom=0-2|author=MillieAmp|label=Development Hell}} | {{BGM|title=millieamp_oops_you_bwoke_it|filename=CU millieamp oops you bwoke it 100.ogg|soundroom=0-2|author=MillieAmp|label=Development Hell|speed=100}} | ||
{{BGM|title=carloscarty__quenaChord_CCBY|filename=cu_carloscarty__quenaChord_CCBY_100.ogg|soundroom=287|author=Carlos Carty|label=Another Alley}} | {{BGM|title=carloscarty__quenaChord_CCBY|filename=cu_carloscarty__quenaChord_CCBY_100.ogg|soundroom=287|author=Carlos Carty|label=Another Alley|speed=100}} | ||
{{BGM|title=voxlalien_portal|filename=cu_voxlalien_portal_90.ogg|soundroom=288|author=VoxlAlien|label=Another Alley (Portal)}} | {{BGM|title=voxlalien_portal|filename=cu_voxlalien_portal_90.ogg|soundroom=288|author=VoxlAlien|label=Another Alley (Portal)|speed=90}} | ||
{{BGM|title=jetrotal_brownNoise|filename=cu_jetrotal_brownNoise_100.ogg|soundroom=289|author=Jetrotal|label=Title Screams}} | {{BGM|title=jetrotal_brownNoise|filename=cu_jetrotal_brownNoise_100.ogg|soundroom=289|author=Jetrotal|label=Title Screams|speed=100}} | ||
{{BGM|title=freed_red|filename=cu_freed_red_100.ogg|soundroom=290|author=Freed|label=Lore}} | {{BGM|title=freed_red|filename=cu_freed_red_100.ogg|soundroom=290|author=Freed|label=Lore|speed=100}} | ||
{{BGM|title=nnaudio_7litDwarfsFlute|filename=cu_nnaudio_7litDwarfsFlute_100.ogg|soundroom=291|author=NNaudio|label=Speak to Her}} | {{BGM|title=nnaudio_7litDwarfsFlute|filename=cu_nnaudio_7litDwarfsFlute_100.ogg|soundroom=291|author=NNaudio|label=Speak to Her|speed=100}} | ||
{{BGM|title=LuisAudp_andeanLoopCCBY|filename=Cu_LuisAudp_andeanLoopCCBY_100.ogg|soundroom=292|author=LuisAudp|label=Gameplay Loop}} | {{BGM|title=LuisAudp_andeanLoopCCBY|filename=Cu_LuisAudp_andeanLoopCCBY_100.ogg|soundroom=292|author=LuisAudp|label=Gameplay Loop|speed=100}} | ||
|Map ID = 0521, 0522, 0523, 0525, 0526, 0527, 0528, 0529 | {{BGM|title=jetrotal_fan|filename=|soundroom=452|author=Jetrotal|label=Danny's PC|speed=100}} | ||
{{BGM|title=rolandasb_forestloop_CC0|filename=|soundroom=454|author=rolandasb|label=Advent|speed=100}} | |||
{{BGM|title=jetrotal_Advent|filename=|soundroom=455|author=Jetrotal|label=Advent|speed=100}} | |||
{{BGM|title=plasterbrain-IamCry|filename=|soundroom=457|author=plasterbrain|label=Gull|speed=100}} | |||
{{BGM|title=maou_battle01 CC-BY|filename=|soundroom=458|author=maou|label=VS Danny|speed=100}} | |||
{{BGM|title=maou_village08 CC-BY|filename=|soundroom=459|author=maou|label=Don's Ship|speed=100}} | |||
{{BGM|title=maou_field08 CC-BY|filename=|soundroom=460|author=maou|label=World Map|speed=100}} | |||
{{BGM|title=alakai_skyfall|filename=|soundroom=461|author=alakai|label=Homecoming|speed=100}} | |||
{{BGM|title=frankum_theMirror CC-BY|filename=|soundroom=462|author=frankum|label=Rescue|speed=100}} | |||
|Map ID = 0521, 0522, 0523, 0525, 0526, 0527, 0528, 0529, 1331, 1332, 1333, 1334, 1335, 1336, 1337, 1338, 1339, 1340, 1831, 1832, 1833 | |||
|VersionAdded = 0.1.0 | |VersionAdded = 0.1.0 | ||
|Primary = Jetrotal | |Primary = Jetrotal | ||
|Contributing = | |Contributing = | ||
}} | }} | ||
'''Uncanny World''' is an area accessible through a hidden path next to a red sign in [[Collective Unconscious:Sunset Woods|Sunset Woods]]. | |||
Uncanny World is a | |||
== Fourth Wall Break Event== | ==Features== | ||
Near the top of the map where it would normally loop, there are four signs with symbols of eyes. Upon entering the map, a random [[Collective Unconscious:Eidola| | Uncanny World is a world in the style of old RPGs and RPG Maker games. This area consists of one looping room and a tent containing Danny's room. In this room, [[Collective Unconscious:Minnatsuki|Minnatsuki]] can push over Danny and the chairs, and interact with his portrait on the wall. Interacting with the portrait while Danny is on the floor displays the portrait sideways. | ||
On the left wall of Danny's tent, there is an opening that is blocked by a chair. Through the opening is a dark hallway with a computer on a desk and the silhouette of a spinning fan overhead. Going left from this hallway will lead Minnatsuki to a large drain pipe in [[Collective Unconscious:Soapy Baths|Soapy Baths]] that they will automatically jump out of, which will then close, preventing them from going back. | |||
Interacting with the computer will display a fake startup screen resembling that of RPG Maker 2000, which will then take you to a map editing screen resembling that of the same program. From here, you can move the cursor with the arrow keys and place tiles by using the Z key. Holding shift and using the arrow keys will let you select which tile you want to use, and the 1-5 keys will cycle through different tilesets. Pressing and holding X will show an animation of an RPG character "walking" to an open door, collecting three white, circular objects along the way. If you let the animation play to its end, you will leave the computer and go back to the hallway. | |||
===Fourth Wall Break Event=== | |||
Near the top of the map where it would normally loop, there are four signs with symbols of eyes. Upon entering the map, a random [[Collective Unconscious:Eidola|eidolon]] is assigned to each of these signs with no repeats. If Minnatsuki has the corresponding eidola to a sign, the eye will be open. If all four eyes are open, then upon attempting to move upward, Minnatsuki will stop, and black bars with move in from the top and bottom of the screen, indicating that a cutscene is happening. Minnatsuki will randomly select four eidola, and cast each of them onto the nearby signs, making them close their respective eyes. | |||
Minnatsuki will then attempt to walk upward, but a glowing silhouette of them will fade in before them. Minnatsuki will slow down as they approach the figure, until on contact, Minnatsuki will be pushed backward, and the figure turns into a portal. The area will darken, and the player's [[Collective Unconscious:Menu Themes|menu theme]] will be forcefully set to [[Collective Unconscious:Menu Themes#Default|Default]]. Moving away from the portal resets the event, closing the portal, restoring the area's brightness, opening the eyes on the signs, and setting the player's menu theme back to their selection. | Minnatsuki will then attempt to walk upward, but a glowing silhouette of them will fade in before them. Minnatsuki will slow down as they approach the figure, until on contact, Minnatsuki will be pushed backward, and the figure turns into a portal. The area will darken, and the player's [[Collective Unconscious:Menu Themes|menu theme]] will be forcefully set to [[Collective Unconscious:Menu Themes#Default|Default]]. Moving away from the portal resets the event, closing the portal, restoring the area's brightness, opening the eyes on the signs, and setting the player's menu theme back to their selection. | ||
Entering the portal is possible, '''but be warned: this is a one-way unless you complete the event, | Entering the portal is possible, '''but be warned: this is a one-way unless you complete the event. If you wish to leave, you will need to have Minnatsuki return to their room, as their eidola are disabled past the portal.''' On the other side of the portal is a small area which seems to be overlooking the [[Collective Unconscious:Nexus|Nexus]]. Down in the Nexus-like area are tiny figures in the distance, apparently other Minnatsukis. | ||
Opening and closing the menu has a 5/11 chance to cause one of the distant Minnatsukis to return from the spirit worlds. If no Minnatsukis have returned, including the first time the menu is opened, the game will automatically open the menu again. Opening and closing the menu repeatedly will eventually cause all 17 distant Minnatsukis to return and the music to slowly fade out. Note that 0.6 in-game seconds need to pass between uses of the menu, or else they will not count. | Opening and closing the menu has a 5/11 chance to cause one of the distant Minnatsukis to return from the spirit worlds. If no Minnatsukis have returned, including the first time the menu is opened, the game will automatically open the menu again. Opening and closing the menu repeatedly will eventually cause all 17 distant Minnatsukis to return and the music to slowly fade out. Note that 0.6 in-game seconds need to pass between uses of the menu, or else they will not count. | ||
{{SpoilerSectionStart|The Main Event:}} | {{SpoilerSectionStart|The Main Event:}} | ||
After all distant Minnatsukis have returned and the menu has been closed an additional 16 times, there is a 25% chance that opening the menu will reveal it to be "corrupted." If this does not occur within more 16 tries, this will be raised to a 50% chance. On the rare chance the event has still not been activated 50 tries after that, this will be raised again to a 75% chance. If the menu is closed after this, the distant Minnatsukis will reappear and the process will have to be repeated. | |||
The corrupted menu plays garbled music, and visually is slightly torn apart and shifting in a chaotic manner. All text is highly pixelated, making it difficult to read without an intuition of what it says. Minnatsuki is also noticeably off-center in their frame. Additionally, the "Debug" option will be available, regardless is debug mode is enabled or not. | The corrupted menu plays garbled music, and visually is slightly torn apart and shifting in a chaotic manner. All text is highly pixelated, making it difficult to read without an intuition of what it says. Minnatsuki is also noticeably off-center in their frame. Additionally, the "Debug" option will be available, regardless is debug mode is enabled or not. | ||
| Line 42: | Line 57: | ||
This corrupted menu's options have unique effects related to the corruption: | This corrupted menu's options have unique effects related to the corruption: | ||
#Eidola: Minnatsuki will become corrupted, seeming to resemble a distorted 3D model. This doesn't end the event, but the effect won't persist when the event is continued. Using this option again will restore Minnatsuki's form. | |||
#Return: Minnatsuki will attempt to return from the spirit world without the menu closing. This happens more quickly than normal, the orb flashes red in addition to the usual cyan, and the sound effect is mangled. Instead of returning to their room, a faint, slightly flashing blue Minnatsuki will be sitting in an empty black void. The garbled music of the corrupted menu can still be heard faintly. Cancelling will return to the corrupted menu. | |||
#Debug: The menu will fade out, as if trying to transition to another screen, but will fade back to this same menu, though the selection will be reset back to "Effects". | |||
#To Title: Without confirmation, the player is returned to a corrupted title screen. It appears similar to television interference and old console graphics errors, having chromatic aberration, scanline distortion, and tiles from Uncanny World's tileset randomly appearing and disappearing. A noise of static slowly fades in, eventually becoming very loud. Cancelling will return to the corrupted menu. | |||
Minnatsuki can move in this corrupted menu, moving as the player navigates the menu's options, but gets sent back into their frame after moving. If the player attempts to move their menu selection to the right when it's on "Debug", the selection will erroneously move to the right, and smash the bottom of Minnatsuki's frame out of the way. This allows Minnatsuki to escape the frame and wander around the menu. If they step on any part of the frame's border, Minnatsuki will be sent back inside the frame, and the menu controls will be re-triggered, moving the selection. This most likely means the selection will be moved back into place, along with the bottom of the frame's border, resealing Minnatsuki. | Minnatsuki can move in this corrupted menu, moving as the player navigates the menu's options, but gets sent back into their frame after moving. If the player attempts to move their menu selection to the right when it's on "Debug", the selection will erroneously move to the right, and smash the bottom of Minnatsuki's frame out of the way. This allows Minnatsuki to escape the frame and wander around the menu. If they step on any part of the frame's border, Minnatsuki will be sent back inside the frame, and the menu controls will be re-triggered, moving the selection. This most likely means the selection will be moved back into place, along with the bottom of the frame's border, resealing Minnatsuki. | ||
Occasionally, a large square with a hole in it can be seen flashing near the center of the screen. Minnatsuki can walk into where the hole appears, revealing the square to be the O of the [[YNOproject:YNOproject Wiki| | Occasionally, a large square with a hole in it can be seen flashing near the center of the screen. Minnatsuki can walk into where the hole appears, revealing the square to be the O of the [[YNOproject:YNOproject Wiki|YNOproject]] logo, which they exit from into a black void. Walking far enough away from the door will make it disappear, and garbled text will begin appear near the bottom of the screen, apparently representing player chat messages, although these are accompanied by unintelligible whispering. Plants will begin to sprout at Minnatsuki's feet as they wander, and the text will become more frequent, with the whispers beginning to overlap and become cacophonous. This is furthered by chaotic percussion playing and slowly building intensity. And then faint images of Minnatsukis will appear all around, as the screen slowly dims and fades to black. | ||
Minnatsuki will then find themselves in a room with a giant Minnatsuki with a door in their chest. The large Minnatsuki looks toward yours. Interacting in front of the door will summon a white tendril shooting up toward the large Minnatsuki's head. It'll pulse upward, along with a subtle noise as if pumping a liquid, and the large Minnatsuki's body will slowly disappear, leaving only the head slowly turning into leaves. As this process happens, your Minnatsuki will sit down and watch. The result is a tree with a white trunk, with leaves contoured to appear like Minnatsuki's head. | Minnatsuki will then find themselves in a room with a giant Minnatsuki with a door in their chest. The large Minnatsuki looks toward yours. Interacting in front of the door will summon a white tendril shooting up toward the large Minnatsuki's head. It'll pulse upward, along with a subtle noise as if pumping a liquid, and the large Minnatsuki's body will slowly disappear, leaving only the head slowly turning into leaves. As this process happens, your Minnatsuki will sit down and watch. The result is a tree with a white trunk, with leaves contoured to appear like Minnatsuki's head. | ||
| Line 59: | Line 71: | ||
Minnatsuki will then find themselves back in Uncanny World, outside Danny's tent.{{SpoilerSectionEnd}} | Minnatsuki will then find themselves back in Uncanny World, outside Danny's tent.{{SpoilerSectionEnd}} | ||
===Don's Advent Event=== | |||
{{SpoilerSectionStart}} Knocking over the chair on the left side of Danny's room will reveal a computer room. Sitting at this computer and interacting with it will result in an RPGMaker splash screen. If this screen has the number 1, 3, or 5 in the bottom right corner of the screen, Don's Advent may be activated. If it is not one of those three numbers, exit the tent and try again - you do not have to leave Uncanny World to do so. To exit the faux-RPGMaker screen, hold down on 'b' or 'x' and Minnatsuki will return to the computer room and be able to leave the tent. Following this, enter the top right corner of Uncanny World to activate the beginning of the Fourth Wall Break event. Before entering the portal, however, click 'x' to dismiss the portal and walk north past the spot it used to be. | |||
On the next screen, Minnatsuki will be transformed into Don, a character resembling default RPGMaker sprites, and will hop down from a cliff without player input. The screen will begin to glitch. The player must now navigate the four corners of the screen to interact with three white balls, though the player can only move when Minnatsuki's sprite has been transformed into Don. Once the three balls are collected, Minnatsuki must navigate to a white door that flashes on and off the screen. Walking through the door will bring Minnatsuki back to the entrance of Uncanny World - now wearing a new RPGMaker-esque visage - but this visage cannot be kept until the event is completed. | |||
Reentering Danny's tent, the player may click on Danny with their actual computer mouse to bring a cursor onto the screen which will pick up Danny and whisk him offscreen. Minnatsuki may now knock over the chair in front of Danny's portrait and click on it with their actual mouse until the portrait turns completely black and zooms in. The screen will turn into an animation of a white bird flying inside of a portrait frame, and after some time a speech bubble with Don's face inside of it will appear. Clicking on this bubble will activate the next part of the event. | |||
Minnatsuki will now join two RPG characters, Don and Gomez, in a battle of rock, paper, scissors against Danny. Each character has a set, consistent amount of HP, and a timer with which they can make a move against Danny. Moving Minnatsuki up and down the screen will freeze the progress of the player's timer. Danny's timer progresses rapidly, and he will attack a random character each turn. At the completion of any of the three characters' timers, the player may choose to play rock, paper, or scissors against Danny, removing a bit of his HP depending on the outcome. If Danny defeats all three players - or if Minnatsuki is the first character to die - the player will be brought back to Uncanny World and have to attempt the event again from the beginning. | |||
If the player manages to take down Danny, a long cutscene will begin during which the three characters tote Danny along on a series of adventures shown via photographs. The player will eventually be given the choice to free Danny, who will again attempt to subdue the three characters. Minnatsuki may leave through a white door above the ship, but Don will shoot Minnatsuki down with a cannonball into the sea. Once Minnatsuki is cast into the sea, the player can swim to the top right of the screen past a giant, uncannily photorealistic Danny towards sunlight. Exiting the water will transport the player to [[Collective Unconscious:Polluted Shore|Polluted Shore]]. Following this, the event is complete and the player may keep the RPGMaker-inspired visage. | |||
{{SpoilerSectionEnd}} | |||
==Directions== | ==Directions== | ||
Nexus → [[Collective Unconscious:Ornament World|Ornament World]] → [[Collective Unconscious:Moonlit Path|Moonlit Path]] → [[Collective Unconscious:Sunset Woods|Sunset Woods]] → Uncanny World | Nexus → [[Collective Unconscious:Ornament World|Ornament World]] → [[Collective Unconscious:Moonlit Path|Moonlit Path]] → [[Collective Unconscious:Sunset Woods|Sunset Woods]] → Uncanny World | ||
== Trivia == | |||
* The RPG world seen during the Don's Advent event is loosely based on ''[https://rpgmaker.fandom.com/wiki/Don%27s_Adventures Don's Adventures]'', an RPG Maker 2000 "sample game" created by Don Miguel in 2000 to show off the features of the program. The layout of the cliffs at the start of the event is identical to those seen at the start of ''Don's Adventures''. | |||
==Gallery== | ==Gallery== | ||
<gallery> | <gallery> | ||
File:Uncanny.png|The main village | File:Uncanny.png|The main village. | ||
File:Dannys home.png|Danny's home, showing the traditional RPG Maker style | File:Dannys home.png|Danny's home, showing the traditional RPG Maker style. | ||
File:Reg danny.png|Danny's portrait | File:Reg danny.png|Danny's portrait. | ||
File:Flipped danny.png|Danny's | File:Flipped danny.png|Danny's portrait after Danny is knocked over. | ||
File:OOO portal!.png|The portal leading to the Nexus overlook | File:OOO portal!.png|The portal leading to the Nexus overlook. | ||
File:I can see my house!.png|The Nexus overlook | File:I can see my house!.png|The Nexus overlook. | ||
File:Cu thecomputerroom.png|Danny's computer room. | |||
File:Cu rpgmaker.png|The startup screen on Danny's computer. Note the number on the bottom right. | |||
File:Cu rpgmaker1.png|A familiar interface. | |||
File:Cu exitcomputer.png|Exiting the computer. | |||
</gallery> | </gallery> | ||
{{SpoilerSectionStart|Fourth Wall Break Event:}} | {{SpoilerSectionStart|Fourth Wall Break Event:}} | ||
<gallery> | <gallery> | ||
File:False hub.png|Menu Theme is set to Default | File:False hub.png|Menu Theme is set to Default. | ||
File:Corrupt menu.png|The corrupted menu | File:Corrupt menu.png|The corrupted menu. | ||
File:Oh dear!.png|Minnatsuki after the player selects the corrupted Eidolon option | File:Oh dear!.png|Minnatsuki after the player selects the corrupted "Eidolon" option. | ||
File:Blue minna.png|The corrupted return location | File:Blue minna.png|The corrupted return location. | ||
File:Corrupt title.png|The corrupted title screen | File:Corrupt title.png|The corrupted title screen. | ||
File:Speakin wingdings.png|The void after escaping the menu. A garbled player message is visible | File:Speakin wingdings.png|The void after escaping the menu. A garbled player message is visible. | ||
File:My name is minna i speak for the trees!.png|The tree which the large Minnatsuki becomes | File:My name is minna i speak for the trees!.png|The tree which the large Minnatsuki becomes. | ||
File:TOO MANY MINNAS.png|Several Minnatsukis pouring out from the house | File:TOO MANY MINNAS.png|Several Minnatsukis pouring out from the house. | ||
File:WAY TOO MANY MINNAS.png|A pile of Minnatsukis rises from the bottom of the cliff | File:WAY TOO MANY MINNAS.png|A pile of Minnatsukis rises from the bottom of the cliff. | ||
File:IM BEING SMOTHERED.png|The pile overtakes the entire screen | File:IM BEING SMOTHERED.png|The pile overtakes the entire screen. | ||
File:Oh we are back...png|Minnatsuki returns to Uncanny World after the event | File:Oh we are back...png|Minnatsuki returns to Uncanny World after the event. | ||
</gallery> | |||
==Video== | |||
{{#ev:youtube|ykcmJrLbGSs|alignment=center|description=Video of the whole event.}} | |||
{{SpoilerSectionEnd}}{{SpoilerSectionStart|label=Don's Advent Event:}}<gallery> | |||
File:Cu donsadventstart.png|An [https://rpgmaker.fandom.com/wiki/Don%27s_Adventures oddly familiar] cliffside | |||
File:Cu glitchadvent.png|Back and forth between RPG protagonist and YNFG protagonist | |||
File:Cu adventgem.png|A white gem | |||
File:Cu glitchdoor.png|The door that appears after three gems are found | |||
File:Cu newuncanny.png|The same world as before, but Minnatsuki looks different... | |||
File:Cu uncannymenu.png|Minnatsuki's new (non-functional) menu | |||
File:Cu dannycursor.png|Hey, give him back! | |||
File:Cu error.png|Danny's computer has encountered an error | |||
File:Cu becominguncanny1.png|Danny's portrait after being clicked | |||
File:Cu becominguncanny2.png|Danny's portrait after being clicked again | |||
File:Cu becominguncanny3.png|...and again... | |||
File:Cu becominguncanny4.png|...and again... | |||
File:Cu becominguncanny5.png|...and again | |||
File:Cu uncannygull.png|A mysterious gull | |||
File:Cu bossbattle.png|Suddenly, a boss battle?! | |||
File:Cu_attackmenu.png|An intense game of rock-paper-scissors | |||
File:Cu_dannydefeated.png|The evil is defeated(?) | |||
File:Cu_donship.png | |||
File:Cu_uncannyparty.png|A new party member | |||
File:Cu_dannytalk2.png|A deal with the devil | |||
File:Cu_settingsail.png|Setting sail | |||
File:Cu_lastphoto.png|The adventure nears its end | |||
File:Cu_uncannyritual.png|Don prepares to summon the door | |||
File:Cu_danneye.png|Danny sees right through you | |||
File:Cu_uncannyreveal.png|The liar revealed | |||
File:Cu_glitchedfight.png|Fighting with Gomez | |||
File:Cu_openthedoor.png|The way out | |||
File:Cu_donslaststand.png|Don stops Minnatsuki with a cannon ball | |||
File:Cu_uncannysea.png|Cast into the sea | |||
File:Cu_bigdanny.png|Now that's uncanny | |||
</gallery> | </gallery> | ||
Revision as of 22:06, 9 April 2025
| Uncanny World | |||
|---|---|---|---|

| |||
| Basic Info | |||
| Eidola | None | ||
| Collectibles |
"RTP Minna" Visage | ||
| Events | Fourth Wall Break, Don's Advent | ||
| Notable NPCs | Danny, Don, Gomez | ||
| Other | |||
| Connecting Areas | Sunset Woods Polluted Shore ➡️ Soapy Baths ➡️ | ||
| BGM | 🔊 millieamp_ancestors – Over the Top (No. 0-1) 🔊 millieamp_oops_you_bwoke_it – Development Hell (No. 0-2) | ||
| Map ID | 0521, 0522, 0523, 0525, 0526, 0527, 0528, 0529, 1331, 1332, 1333, 1334, 1335, 1336, 1337, 1338, 1339, 1340, 1831, 1832, 1833 | ||
| Version Added | 0.1.0 | ||
| Author | Jetrotal | ||
| |||
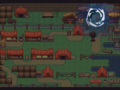
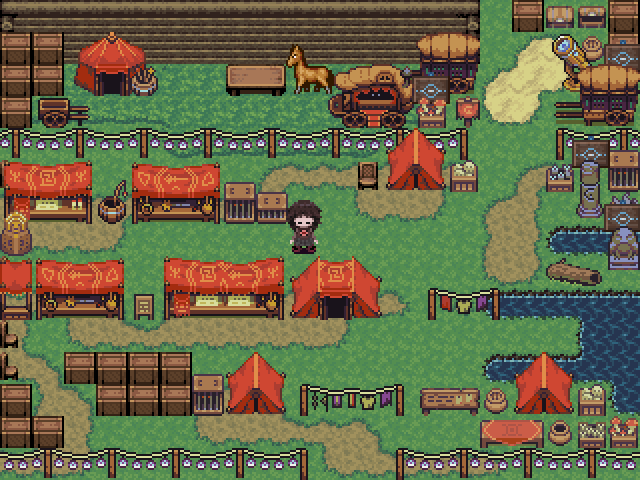
Uncanny World is an area accessible through a hidden path next to a red sign in Sunset Woods.
Features
Uncanny World is a world in the style of old RPGs and RPG Maker games. This area consists of one looping room and a tent containing Danny's room. In this room, Minnatsuki can push over Danny and the chairs, and interact with his portrait on the wall. Interacting with the portrait while Danny is on the floor displays the portrait sideways.
On the left wall of Danny's tent, there is an opening that is blocked by a chair. Through the opening is a dark hallway with a computer on a desk and the silhouette of a spinning fan overhead. Going left from this hallway will lead Minnatsuki to a large drain pipe in Soapy Baths that they will automatically jump out of, which will then close, preventing them from going back.
Interacting with the computer will display a fake startup screen resembling that of RPG Maker 2000, which will then take you to a map editing screen resembling that of the same program. From here, you can move the cursor with the arrow keys and place tiles by using the Z key. Holding shift and using the arrow keys will let you select which tile you want to use, and the 1-5 keys will cycle through different tilesets. Pressing and holding X will show an animation of an RPG character "walking" to an open door, collecting three white, circular objects along the way. If you let the animation play to its end, you will leave the computer and go back to the hallway.
Fourth Wall Break Event
Near the top of the map where it would normally loop, there are four signs with symbols of eyes. Upon entering the map, a random eidolon is assigned to each of these signs with no repeats. If Minnatsuki has the corresponding eidola to a sign, the eye will be open. If all four eyes are open, then upon attempting to move upward, Minnatsuki will stop, and black bars with move in from the top and bottom of the screen, indicating that a cutscene is happening. Minnatsuki will randomly select four eidola, and cast each of them onto the nearby signs, making them close their respective eyes.
Minnatsuki will then attempt to walk upward, but a glowing silhouette of them will fade in before them. Minnatsuki will slow down as they approach the figure, until on contact, Minnatsuki will be pushed backward, and the figure turns into a portal. The area will darken, and the player's menu theme will be forcefully set to Default. Moving away from the portal resets the event, closing the portal, restoring the area's brightness, opening the eyes on the signs, and setting the player's menu theme back to their selection.
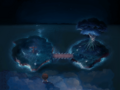
Entering the portal is possible, but be warned: this is a one-way unless you complete the event. If you wish to leave, you will need to have Minnatsuki return to their room, as their eidola are disabled past the portal. On the other side of the portal is a small area which seems to be overlooking the Nexus. Down in the Nexus-like area are tiny figures in the distance, apparently other Minnatsukis.
Opening and closing the menu has a 5/11 chance to cause one of the distant Minnatsukis to return from the spirit worlds. If no Minnatsukis have returned, including the first time the menu is opened, the game will automatically open the menu again. Opening and closing the menu repeatedly will eventually cause all 17 distant Minnatsukis to return and the music to slowly fade out. Note that 0.6 in-game seconds need to pass between uses of the menu, or else they will not count.
The Main Event:
Don's Advent Event
Spoilers:
Directions
Nexus → Ornament World → Moonlit Path → Sunset Woods → Uncanny World
Trivia
- The RPG world seen during the Don's Advent event is loosely based on Don's Adventures, an RPG Maker 2000 "sample game" created by Don Miguel in 2000 to show off the features of the program. The layout of the cliffs at the start of the event is identical to those seen at the start of Don's Adventures.
Gallery
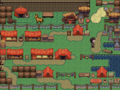
The main village.
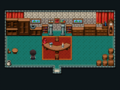
Danny's home, showing the traditional RPG Maker style.
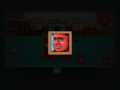
Danny's portrait.
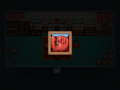
Danny's portrait after Danny is knocked over.
The portal leading to the Nexus overlook.
The Nexus overlook.

Danny's computer room.

The startup screen on Danny's computer. Note the number on the bottom right.

A familiar interface.

Exiting the computer.


Fourth Wall Break Event:


Don's Advent Event:


- A32C0F
- 83B06F