Potatoidea (talk | contribs) m (BGM) |
Dreamerkitty (talk | contribs) mNo edit summary |
||
| (3 intermediate revisions by 2 users not shown) | |||
| Line 1: | Line 1: | ||
{{Locationbox | {{Locationbox | ||
|headercolor = #756450 | |headercolor = #756450 | ||
| Line 15: | Line 14: | ||
|VersionAdded = | |VersionAdded = | ||
}} | }} | ||
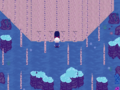
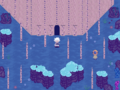
The '''Submarine City''' is an area accessible from | The '''Submarine City''' is an area accessible by heading north from [[Dotflow:Submarine World|Submarine World]]'s entrance. | ||
{{LocationMap|filename=SubmarineCitySillyzawa.png|caption=Annotated map of Submarine City}} | |||
==Features== | ==Features== | ||
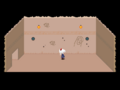
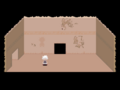
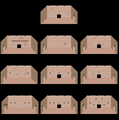
The Submarine City is a large building | The Submarine City, contrary to its name, is actually a singular, large building, containing a maze of ten dilapidated rooms. The maze has a rather confusing layout, with many rooms interlinking with one another, and only containing one actual dead end. Many of the rooms are filled with graffiti, either of eyeballs or illegible text. | ||
From the entrance, to get to the exit: | |||
*Take the only door. | |||
*This room should have four windows. Take the right door. | |||
*This room should have six windows. Take the north door. | |||
*This room should have illegible text on the wall. Take the left door. | |||
*This room should have illegible text on the wall, as well as graffiti of two eyeballs. Take the left door. | |||
*This room should have a half-complete drawing of Sabitsuki's face on the wall. Take the only door. | |||
Navigating through the maze successfully will lead to a room featuring both a faded silhouette of Sabitsuki on the wall and a door that exits to the [[Dotflow:Submarine Corridors|Submarine Corridors]]. | |||
==Directions== | ==Directions== | ||
| Line 24: | Line 34: | ||
==Trivia== | ==Trivia== | ||
*[[Dotflow:Oreko|Oreko]] is programmed to potentially spawn in the area outside the building but never does. Due to an oversight, using the [[Dotflow:Effects#Handgun|Handgun]] here will cause her to briefly appear. | *[[Dotflow:Oreko|Oreko]] is programmed to potentially spawn in the area outside the building but never does.<ref>Whenever a flow session starts, the game rolls a random number from 0 to 14 to decide where Oreko should appear. She is coded to appear outside of the building if this number is 15, but this can never happen legitimately.</ref> Due to an oversight, using the [[Dotflow:Effects#Handgun|Handgun]] here will cause her to briefly appear. | ||
* | *The only dead end room notably features a drawing resembling [[Yume Nikki:Uboa|Uboa]] from ''Yume Nikki'' on the wall. | ||
==Gallery== | ==Gallery== | ||
<gallery> | <gallery> | ||
File:Submarine City Entrance.png | File:Submarine City Entrance.png|Outside of the building | ||
File:Submarine City Oreko.png | File:Submarine City Oreko.png|Oreko appearing when the Handgun is used | ||
File:Submarine City Uboa.png | File:Submarine City Uboa.png|Dead end with the Uboa drawing | ||
File:Submarine City Exit.png | File:Submarine City Exit.png|Entrance to the [[Dotflow:Submarine Corridors|Submarine Corridors]] | ||
File:Flow submarine world dead end.png|An isolated area you're sent to after being caught by a Kaibutsu | |||
File:Submarinecitymaze.png|Map of Submarine City with only text annotations | |||
</gallery> | </gallery> | ||
==References== | |||
Latest revision as of 20:01, 28 December 2023
| Submarine City | |
|---|---|

| |
| Basic Info | |
| Japanese Name(s) |
海底都市 |
| Effects | None |
| Events | None |
| Notable NPCs | Oreko |
| Other | |
| Connecting Areas | Submarine World Submarine Corridors |
| BGM | 🔊 海底都市/Submarine City |
| Map ID | 0026, 0029, 0030, 0031, 0032, 0033, 0034, 0035, 0036, 0037, 0038 |
The Submarine City is an area accessible by heading north from Submarine World's entrance.

Features
The Submarine City, contrary to its name, is actually a singular, large building, containing a maze of ten dilapidated rooms. The maze has a rather confusing layout, with many rooms interlinking with one another, and only containing one actual dead end. Many of the rooms are filled with graffiti, either of eyeballs or illegible text.
From the entrance, to get to the exit:
- Take the only door.
- This room should have four windows. Take the right door.
- This room should have six windows. Take the north door.
- This room should have illegible text on the wall. Take the left door.
- This room should have illegible text on the wall, as well as graffiti of two eyeballs. Take the left door.
- This room should have a half-complete drawing of Sabitsuki's face on the wall. Take the only door.
Navigating through the maze successfully will lead to a room featuring both a faded silhouette of Sabitsuki on the wall and a door that exits to the Submarine Corridors.
Directions
Entrance → Plant World → Submarine World → Submarine City
Trivia
- Oreko is programmed to potentially spawn in the area outside the building but never does.[1] Due to an oversight, using the Handgun here will cause her to briefly appear.
- The only dead end room notably features a drawing resembling Uboa from Yume Nikki on the wall.
Gallery
Outside of the building
Oreko appearing when the Handgun is used
Dead end with the Uboa drawing
Entrance to the Submarine Corridors

An isolated area you're sent to after being caught by a Kaibutsu
Map of Submarine City with only text annotations


References
- ↑ Whenever a flow session starts, the game rolls a random number from 0 to 14 to decide where Oreko should appear. She is coded to appear outside of the building if this number is 15, but this can never happen legitimately.
- 756450
- cea694