GrogsyShovel (talk | contribs) mNo edit summary |
Enharmonics (talk | contribs) (Overhaul of Features section (still WIP)) |
||
| Line 1: | Line 1: | ||
{{MissingInfo| | {{MissingInfo|Add and update maps, update gallery, (split Stone Graveyard into a separate article?)}} | ||
{{Locationbox | {{Locationbox | ||
|headercolor = #0F6202 | |headercolor = #0F6202 | ||
|headerfontcolor = #E9FFFA | |headerfontcolor = #E9FFFA | ||
|Name = | |Name = 夢国道, ''Yume Kokudō'', Dream Highway | ||
|image = DreamRouteArticleImg.png | |image = DreamRouteArticleImg.png | ||
|caption = Entrance to Mourning Void | |caption = Entrance to Mourning Void | ||
| Line 26: | Line 26: | ||
}} | }} | ||
Dream Route is an area accessible from the red flowers in [[Yume 2kki:Mourning Void|Mourning Void]]. | Dream Route is an area accessible from the red flowers in [[Yume 2kki:Mourning Void|Mourning Void]]. | ||
{{LocationMap|filename=Deltashedgemaze.png|customsize=275px|caption=Map of the Park | {{LocationMap | ||
{{LocationMap|filename=AmethystCave map jp.png|caption=Map in | | filename = Deltashedgemaze.png | ||
| customsize = 275px | |||
| caption = Map of the Past Park (some info is outdated) | |||
}} | |||
{{LocationMap | |||
| filename = AmethystCave map jp.png | |||
| caption = Map (in Japanese) of the Past Amethyst Caves | |||
}} | |||
==Features== | ==Features== | ||
Dream Route is a | The Dream Route is a vast world made up of 4 main sections: the '''Dream Roads''', the '''Present Park''', the '''Present Amethyst Caves''', the '''Past Park''', and the '''Past Amethyst Caves'''. | ||
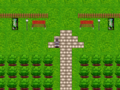
Upon reaching '''Gate 1''', you will find a small transition room with | === Dream Roads === | ||
From the Mourning Void entrance, the players starts on the right side of '''Route 1''' with cones blocking the northern path. The only way to continue is by going south, down the road. Upon reaching '''Gate 1''', you will find a small transition room with two passive Shadow Ladies standing in front of the north wall, following Urotsuki with their gaze. Equipping the [[Yume 2kki:Effects#Chainsaw|Chainsaw]] effect here will cause an enraged Shadow Lady to appear and chase you until you either unequip it or leave the room. | |||
Continuing east at the gate leads to '''Route 2'''. | Continuing east at the gate leads to '''Route 2'''. which takes the form of a single road stretching horizontally and lined with trees. At the end of the route is '''Gate 2''', where a Light Lady wanders the room and a woman in a green cropped tank top stands near the bottom right corner. Interacting with the woman transforms you into her. | ||
Continuing east leads to '''Route 3''', which is very visually similar to '''Route 2'''. To the east, an enraged-looking (yet entirely harmless) Shadow Lady sits surrounded by cones and a warning sign. Interacting with her will show a close-up of her menacing glare. If you have visited [[Yume 2kki:Bikini Beach|Bikini Beach]] at least once, she will be replaced by a Light Lady who will step aside for you, on the other side of which is a short bridge over a glitchy abyss and another Light Lady who will do the same, granting you a shortcut to '''Gate 3'''. | |||
To the north of the Shadow/Light Lady is the empty '''Park Gate''', on the other side of which is '''Present Park'''. | |||
=== Present Park === | |||
The Present Park is a peaceful, grassy area bordered by trees and full of checkered stone paths leading to several lily ponds and flower gardens. A few women in black dresses can be found here, either standing idly or walking around. | |||
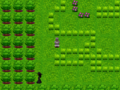
East entrance is a section made of tall patches of grass arranged to resemble a maze, though they can all be walked over. Here you will find a door that takes you to a roughly equivalent area in '''Past Park'''. | |||
In the northwest corner of the True Park another gate, sporting a grey and industrial interior. On the other side is a path to the north leading to a hole in a crystalline purple wall that serves as the entrance to '''Present Amethyst caves'''. To the right of path are red construction barriers blocking off a hedge maze as well as a door with a clock symbol on it that leads to the corresponding hedge maze area in '''Past Park'''. | |||
===Amethyst Caves=== | === Present Amethyst Caves === | ||
The Present Amethyst Caves are a cave system with purple amethyst walls and beige/tan floors. Upon entering from '''Present Park''', you are greeted with a Light Lady standing next to a sign with "500" scratched out and replaced with "0". If you ignore her and enter the hole in the north wall, you will be met with red cones surrounding a door that will take you to a roughly equivalent area in the '''Past Amethyst Caves,''' which lacks the red cones. | |||
Interacting with the Light Lady next to the sign transports the player to a short passage leading to a small room with a doorway in each of the four cardinal direction. In order to progress, you must choose the correct doorway, which will lead to another room where you must do the same, and so on. For each correctly chosen door, a sound effect will play and a dot will appear on the ground in the following room. Choosing an incorrect door will take you back at least 3 rooms. | |||
After | Equipping the [[Yume 2kki:Effects#Glasses|Glasses]] effect will allow you to see a transparent Light Lady who will guide to the correct door in a given room. As you progress, transparent Shadow Ladies will appear and walk into incorrect doorways. Eventually, the Light Lady will stop appearing, at which point you must choose the doorway that the Shadow Ladies do not walk into. | ||
<div class="mw-collapsible mw-collapsed" style="overflow:auto;"> | |||
After successfully traversing through 10 dot rooms and 2 rooms without dots, you will enter a room with a small star at the base of a large grey slab. Walking back through the entrance doorway leads to an identically shaped room which contains only a small white oval with animated yellow speckles. This will teleport the player back to the first room of that caves and unlock a permanent shortcut between those two rooms. | |||
Interacting with the star in the slab room will cause it to disappear and play a sound, as if it was collected (this unlocks a permanent connection between '''Stone Graveyard''' and [[Yume 2kki:Abandoned Campsite|Abandoned Campsite]]). Interacting with the stone slab at this point will transport the player to Stone Graveyard. | |||
Entering to doorway on the northern wall of the slab room places you inside the '''Cave Gate''', which is visually identical to the '''Park Gate'''. Upon exiting to the south, the player will again be on '''Route 3''', now on the opposite side of the row of cones and Shadow/Light Lady. To the southeast is '''Gate 3''', inside which is a tan woman in a bikini that will warp you to Bikini Beach. | |||
=== Past Park === | |||
The Past Park is much, much larger and more linear than it's "present" counterpart, though it shares many visual elements with it. Unlike Present Park, it features a faint CRT screen overlay. Many areas here resemble objects or shapes when seen from above, including a Gameboy, a smiley face, and Urotsuki's face. | |||
Entering from the door found east of '''Present Park'''<nowiki/>'s entrance, you are placed in front of a section of tall grass patches arranged like a maze. Though they do not animate when stepped on like in '''Present Park''', they can still be walked over. To the left is a pond very similar to one found at the entrance of '''Present Park''', though the black-dress women have been replaced with lifeless paper cutouts and are joined by a paper Shadow Lady. The path that would have lead back to '''Gate 3''' in '''Present Park''' is blocked by cones. | |||
Following the sign pointing right sets you on a path that winds through multiple mazes, including a truly gargantuan hedge maze in the center of the map. Right before its entrance is a door that will take you back to '''Present Park''', right before '''Present Amethyst Caves'''. | |||
After successfully traversing the maze, continue south and then east to reach a fenced area with hedges and grass in the shape of a snake from [[Yume 2kki:Serpent Ruins A|Serpent Ruins A]]. A solitary green snake stands north of the fence that cannot be interacted with or killed. | |||
Going west instead of east on the path prior leads to a Shadow Lady that will teleport you to an earlier area before the hedge maze when interacted with. | |||
Near the northeast corner of the snake design is a path through the trees that continues rather linearly through most of the remaining areas, including a pond and a much smaller, more straightforward hedge maze. The player will eventually reach a dead end in the form of a squared-off area with patches of tall grass in the shape of a rabbit. Two NPCs are found here: a Shadow Lady who, upon interaction, will teleport you to a dead end to left of the massive hedge maze featuring grass patches in the shape of Urotsuki's face and the words "YUME NIKKI", forcing you to repeat part of the maze, and a Light Lady who will teleport you to the final section of the park. From here is yet another hedge maze, at the end of which is a path to the '''Past Amethyst Caves'''. | |||
=== Past Amethyst Caves === | |||
As is the case with the two parks, the '''Past Amethyst Caves''' visually resemble their "past" counterpart, but with a layout that is entirely different are far more difficult. Like the '''Past Park''', it features a faint CRT overlay. | |||
Upon entering the caves, the way back will be blocked by a cone. Where the Light Lady would have been in the True Caves, there is instead a harmless paper Shadow Lady. Continuing to the next room, you will be presented with a door that will take you to a roughly equivalent area in the '''Present Amethyst Caves'''. If you choose to instead press forward, you will have to complete a vast and complex maze of rooms, some with doorways that lead to looping sections or that send you back to previous areas in the cave. Unlike the '''Present Amethyst Caves''', the [[Yume 2kki:Effects#Bat|Bat]] effect is not disabled, making it a potentially useful tool when navigating. | |||
After a long journey, you'll eventually reach a room with four doorways in the cardinal directions, almost visually and functionally identical to the four doors room in the '''Present Amethyst Caves''' (If you have already completed that Dot Maze, a small white oval will be present here that will warp you to corresponding oval at the end of the Present Caves). | |||
Unlike the Present Caves, using the glasses effect will not help guide you and taking a wrong doorway will place you far back in the cave system. After completing the dot rooms, you will enter a room with four doorways on the northern wall. From left to right, use the second doorway, then return through the same doorway you came and you will find yourself in the Past Caves version of the Stone Slab Room (see '''Present Amethyst Caves'''). From here, you can interact with the slab to be taken to Stone Graveyard or head north to the '''Cave Gate''' and continue to the end of '''Route 3'''.<div class="mw-collapsible mw-collapsed" style="overflow:auto;"> | |||
<div style="font-weight:bold; float:left; margin-right:0.5em;" >Correct Order of Doorways in the Dot Room:</div> | <div style="font-weight:bold; float:left; margin-right:0.5em;" >Correct Order of Doorways in the Dot Room:</div> | ||
<div class="mw-collapsible-toggle" style="float:left;">[Show/Hide]</div> | <div class="mw-collapsible-toggle" style="float:left;">[Show/Hide]</div> | ||
| Line 66: | Line 103: | ||
</div> | </div> | ||
</div> | </div> | ||
=== Stone Graveyard === | |||
The Stone Graveyard is a small, non-looping world filled with many rows of grungy stones slabs and background resembling a fiery red sun. Re-entering the green door you came from will take you to a corresponding door in Abandoned Campsite, which can now be accessed from that side. | |||
Above the row that contains a clean stone is a grey snake that moves around and can only be seen while the player has [[Yume 2kki:Effects#Grave|Grave]] effect equipped. Interacting with it will bring you back to stone slab the '''Present Amethyst Caves'''. | |||
==Directions== | ==Directions== | ||
| Line 85: | Line 127: | ||
File:Dream Route 4.png|Gate 2. | File:Dream Route 4.png|Gate 2. | ||
File:Dream Route fly with Bat here.png|The start of Route 3, where you can fly to the end of Route 3 if you placed a Bat marker there. | File:Dream Route fly with Bat here.png|The start of Route 3, where you can fly to the end of Route 3 if you placed a Bat marker there. | ||
File:Dream Route warp woman.png| | File:Dream Route warp woman.png|This Shadow Lady used to send you back to Mourning Void if you interacted with her and had less than 800,000夢. Now she's paper. | ||
File:Dream Route maze vm.png | File:Dream Route maze vm.png | ||
File:Dream Route maze pond.png | File:Dream Route maze pond.png | ||
File:Dream Route maze evil.png | File:Dream Route maze evil.png | ||
File:Dream Route maze vms.png | File:Dream Route maze vms.png | ||
Revision as of 05:23, 16 April 2024
| This page is missing information. You can help YumeWiki by expanding it. Details: Add and update maps, update gallery, (split Stone Graveyard into a separate article?) |
| Dream Route | |
|---|---|
 Entrance to Mourning Void | |
| Basic Info | |
| Japanese Name(s) |
夢国道 |
| Effects | None |
| Events | None |
| Notable NPCs | Shadow Ladies, Light Ladies |
| Other | |
| Connecting Areas | Mourning Void Bikini Beach |
| Removed Connections | Emotions Maze ➡️ |
| BGM | 🔊 yumepo1 – Routes (No. 017E, 017F and 017J) 🔊 yumepo1 (quiet) – Gates (No. 017G, 017H and 017K) 🔊 delta_song_10 – Park (No. 909A) 🔊 delta_song_12 – Amethyst Caves (No. 910) 🔊 sound3e – Stone Graveyard (No. 185S) |
| Map ID | 2596, 2731, 2734, 2735, 3012, 3013, 3014, 3015, 3020, 3029 |
| Version Added | 0.122 patch 1 |
| Last Updated | 0.123b |
| Primary Author | delta_judgment |
| Contributing Author(s) | Nabisae |
Dream Route is an area accessible from the red flowers in Mourning Void.


Features
The Dream Route is a vast world made up of 4 main sections: the Dream Roads, the Present Park, the Present Amethyst Caves, the Past Park, and the Past Amethyst Caves.
Dream Roads
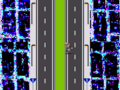
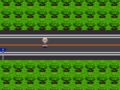
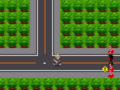
From the Mourning Void entrance, the players starts on the right side of Route 1 with cones blocking the northern path. The only way to continue is by going south, down the road. Upon reaching Gate 1, you will find a small transition room with two passive Shadow Ladies standing in front of the north wall, following Urotsuki with their gaze. Equipping the Chainsaw effect here will cause an enraged Shadow Lady to appear and chase you until you either unequip it or leave the room.
Continuing east at the gate leads to Route 2. which takes the form of a single road stretching horizontally and lined with trees. At the end of the route is Gate 2, where a Light Lady wanders the room and a woman in a green cropped tank top stands near the bottom right corner. Interacting with the woman transforms you into her.
Continuing east leads to Route 3, which is very visually similar to Route 2. To the east, an enraged-looking (yet entirely harmless) Shadow Lady sits surrounded by cones and a warning sign. Interacting with her will show a close-up of her menacing glare. If you have visited Bikini Beach at least once, she will be replaced by a Light Lady who will step aside for you, on the other side of which is a short bridge over a glitchy abyss and another Light Lady who will do the same, granting you a shortcut to Gate 3.
To the north of the Shadow/Light Lady is the empty Park Gate, on the other side of which is Present Park.
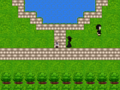
Present Park
The Present Park is a peaceful, grassy area bordered by trees and full of checkered stone paths leading to several lily ponds and flower gardens. A few women in black dresses can be found here, either standing idly or walking around.
East entrance is a section made of tall patches of grass arranged to resemble a maze, though they can all be walked over. Here you will find a door that takes you to a roughly equivalent area in Past Park.
In the northwest corner of the True Park another gate, sporting a grey and industrial interior. On the other side is a path to the north leading to a hole in a crystalline purple wall that serves as the entrance to Present Amethyst caves. To the right of path are red construction barriers blocking off a hedge maze as well as a door with a clock symbol on it that leads to the corresponding hedge maze area in Past Park.
Present Amethyst Caves
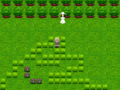
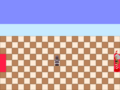
The Present Amethyst Caves are a cave system with purple amethyst walls and beige/tan floors. Upon entering from Present Park, you are greeted with a Light Lady standing next to a sign with "500" scratched out and replaced with "0". If you ignore her and enter the hole in the north wall, you will be met with red cones surrounding a door that will take you to a roughly equivalent area in the Past Amethyst Caves, which lacks the red cones.
Interacting with the Light Lady next to the sign transports the player to a short passage leading to a small room with a doorway in each of the four cardinal direction. In order to progress, you must choose the correct doorway, which will lead to another room where you must do the same, and so on. For each correctly chosen door, a sound effect will play and a dot will appear on the ground in the following room. Choosing an incorrect door will take you back at least 3 rooms.
Equipping the Glasses effect will allow you to see a transparent Light Lady who will guide to the correct door in a given room. As you progress, transparent Shadow Ladies will appear and walk into incorrect doorways. Eventually, the Light Lady will stop appearing, at which point you must choose the doorway that the Shadow Ladies do not walk into.
After successfully traversing through 10 dot rooms and 2 rooms without dots, you will enter a room with a small star at the base of a large grey slab. Walking back through the entrance doorway leads to an identically shaped room which contains only a small white oval with animated yellow speckles. This will teleport the player back to the first room of that caves and unlock a permanent shortcut between those two rooms.
Interacting with the star in the slab room will cause it to disappear and play a sound, as if it was collected (this unlocks a permanent connection between Stone Graveyard and Abandoned Campsite). Interacting with the stone slab at this point will transport the player to Stone Graveyard.
Entering to doorway on the northern wall of the slab room places you inside the Cave Gate, which is visually identical to the Park Gate. Upon exiting to the south, the player will again be on Route 3, now on the opposite side of the row of cones and Shadow/Light Lady. To the southeast is Gate 3, inside which is a tan woman in a bikini that will warp you to Bikini Beach.
Past Park
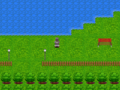
The Past Park is much, much larger and more linear than it's "present" counterpart, though it shares many visual elements with it. Unlike Present Park, it features a faint CRT screen overlay. Many areas here resemble objects or shapes when seen from above, including a Gameboy, a smiley face, and Urotsuki's face.
Entering from the door found east of Present Park's entrance, you are placed in front of a section of tall grass patches arranged like a maze. Though they do not animate when stepped on like in Present Park, they can still be walked over. To the left is a pond very similar to one found at the entrance of Present Park, though the black-dress women have been replaced with lifeless paper cutouts and are joined by a paper Shadow Lady. The path that would have lead back to Gate 3 in Present Park is blocked by cones.
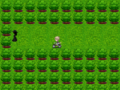
Following the sign pointing right sets you on a path that winds through multiple mazes, including a truly gargantuan hedge maze in the center of the map. Right before its entrance is a door that will take you back to Present Park, right before Present Amethyst Caves.
After successfully traversing the maze, continue south and then east to reach a fenced area with hedges and grass in the shape of a snake from Serpent Ruins A. A solitary green snake stands north of the fence that cannot be interacted with or killed.
Going west instead of east on the path prior leads to a Shadow Lady that will teleport you to an earlier area before the hedge maze when interacted with.
Near the northeast corner of the snake design is a path through the trees that continues rather linearly through most of the remaining areas, including a pond and a much smaller, more straightforward hedge maze. The player will eventually reach a dead end in the form of a squared-off area with patches of tall grass in the shape of a rabbit. Two NPCs are found here: a Shadow Lady who, upon interaction, will teleport you to a dead end to left of the massive hedge maze featuring grass patches in the shape of Urotsuki's face and the words "YUME NIKKI", forcing you to repeat part of the maze, and a Light Lady who will teleport you to the final section of the park. From here is yet another hedge maze, at the end of which is a path to the Past Amethyst Caves.
Past Amethyst Caves
As is the case with the two parks, the Past Amethyst Caves visually resemble their "past" counterpart, but with a layout that is entirely different are far more difficult. Like the Past Park, it features a faint CRT overlay.
Upon entering the caves, the way back will be blocked by a cone. Where the Light Lady would have been in the True Caves, there is instead a harmless paper Shadow Lady. Continuing to the next room, you will be presented with a door that will take you to a roughly equivalent area in the Present Amethyst Caves. If you choose to instead press forward, you will have to complete a vast and complex maze of rooms, some with doorways that lead to looping sections or that send you back to previous areas in the cave. Unlike the Present Amethyst Caves, the Bat effect is not disabled, making it a potentially useful tool when navigating.
After a long journey, you'll eventually reach a room with four doorways in the cardinal directions, almost visually and functionally identical to the four doors room in the Present Amethyst Caves (If you have already completed that Dot Maze, a small white oval will be present here that will warp you to corresponding oval at the end of the Present Caves).
Unlike the Present Caves, using the glasses effect will not help guide you and taking a wrong doorway will place you far back in the cave system. After completing the dot rooms, you will enter a room with four doorways on the northern wall. From left to right, use the second doorway, then return through the same doorway you came and you will find yourself in the Past Caves version of the Stone Slab Room (see Present Amethyst Caves). From here, you can interact with the slab to be taken to Stone Graveyard or head north to the Cave Gate and continue to the end of Route 3.
- 1 dot - Right
- 2 dots - Left
- 3 dots - Right
- 4 dots - Right
- 5 dots - Left
- 6 dots - Right
- 7 dots - Left
- 8 dots - Left
- 9 dots - Up
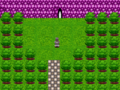
Stone Graveyard
The Stone Graveyard is a small, non-looping world filled with many rows of grungy stones slabs and background resembling a fiery red sun. Re-entering the green door you came from will take you to a corresponding door in Abandoned Campsite, which can now be accessed from that side.
Above the row that contains a clean stone is a grey snake that moves around and can only be seen while the player has Grave effect equipped. Interacting with it will bring you back to stone slab the Present Amethyst Caves.
Directions
- The Nexus → Abandoned Campsite → Pointing Labyrinth → Serpent Ruins A → Mourning Void → Dream Route
After paying 500夢 to the Light Lady in Abandoned Campsite per visit:
- The Nexus → Abandoned Campsite → Mourning Void → Dream Route
Trivia
- Before version 0.123b, on the east side of Gate 2, there used to be two cones and a woman with an orange mask on her face. Interacting with her took Urotsuki to Emotions Maze.
- This version included the addition of Route 3 and its mazes, as well as some NPCs in the Gates and a background for Route 1.
- Many of the walls in the caves feature impassable, invisible blocks accompanied by purple lines on the ground.
Gallery
Route 1.
Gate 1.
Route 2.
Gate 2.
The start of Route 3, where you can fly to the end of Route 3 if you placed a Bat marker there.
This Shadow Lady used to send you back to Mourning Void if you interacted with her and had less than 800,000夢. Now she's paper.

This specific Light Lady must be interacted with to reach another maze.
To the caves.
If you set a Bat marker here, you can fly here from the start of Route 3 and skip the entirety of the park and caves.
Gate 3 and the woman that takes you to the beach.


- 0F6202
- E9FFFA