m (dark bunk) |
m (→Directions: reverting name changes) Tag: Manual revert |
||
| (19 intermediate revisions by 7 users not shown) | |||
| Line 1: | Line 1: | ||
{{Locationbox | {{Locationbox | ||
|headercolor = # | |headercolor = #006060 | ||
|headerfontcolor = # | |headerfontcolor = #B0B1B3 | ||
|image = Lit tile path 01.png | |image = Lit tile path 01.png | ||
|Name = | |Name = 八休, Serene Light Dance, Serene Dancing | ||
|JapaneseName = 無静光踊 | |JapaneseName = 無静光踊 | ||
|Effects = None | |Effects = None | ||
| Line 10: | Line 9: | ||
|Wallpapers = None | |Wallpapers = None | ||
|NPCS = None | |NPCS = None | ||
|Connections = {{Connection|Private Rooms|one_way_type=NoEntry}}, {{Connection|Obstacle Course 2}} | |Connections = {{Connection|Private Rooms|one_way_type=NoEntry}}, {{Connection|Obstacle Course 2||unlock_type=LockedCondition|unlock_conditions=Complete the terminal puzzle.}} | ||
|BGM = samayou無静光踊 | |BGM = {{BGM|title=samayou無静光踊|filename=Lit Tile Path (samayou無静光踊).ogg|label=Lit Version|speed=100}}, {{BGM|title=samayou八休|filename=Lit Tile Path Room (samayou八休).ogg|label=Overgrowth Outlook Room|speed=100}} | ||
|Map ID = 1715, 1719 | |Map ID = 1715, 1719 | ||
|Primary = Yume wo Samayou | |Primary = Yume wo Samayou | ||
|Contributing = | |Contributing = | ||
|VersionAdded = 0.120c patch 5 | |VersionAdded = 0.120c patch 5 | ||
|VersionsUpdated = 0.124g patch 2 | |||
}} | }} | ||
'''Lit Tile Path''' is | '''Lit Tile Path''' is a world accessible from [[Yume 2kki:Private Rooms|Private Rooms]]. | ||
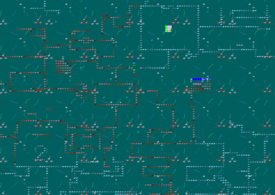
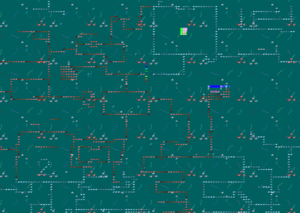
{{LocationMap|filename=Littilepath.png|caption=Map of the Lit Tile Path.}} | |||
==Features== | ==Features== | ||
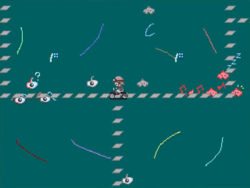
The Lit Tile Path is a large tile maze with many twisting passages. Entering this world through the window in [[Yume 2kki:Private Rooms|Private Rooms]] brings [[Yume 2kki:Urotsuki|Urotsuki]] to the '''unlit''' version of Lit Tile Path, in which the tiles are dull white and gray and the various creatures that can be found here are gray and unanimated. Equipping the [[Yume 2kki:Effects#Eyeball Bomb|Eyeball Bomb]] effect will cause the eye creature near the entrance to take on a happy expression. Going on the path above the entrance and to the right will lead to a colorful looking array of blocks. Trying to walk (or, using the [[Yume 2kki:Effects#Fairy/Yousei|Fairy]] or [[Yume 2kki:Effects#Spacesuit|Spacesuit]] effects, fly) over the gap will cause Urotsuki to be teleported back. The [[Yume 2kki:Effects#Rainbow|Rainbow]] effect, however, will form a rainbow bridge that allows her to walk across the gap. Going left instead brings her to a pink conveyor that will push her to the right, unless flying over it using Fairy or Spacesuit. | |||
Taking the rightmost path from the entrance and then taking a right at the fork, Urotsuki will come across a path marked with two cyan screens on either side. Going up it will lead to a terminal with four deep blue screens which can display arrows by using the yellow buttons underneath them. The arrows can be displayed in any one of the four cardinal directions. Each button and screen are marked by a number, except for the third button from the left, which appears broken. Trying to interact with it will cause Urotsuki to frantically press the button until it combusts. Interacting with it afterwards will cause Urotsuki to say her "can't do that" line. To the left of the terminal is a button that, when pressed, toggles between the '''lit''' and '''unlit''' versions of the world. To the right is a gray keycard reader and a cyan door that leads to [[Yume 2kki:Obstacle Course 2|Obstacle Course 2]] after the puzzle described below has been solved. | |||
To access Obstacle Course 2, Urotsuki must find three gray star creatures scattered throughout the maze, holding up signs with pink numbers on them. Interacting with these stars will change the displayed number into an arrow pointing in one of the four cardinal directions (randomized when the world is first entered). The direction of the arrow corresponds to the number, and the number corresponds to one of the screens on the terminal, meaning the direction of the arrow on the sign and the terminal screen should match. (Ex: If the 2 sign becomes a left arrow, the terminal screen marked with a 2 should display a left arrow.) After inputting every direction into the terminal, the player can check their answer by interacting with the grey keycard reader. The reader will beep 3 times, and if the code is incorrect, a buzzer sound will play. If the code is successful however, it will make a ding noise and the door to [[Yume 2kki:Obstacle Course 2|Obstacle Course 2]] will open. This puzzle will have to be repeated on future visits. | |||
* '''1:''' Above the entrance, make a left away from the rainbow bridge, then make another left before the conveyor to find the star holding sign 1. | |||
* '''2:''' From the entrance, head down, then left at every fork beyond to find the star holding sign 2. | |||
* '''3:''' From the entrance, head down, then left at the first fork, head down at the second fork, down at the third fork and right at the fourth to find the star holding sign 3. | |||
===Lit Version=== | |||
In the '''lit''' version of Lit Tile Path, the gray tiles will flow red and brown, the white tiles will flow white and gray, the gray stars become red, all of the entities begin dancing, and music will start playing. | |||
If the [[Yume 2kki:Snow White Field#The Tunnel|computer lights]] have been unlocked and Lit Tile Path was entered from the [[Yume 2kki:Private Rooms#Rainbow Room|Rainbow Room]] of Private Rooms, it will immediately be in the '''lit''' version, with a couple of differences: | |||
* The button that allows Urotsuki to toggle between both versions of the world will be absent. | |||
* A new path will appear across the rainbow bridge that leads north to a small, somewhat mossy, square-shaped building painted green and pink. | |||
Entering the building accessible from this new path brings Urotsuki out onto the '''Overgrowth Outlook'''. | |||
===Overgrowth Outlook=== | |||
The Overgrown Outlook is a small, guppie green alley of sorts. A girl can be seen laying down on top of the left wall, seemingly growing various fruits from her hair and tending to the roots growing from the hole in the mossy wall. A brick wall with a crack and a hole in it lies in the back of the alley overlooking a sunlit sky, and Urotsuki can jump on top of it using the [[Yume 2kki:Effects#Spring|Spring]] effect. The floor has a large, yellow circle on it. The bottom half of the right wall has white stripes, and the top half has a lot of moss, as well as a window with red curtains on a solid pink wall. From here, Urotsuki can return to the main area by walking downwards, where she entered from. | |||
==Directions== | ==Directions== | ||
Nexus → [[Yume 2kki:Mushroom World|Mushroom World]] → [[Yume 2kki:Bug Maze|Bug Maze]] → [[Yume 2kki:The Hand Hub|The Hand Hub]] → [[Yume 2kki:Shape World|Shape World]] → [[Yume 2kki:Obstacle Course|Obstacle Course | *The Nexus → [[Yume 2kki:Mushroom World|Mushroom World]] → [[Yume 2kki:Bug Maze|Bug Maze]] → [[Yume 2kki:The Hand Hub|The Hand Hub]] → [[Yume 2kki:Shape World|Shape World]] → [[Yume 2kki:Obstacle Course|Obstacle Course]] → [[Yume 2kki:Snow White Field|Snow White Field]] → [[Yume 2kki:Cherryblossom Fields|Cherryblossom Fields]] → [[Yume 2kki:Private Rooms|Private Rooms]] → '''Lit Tile Path''' | ||
After visiting [[Yume 2kki:The Hand Hub|The Hand Hub]] once and unlocking the connection from [[Yume 2kki:Snow White Field|Snow White Field]] to [[Yume 2kki:Shape World|Shape World]]: | |||
*The Nexus → [[Yume 2kki:Urotsuki's Dream Apartments|Urotsuki's Dream Apartments]] → [[Yume 2kki:Simple Street|Simple Street]] → [[Yume 2kki:The Hand Hub|The Hand Hub]] → [[Yume 2kki:Shape World|Shape World]] → [[Yume 2kki:Snow White Field|Snow White Field]] → [[Yume 2kki:Cherryblossom Fields|Cherryblossom Fields]] → [[Yume 2kki:Private Rooms|Private Rooms]] → '''Lit Tile Path''' | |||
OR | OR | ||
*The Nexus → [[Yume 2kki:Clock World|Clock World]] → [[Yume 2kki:Dark Bunker|Dark Bunker]] → [[Yume 2kki:The Hand Hub|The Hand Hub]] → [[Yume 2kki:Shape World|Shape World]] → [[Yume 2kki:Snow White Field|Snow White Field]] → [[Yume 2kki:Cherryblossom Fields|Cherryblossom Fields]] → [[Yume 2kki:Private Rooms|Private Rooms]] → '''Lit Tile Path''' | |||
==Gallery== | ==Gallery== | ||
<gallery> | <gallery> | ||
Lit tile path 02.png|One of the 3 | File:Lit tile path 02.png|One of the 3 numbers, specifically the 3rd one. | ||
Lit tile path 03.png| | File:Lit tile path 03.png|Why isn't this working!? | ||
Lit tile path 04.png| | File:ULLTP 01.png|The party button! | ||
File:Lit tile path 04.png|Look how happy it is! | |||
File:LLTP 01.png|Lit Tile Path, now living up to its name! | |||
File:LLTP 02.png|Block of House | |||
File:Lit Tile Green Room.png|alt=A very green alley.|Getting here is quite the accomplishment! | |||
</gallery> | </gallery> | ||
[[Category:Yume 2kki In Development]] | [[Category:Yume 2kki In Development]] | ||
Revision as of 05:43, 15 December 2024
| Lit Tile Path | |
|---|---|

| |
| Basic Info | |
| Japanese Name(s) |
無静光踊 |
| Effects | None |
| Events | None |
| Notable NPCs | None |
| Other | |
| Connecting Areas | Private Rooms ⛔ Obstacle Course 2 🔐 |
| BGM | 🔊 samayou無静光踊 – Lit Version 🔊 samayou八休 – Overgrowth Outlook Room |
| Map ID | 1715, 1719 |
| Version Added | 0.120c patch 5 |
| Last Updated | 0.124g patch 2 |
| Author | Yume wo Samayou |
Lit Tile Path is a world accessible from Private Rooms.
Features
The Lit Tile Path is a large tile maze with many twisting passages. Entering this world through the window in Private Rooms brings Urotsuki to the unlit version of Lit Tile Path, in which the tiles are dull white and gray and the various creatures that can be found here are gray and unanimated. Equipping the Eyeball Bomb effect will cause the eye creature near the entrance to take on a happy expression. Going on the path above the entrance and to the right will lead to a colorful looking array of blocks. Trying to walk (or, using the Fairy or Spacesuit effects, fly) over the gap will cause Urotsuki to be teleported back. The Rainbow effect, however, will form a rainbow bridge that allows her to walk across the gap. Going left instead brings her to a pink conveyor that will push her to the right, unless flying over it using Fairy or Spacesuit.
Taking the rightmost path from the entrance and then taking a right at the fork, Urotsuki will come across a path marked with two cyan screens on either side. Going up it will lead to a terminal with four deep blue screens which can display arrows by using the yellow buttons underneath them. The arrows can be displayed in any one of the four cardinal directions. Each button and screen are marked by a number, except for the third button from the left, which appears broken. Trying to interact with it will cause Urotsuki to frantically press the button until it combusts. Interacting with it afterwards will cause Urotsuki to say her "can't do that" line. To the left of the terminal is a button that, when pressed, toggles between the lit and unlit versions of the world. To the right is a gray keycard reader and a cyan door that leads to Obstacle Course 2 after the puzzle described below has been solved.
To access Obstacle Course 2, Urotsuki must find three gray star creatures scattered throughout the maze, holding up signs with pink numbers on them. Interacting with these stars will change the displayed number into an arrow pointing in one of the four cardinal directions (randomized when the world is first entered). The direction of the arrow corresponds to the number, and the number corresponds to one of the screens on the terminal, meaning the direction of the arrow on the sign and the terminal screen should match. (Ex: If the 2 sign becomes a left arrow, the terminal screen marked with a 2 should display a left arrow.) After inputting every direction into the terminal, the player can check their answer by interacting with the grey keycard reader. The reader will beep 3 times, and if the code is incorrect, a buzzer sound will play. If the code is successful however, it will make a ding noise and the door to Obstacle Course 2 will open. This puzzle will have to be repeated on future visits.
- 1: Above the entrance, make a left away from the rainbow bridge, then make another left before the conveyor to find the star holding sign 1.
- 2: From the entrance, head down, then left at every fork beyond to find the star holding sign 2.
- 3: From the entrance, head down, then left at the first fork, head down at the second fork, down at the third fork and right at the fourth to find the star holding sign 3.
Lit Version
In the lit version of Lit Tile Path, the gray tiles will flow red and brown, the white tiles will flow white and gray, the gray stars become red, all of the entities begin dancing, and music will start playing.
If the computer lights have been unlocked and Lit Tile Path was entered from the Rainbow Room of Private Rooms, it will immediately be in the lit version, with a couple of differences:
- The button that allows Urotsuki to toggle between both versions of the world will be absent.
- A new path will appear across the rainbow bridge that leads north to a small, somewhat mossy, square-shaped building painted green and pink.
Entering the building accessible from this new path brings Urotsuki out onto the Overgrowth Outlook.
Overgrowth Outlook
The Overgrown Outlook is a small, guppie green alley of sorts. A girl can be seen laying down on top of the left wall, seemingly growing various fruits from her hair and tending to the roots growing from the hole in the mossy wall. A brick wall with a crack and a hole in it lies in the back of the alley overlooking a sunlit sky, and Urotsuki can jump on top of it using the Spring effect. The floor has a large, yellow circle on it. The bottom half of the right wall has white stripes, and the top half has a lot of moss, as well as a window with red curtains on a solid pink wall. From here, Urotsuki can return to the main area by walking downwards, where she entered from.
Directions
- The Nexus → Mushroom World → Bug Maze → The Hand Hub → Shape World → Obstacle Course → Snow White Field → Cherryblossom Fields → Private Rooms → Lit Tile Path
After visiting The Hand Hub once and unlocking the connection from Snow White Field to Shape World:
- The Nexus → Urotsuki's Dream Apartments → Simple Street → The Hand Hub → Shape World → Snow White Field → Cherryblossom Fields → Private Rooms → Lit Tile Path
OR
- The Nexus → Clock World → Dark Bunker → The Hand Hub → Shape World → Snow White Field → Cherryblossom Fields → Private Rooms → Lit Tile Path
Gallery
- 006060
- B0B1B3


