(Created page with "{{Locationbox |headercolor = #000063 |headerfontcolor = #00FFFF |image = shape_world.png |Name = 図形 |JapaneseName = 図形 |Effects = None |Events = None |Wallpapers = Non...") |
m (Moved Yume kanji to be next to amount for consistency) |
||
| (20 intermediate revisions by 11 users not shown) | |||
| Line 1: | Line 1: | ||
{{Locationbox | {{Locationbox | ||
|headercolor = # | |headercolor = #A8A8FF | ||
|headerfontcolor = # | |headerfontcolor = #ffffff | ||
|image = shape_world.png | |image = shape_world.png | ||
|Name = | |Name = | ||
|JapaneseName = 図形 | |JapaneseName = 図形 | ||
|Effects = None | |Effects = None | ||
|Events = None | |Events = None | ||
|Wallpapers = | |Wallpapers = WP #796 | ||
|NPCS = None | |NPCS = None | ||
|Connections = | |Connections = {{Connection|The Hand Hub}}, {{Connection|Obstacle Course}}, {{Connection|Snow White Field|unlock_type=Locked}} | ||
|BGM = samayou図形 | |BGM = {{BGM|title=samayou図形|filename=Shape_World_(samayou図形).ogg|speed=100}}, {{BGM|title=samayou図形家|filename=Shape_World_House_(samayou図形家).ogg|label=House|speed=100}} | ||
|Map ID = | |Map ID = 1702, 1703 | ||
|Primary = | |Primary = Yume wo Samayou | ||
|VersionAdded= 0.117i | |VersionAdded = 0.117i | ||
|VersionsUpdated = 0.118a--,0.118b--,0.118c patch 1-b | |||
}} | }} | ||
'''Shape World''' is an area accessible from the glyph in the lower section of [[Yume 2kki:The Hand Hub|The Hand Hub]]. | |||
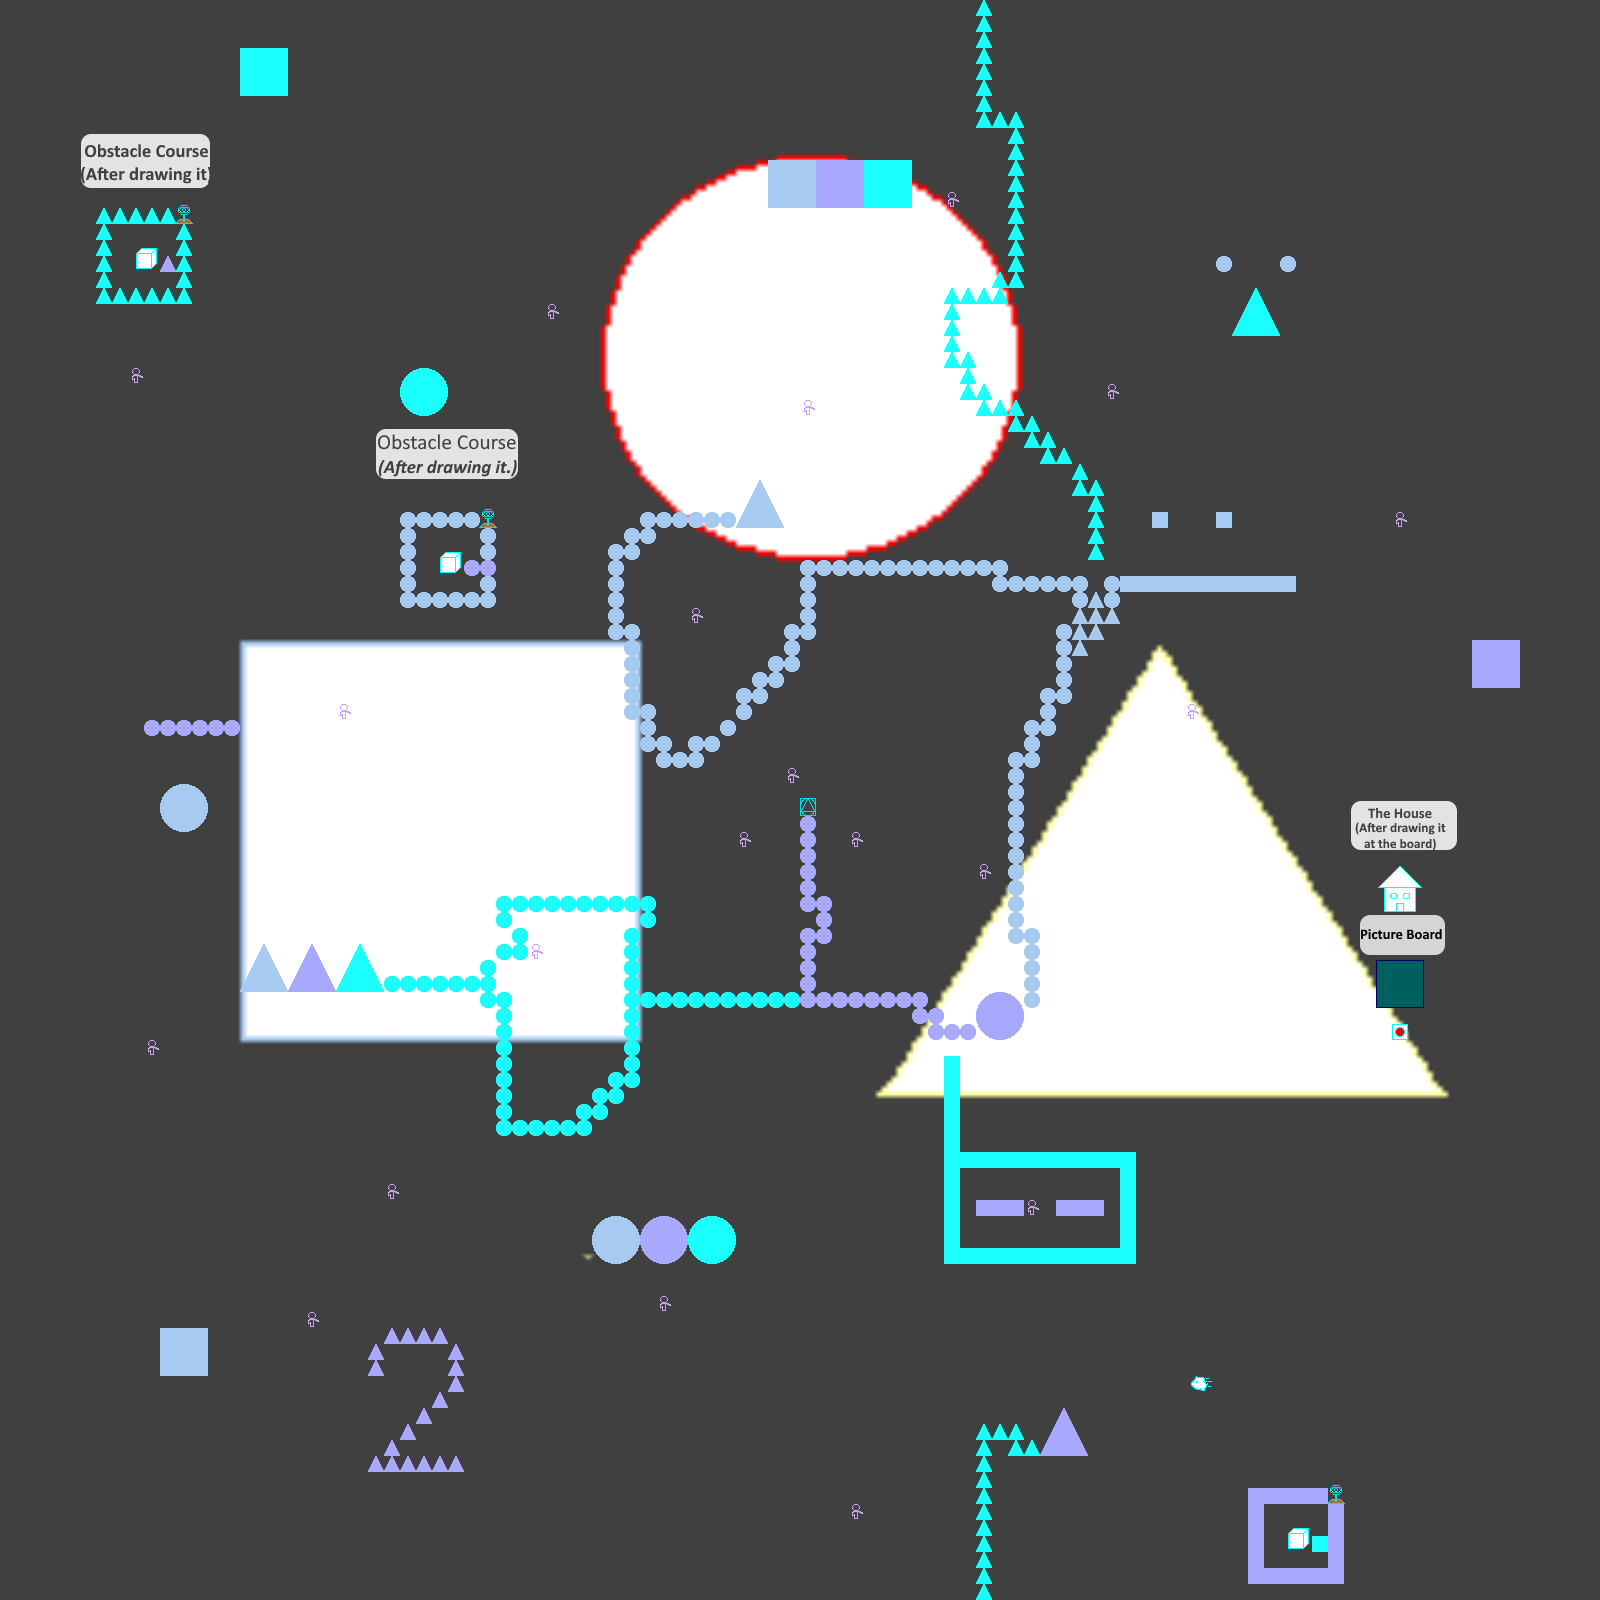
{{LocationMap|filename=shapeworldmap.png|caption=Annotated map of Shape World.}} | |||
==Features== | ==Features== | ||
Shape World is an area filled with pathways formed by circles, squares, and triangles of differing sizes, with said shapes being part of the panorama. Small humanoid outlines waving their right arms populate the area, as well as a living cloud that flies by on occasion. | Shape World is an area filled with pathways formed by circles, squares, and triangles of differing sizes, with said shapes being part of the panorama. Small humanoid outlines waving their right arms populate the area, as well as a living cloud that flies by on occasion. | ||
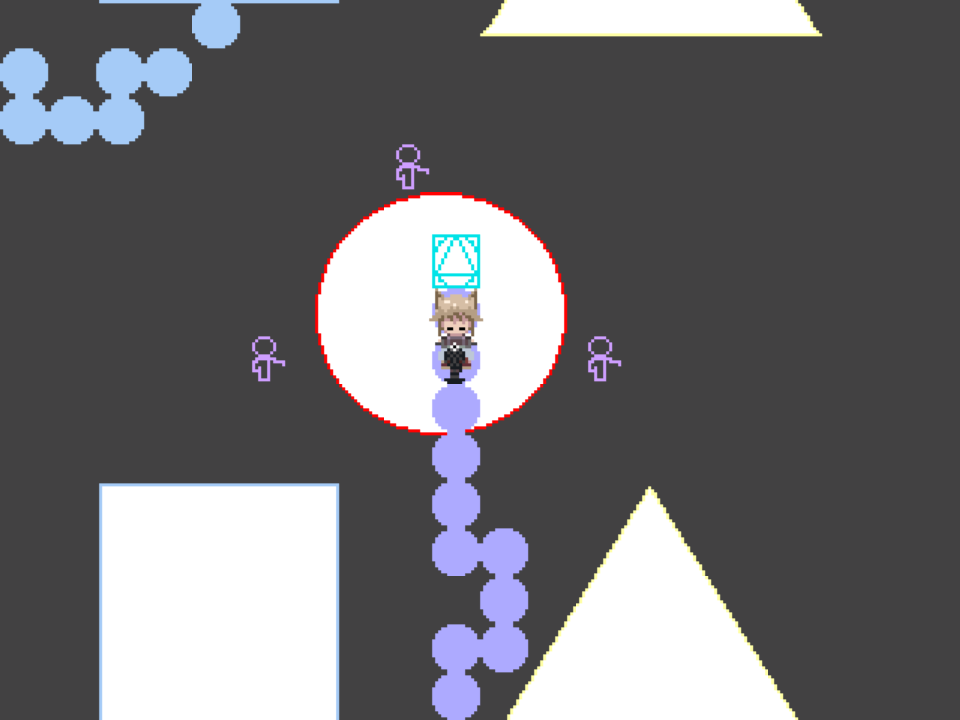
Following the path of gray circles from the entrance until you hit the larger circle, then going east from there, you can find a board next to a switch. Interacting with the board as you step on it will change its content, where you can form a house or a schematic which shows you a path to follow. By forming the house and interacting with the switch below the board, a similar house will appear above the board. Entering it takes you to a small house inhabited by a child with blue-green hair, alongside a table, some toys, and an outline of a gnome. Interacting with this gnome with the [[Effects#Child|Child]] effect equipped gives you 1000 [[Money|夢]]. | Following the path of gray circles from the entrance until you hit the larger circle, then going east from there, you can find a board next to a switch. Interacting with the board as you step on it will change its content, where you can form a house or a schematic which shows you a path to follow. By forming the house and interacting with the switch below the board, a similar house will appear above the board. Entering it takes you to a small house inhabited by a child with blue-green hair, alongside a table, some toys, and (sometimes) an outline of a gnome. Interacting with this gnome with the [[Yume 2kki:Effects#Child|Child]] effect equipped gives you 1000[[Yume 2kki:Money|夢]]. The money can be obtained multiple times per dream, each time the gnome appears in the house. If the gnome isn't present, one can repeatedly re-enter the house until it appears (chances of it appearing are roughly 1/6). | ||
If you form the schematic with the board instead of the house, you will notice that it directs you to follow a path to a cube. Three similar patterns exist in this area, | If you form the schematic with the board instead of the house, you will notice that it directs you to follow a path to a cube. Three similar patterns exist in this area, and which one will work during your current visit depends on the shape surrounding the cycloptic creature that the arrow originates from. If the shape is a square, for example, you need to locate the pattern found southeast of the entrance, where the cube can be seen inside a pattern of squares. If the shape is a circle or a triangle, however, the corresponding patterns can be found northwest of the entrance. After pressing the switch while the schematic is on the board and finding the correct pattern, follow the path as shown by the board. Doing this takes you to the [[Yume 2kki:Obstacle Course|Obstacle Course]]. | ||
== | ==Directions== | ||
The | *The Nexus → [[Yume 2kki:Mushroom World|Mushroom World]] → [[Yume 2kki:Bug Maze|Bug Maze]] → [[Yume 2kki:The Hand Hub|The Hand Hub]] → '''Shape World''' | ||
After visiting [[Yume 2kki:The Hand Hub|The Hand Hub]] once: | |||
Nexus → [[ | *The Nexus → [[Yume 2kki:Urotsuki's Dream Apartments|Urotsuki's Dream Apartments]] → [[Yume 2kki:Simple Street|Simple Street]] → [[Yume 2kki:The Hand Hub|The Hand Hub]] → '''Shape World''' | ||
==Gallery== | ==Gallery== | ||
<gallery> | <gallery> | ||
shape_world_board.png | shape_world_board.png | ||
shape_world_board_path.png | |||
shape_world_board_house.png | shape_world_board_house.png | ||
shape_world_kid.png | |||
shape_world_house.png | shape_world_house.png | ||
shape_world_gnome.png | shape_world_gnome.png | ||
</gallery> | </gallery> | ||
Latest revision as of 01:12, 18 August 2024
| Shape World | |
|---|---|

| |
| Basic Info | |
| Japanese Name(s) |
図形 |
| Effects | None |
| Collectibles |
WP #796 |
| Events | None |
| Notable NPCs | None |
| Other | |
| Connecting Areas | The Hand Hub Obstacle Course Snow White Field 🔒 |
| BGM | 🔊 samayou図形 🔊 samayou図形家 – House |
| Map ID | 1702, 1703 |
| Version Added | 0.117i |
| Last Updated | 0.118c patch 1 |
| Author | Yume wo Samayou |
Shape World is an area accessible from the glyph in the lower section of The Hand Hub.

Features
Shape World is an area filled with pathways formed by circles, squares, and triangles of differing sizes, with said shapes being part of the panorama. Small humanoid outlines waving their right arms populate the area, as well as a living cloud that flies by on occasion.
Following the path of gray circles from the entrance until you hit the larger circle, then going east from there, you can find a board next to a switch. Interacting with the board as you step on it will change its content, where you can form a house or a schematic which shows you a path to follow. By forming the house and interacting with the switch below the board, a similar house will appear above the board. Entering it takes you to a small house inhabited by a child with blue-green hair, alongside a table, some toys, and (sometimes) an outline of a gnome. Interacting with this gnome with the Child effect equipped gives you 1000夢. The money can be obtained multiple times per dream, each time the gnome appears in the house. If the gnome isn't present, one can repeatedly re-enter the house until it appears (chances of it appearing are roughly 1/6).
If you form the schematic with the board instead of the house, you will notice that it directs you to follow a path to a cube. Three similar patterns exist in this area, and which one will work during your current visit depends on the shape surrounding the cycloptic creature that the arrow originates from. If the shape is a square, for example, you need to locate the pattern found southeast of the entrance, where the cube can be seen inside a pattern of squares. If the shape is a circle or a triangle, however, the corresponding patterns can be found northwest of the entrance. After pressing the switch while the schematic is on the board and finding the correct pattern, follow the path as shown by the board. Doing this takes you to the Obstacle Course.
Directions
- The Nexus → Mushroom World → Bug Maze → The Hand Hub → Shape World
After visiting The Hand Hub once:
- The Nexus → Urotsuki's Dream Apartments → Simple Street → The Hand Hub → Shape World
Gallery


- A8A8FF
- ffffff