| Subterranean Research Center | |||||||||||
|---|---|---|---|---|---|---|---|---|---|---|---|

| |||||||||||
| Basic Info | |||||||||||
| Japanese Name(s) |
夢研究所 | ||||||||||
| Effects | None | ||||||||||
| Events | None | ||||||||||
| Notable NPCs | Shadow Gloop | ||||||||||
| Other | |||||||||||
| Connecting Areas | Hollows Spear Tribe World Rainbow Towers ✨ | ||||||||||
| BGM | 🔊 ヴォー (No. 195B) | ||||||||||
| Map ID | 1652 | ||||||||||
| Version Added | 0.117c | ||||||||||
| Last Updated | 0.123g patch 1 | ||||||||||
| Author | Horatsuki | ||||||||||
| |||||||||||
Subterranean Research Center is an area accessible from the lower section of the Hollows.
Features
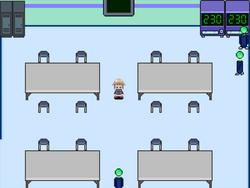
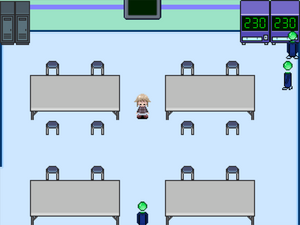
This area is a laboratory with light-blue walls and floors, and mechanical doors leading to different facilities. Inhabiting it are suited humanoid creatures with green lights for heads which turn red when the Chainsaw is brandished, or stare at her when the Marginal effect is equipped. They will stop in response to the Crossing effect. The main corridor's structure consists of a western, eastern, and southern section, where the southern section has a door leading to Spear Tribe World.
West Section
The first door in this area leads to a laboratory inhabited by a creature with a green orb for a head and a robot. In this laboratory, one can find empty glass tubes, a table with two small computers, and a machine connected to a sort of platform with a Teleport Rune atop. With the Spring, you can hop onto the platform and interact with it, where it will then lead you to the Rainbow Towers.
Further down this hall is a heavy hazard door which, when opened, leads to a small room with two large, glass tubes filled with a green-blue substance, and a computer stationed in front of a view port containing an egg. The computer cannot be used, as Urotsuki says one of her "I can't do that" lines when attempting to interact with it. The DNA screen on the upper right corner of the room suggests that there is some sort of genetic experiment taking place. If Urotsuki equips the Chainsaw in this room, a blaring alarm will sound, and she will be forced to unequip it. The Child effect will cause the mysterious egg to change appearance.
At the end of the west corridor leads to a north passage with a door that leads the player into a room with a computer, a large screen with a smiling face, and a terminal just right of it that gives insight to its emotions. By using the computer, you can power the face's screen on and off. Chainsawing the terminal will cause the computer to crash and display a 'no signal' screen until the next wakeup.
The face reacts to a variety of effects:
- Chainsaw, Eyeball Bomb: The face will wear a worried expression with streaks displayed in the terminal.
- Crossing: The terminal reads "..." when this effect is activated.
- Drum: It appears to flinch in surprise when Urotsuki slams the drum.
- Marginal: The face appears angry or disappointed, with grumpy scribbles on its terminal.
- Twintails, Penguin, Bunny Ears: It will become ecstatic, with a heart on the terminal.
- Invisible: Upon using the effect to make Urotsuki vanish, face will appear confused, with a question mark on the terminal.
- Trombone, Telephone: The face appears surprised when the trombone is played or the phone is ringing, with an exclamation mark on the terminal.
- Cake: The face will drool, with a heart on its terminal.
- Wolf: The face will change to that of a blushing Seanut's, with a heart on the terminal screen, similar to how the real Seanut reacts to Urotsuki equipping this effect.
- Polygon: Perhaps the most interesting of the bunch, the face disappears entirely, and instead a green hologram of Urotsuki will appear and wander around the room in its place. This holographic doppelganger will beep when interacted with. When the effect is used, the hologram becomes momentarily opaque.
East Section
The tall, thin door leads to a sort of storage room containing cabinets, lockers, stools, barrels, shelves stocked with items, and a single, small computer. There is otherwise nothing of note here.
A small, circular panel can be found at the right of this door, which can be used to identify the current in-game season.
The next door is another laboratory area with several glass tubes encasing several creatures, including a horned sheep, a tapir, and an imprisoned Shadow Gloop chaser. There is a small chance the Gloop may escape and begin chasing the player.
At the end of this corridor lies a large cafeteria or break area with two vending machines that dispense products for 230 Yume (夢), rather than the standard price of 100. The rightmost vending machine cannot be used unless Urotsuki chainsaws the green headed creature occupying it.
South Section
The bottom-most entryway of this area leads to the Spear Tribe World, and the door near to it leads to yet another small laboratory area with two wide, glass tubes. One of these tubes has a pasted "X" over it, obscuring something that the player cannot see aside from yellow strings. There is an operating or examination table hooked up to a strange machine in the room below a small monitor displaying a number based on your current Variable #44 value.
Directions
- The Nexus → Clock World → Dark Bunker → Spear Tribe World → Subterranean Research Center
With the Fairy, Child, Grave, or Dice effect:
- The Nexus → Rock World → Entomophobia Realm → Hollows → Subterranean Research Center
Trivia
- The monitor at the southern section used to display a 0 instead of a number based on your current Variable #44 value, but due to an error with the programming of the event, the monitor didn't show the changes. This was fixed in version 0.123b patch 4.
- Before version 0.123g patch 1, the suited creatures were immune to the effects of the Crossing effect.
Gallery
- 60C7FF
- 000064


