mNo edit summary |
m (→Features) |
||
| Line 20: | Line 20: | ||
==Features== | ==Features== | ||
This is a large tile maze with many twisting passages. Taking the rightmost path from the entrance and then taking a right at the fork, you'll come across a path marked with two blue checkered flags on either side. Going up it will lead you to a terminal with four blue screens which you can toggle between arrows by the button underneath each corresponding screen. Trying to interact with the 3rd button's screen will cause Urotsuki to frantically press the button until it combusts. Interacting with it afterwards will cause Urotsuki to say her "can't do that" line. To the right of the is a grey keycard reader and a blue creature with cyan ears sticking out of the ground. | This is a large tile maze with many twisting passages. Taking the rightmost path from the entrance and then taking a right at the fork, you'll come across a path marked with two blue checkered flags on either side. Going up it will lead you to a terminal with four blue screens which you can toggle between arrows by the button underneath each corresponding screen. Trying to interact with the 3rd button's screen from the left will cause Urotsuki to frantically press the button until it combusts. Interacting with it afterwards will cause Urotsuki to say her "can't do that" line. To the right of the is a grey keycard reader and a blue creature with cyan ears sticking out of the ground. | ||
You must find 3 purple numbers scattered throughout the maze held up by gray creatures and get their corresponding arrow and input it into the terminal. These arrows are random each time you enter this world. The catch being the last screen from the | '''Terminal Puzzle''' | ||
You must find 3 purple numbers scattered throughout the maze held up by gray creatures and get their corresponding arrow and input it into the terminal. These arrows are random each time you enter this world. The catch being the last screen from the left being input #3. Once done, you have to check your answer using the grey keycard reader. If it is wrong, a buzzing noise will play after the 3rd beep the reader makes. If successful however, it will make a ding noise and you can interact with the blue creature to enter [[Yume 2kki:Obstacle Course 2|Obstacle Course 2]], permanently unlocking the connection without needing to do the puzzle again. | |||
1: From the beginning, head right and up above the rectangle roundabout and head for the leftmost paths to find the number. | 1: From the beginning, head right and up above the rectangle roundabout and head for the leftmost paths to find the number. | ||
| Line 37: | Line 38: | ||
==Directions== | ==Directions== | ||
Nexus → [[Yume 2kki:Mushroom World|Mushroom World]] → [[Yume 2kki:Bug Maze|Bug Maze]] → [[Yume 2kki:The Hand Hub|The Hand Hub]] → [[Yume 2kki:Shape World|Shape World]] → [[Yume 2kki:Obstacle Course|Obstacle Course]] → [[Yume 2kki:Snow White Field|Snow White Field]] → [[Yume 2kki:Cherryblossom Fields|Cherryblossom Fields]] → [[Yume 2kki:Private Rooms|Private Rooms]] → '''Lit Tile Path''' | Nexus → [[Yume 2kki:Mushroom World|Mushroom World]] → [[Yume 2kki:Bug Maze|Bug Maze]] → [[Yume 2kki:The Hand Hub|The Hand Hub]] → [[Yume 2kki:Shape World|Shape World]] → [[Yume 2kki:Obstacle Course|Obstacle Course]] → [[Yume 2kki:Snow White Field|Snow White Field]] → [[Yume 2kki:Cherryblossom Fields|Cherryblossom Fields]] → [[Yume 2kki:Private Rooms|Private Rooms]] → '''Lit Tile Path''' | ||
Nexus → [[Yume 2kki:Urotsuki's Dream Apartments|Urotsuki's Dream Apartments]] → [[Yume 2kki:Simple Street|Simple Street]] → [[Yume 2kki:The Hand Hub|The Hand Hub]] → [[Yume 2kki:Shape World|Shape World]] → [[Yume 2kki:Snow White Field|Snow White Field]] →[[Yume 2kki:Cherryblossom Fields|Cherryblossom Fields]] → [[Yume 2kki:Private Rooms|Private Rooms]] → '''Lit Tile Path''' | |||
After visiting [[Yume 2kki:The Hand Hub|The Hand Hub]] once And Unlocking the Connection From [[Yume 2kki:Snow White Field|Snow White Field]] To [[Yume 2kki:Shape World|Shape World]]: | |||
* Nexus → [[Yume 2kki:Urotsuki's Dream Apartments|Urotsuki's Dream Apartments]] → [[Yume 2kki:Simple Street|Simple Street]] → [[Yume 2kki:The Hand Hub|The Hand Hub]] → [[Yume 2kki:Shape World|Shape World]] → [[Yume 2kki:Snow White Field|Snow White Field]] → [[Yume 2kki:Cherryblossom Fields|Cherryblossom Fields]] → [[Yume 2kki:Private Rooms|Private Rooms]] → '''Lit Tile Path''' | |||
OR | OR | ||
Nexus → [[Yume 2kki:Red Streetlight World|Red Streetlight World]] → [[Yume 2kki:Dark Bunker|Dark Bunker]] → [[Yume 2kki:The Hand Hub|The Hand Hub]] → [[Yume 2kki:Shape World|Shape World]] → [[Yume 2kki:Snow White Field|Snow White Field]] →[[Yume 2kki:Cherryblossom Fields|Cherryblossom Fields]] → [[Yume 2kki:Private Rooms|Private Rooms]] → '''Lit Tile Path''' | * Nexus → [[Yume 2kki:Red Streetlight World|Red Streetlight World]] → [[Yume 2kki:Dark Bunker|Dark Bunker]] → [[Yume 2kki:The Hand Hub|The Hand Hub]] → [[Yume 2kki:Shape World|Shape World]] → [[Yume 2kki:Snow White Field|Snow White Field]] → [[Yume 2kki:Cherryblossom Fields|Cherryblossom Fields]] → [[Yume 2kki:Private Rooms|Private Rooms]] → '''Lit Tile Path''' | ||
==Gallery== | ==Gallery== | ||
<gallery> | <gallery> | ||
Lit tile path 02.png|One of the 3 | File:Lit tile path 02.png|One of the 3 numbers, specifically the 3rd one. | ||
Lit tile path 03.png|After marking the arrows at their respective spots in the terminal from left to right and checking at the right reader, you can access Obstacle Course 2 from the blue creature. | File:Lit tile path 03.png|After marking the arrows at their respective spots in the terminal from left to right and checking at the right reader, you can access Obstacle Course 2 from the blue creature. | ||
Lit tile path 04.png|Bomb eye | File:Lit tile path 04.png|Bomb eye | ||
</gallery> | </gallery> | ||
[[Category:Yume 2kki Locations]] | [[Category:Yume 2kki Locations]] | ||
[[Category:Yume wo Samayou]] | [[Category:Yume wo Samayou]] | ||
[[Category:Yume 2kki In Development]] | [[Category:Yume 2kki In Development]] | ||
Revision as of 21:13, 12 August 2023
| This article is a stub. You can help YumeWiki by expanding it. Details: Add more info in features, also subarea MAP1719 (八休)? |
| Lit Tile Path | |
|---|---|

| |
| Basic Info | |
| Japanese Name(s) |
無静光踊 |
| Effects | None |
| Events | None |
| Notable NPCs | None |
| Other | |
| Connecting Areas | Private Rooms ⛔ Obstacle Course 2 |
| BGM | samayou無静光踊 |
| Map ID | 1715, 1719 |
| Version Added | 0.120c patch 5 |
| Author | Yume wo Samayou |
Lit Tile Path is an area accessible from Private Rooms.
Features
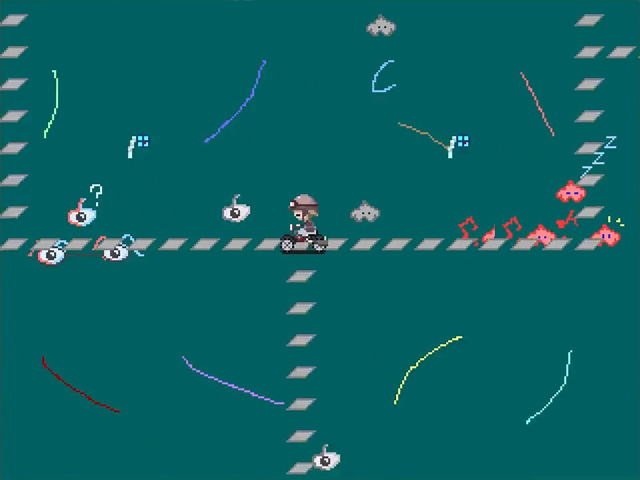
This is a large tile maze with many twisting passages. Taking the rightmost path from the entrance and then taking a right at the fork, you'll come across a path marked with two blue checkered flags on either side. Going up it will lead you to a terminal with four blue screens which you can toggle between arrows by the button underneath each corresponding screen. Trying to interact with the 3rd button's screen from the left will cause Urotsuki to frantically press the button until it combusts. Interacting with it afterwards will cause Urotsuki to say her "can't do that" line. To the right of the is a grey keycard reader and a blue creature with cyan ears sticking out of the ground.
Terminal Puzzle
You must find 3 purple numbers scattered throughout the maze held up by gray creatures and get their corresponding arrow and input it into the terminal. These arrows are random each time you enter this world. The catch being the last screen from the left being input #3. Once done, you have to check your answer using the grey keycard reader. If it is wrong, a buzzing noise will play after the 3rd beep the reader makes. If successful however, it will make a ding noise and you can interact with the blue creature to enter Obstacle Course 2, permanently unlocking the connection without needing to do the puzzle again.
1: From the beginning, head right and up above the rectangle roundabout and head for the leftmost paths to find the number.
2: From the start of the control room path, head on the rightmost paths at the fork until you come up to a fork where the right path goes to the greyer tiles. Head left and the number will lay at the end of this path.
3: From the beginning, head down, left, down, keep going down and right to the number at their respective path forks (not including the forks which paths end quickly) to find the number at the end of a curly path.
Interact with the number to see its corresponding arrow. The terminal's screens cycles through up, right, down and left and no arrow.
Directions
Nexus → Mushroom World → Bug Maze → The Hand Hub → Shape World → Obstacle Course → Snow White Field → Cherryblossom Fields → Private Rooms → Lit Tile Path
After visiting The Hand Hub once And Unlocking the Connection From Snow White Field To Shape World:
- Nexus → Urotsuki's Dream Apartments → Simple Street → The Hand Hub → Shape World → Snow White Field → Cherryblossom Fields → Private Rooms → Lit Tile Path
OR
- Nexus → Red Streetlight World → Dark Bunker → The Hand Hub → Shape World → Snow White Field → Cherryblossom Fields → Private Rooms → Lit Tile Path
Gallery
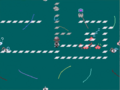
One of the 3 numbers, specifically the 3rd one.
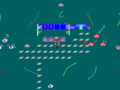
After marking the arrows at their respective spots in the terminal from left to right and checking at the right reader, you can access Obstacle Course 2 from the blue creature.
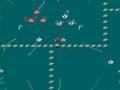
Bomb eye


- af875f
- ffffff