| Forest Pier | |||||||||||||
|---|---|---|---|---|---|---|---|---|---|---|---|---|---|

| |||||||||||||
| Basic Info | |||||||||||||
| Japanese Name(s) |
桟橋の森 | ||||||||||||
| Effects | None | ||||||||||||
| Collectibles |
WP #204 | ||||||||||||
| Events | None | ||||||||||||
| Notable NPCs | Forest Guardian and Bugger, Sad Jellyfish, The Neon Pier Creatures | ||||||||||||
| Other | |||||||||||||
| Connecting Areas | Cog Maze ⛔ Urotsuki's Dream Apartments ⛔ Abandoned Factory ➡️ Hidden Shoal 🔐 ✨ | ||||||||||||
| BGM | 🔊 n3-ELP (No. 168F) 🔊 n3-NaT – The Ford 🔊 bgm008 – Entrance from Urotsuki's Dream Apartments (No. 235G) | ||||||||||||
| Map ID | 0512, 0521, 0522, 0523, 0524, 0563 | ||||||||||||
| Version Added | 0.100a | ||||||||||||
| Author | wataru | ||||||||||||
| |||||||||||||

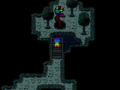
The Forest Pier is an area accessible from the dented screw in the Cog Maze.

Features
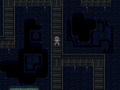
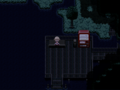
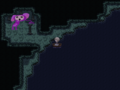
The Forest Pier is a large, dark, heavily forested area filled with lakes and boardwalks. It resembles Yume Nikki's Witch's Island. There are twisting pathways hidden among the trees.
There are many NPCs in this area that change appearance in response to certain effects.
Northern area
The entrance from the Cog Maze is in the northern part of the map. Here there are paths branching to the west and south.
The southern route has one hidden detour near the bend that leads to a dead-end with a single tree. The main path ultimately leads to a small pond with a neon heart-faced NPC swimming around. Equipping the Marginal effect will show its true form — red and black with bright green eyes. A hidden path in this clearing wraps around to the manhole on the other side.
The western route is longer and ultimately leads to the next part of the Forest Pier, though there are some minor detours along the way. The first is a branching path to the north; this leads to a closed-off lake area with a few bridges and a solitary streetlamp. Continuing across the bridges in this clearing will take the player to a large unpassable stone. Equipping the Chainsaw effect here reveals the Sad Jellyfish floating nearby.
The next detour on the western route is a short pier to the north extending over a pond. On the other side of the pond is an open manhole with a large tentacle creature coming out of it. Its face becomes rainbow if the Rainbow effect is used, and it wilts slightly if the Chainsaw is equipped or the Wolf effect is used.
Following the path around the corner and south will take you past a stone tower, over a bridge and finally to a seemingly dead-end in the forest, where a hidden path through the trees above leads to the Boardwalks.
Boardwalks
Here there is a snaking series of boardwalks extending over a large body of water. The boardwalks lead south and then split over the lake the path splits off to the southeast, northwest, and west.
The southeast path leads to a dark clearing with a winged statue entity. However, you cannot interact with it from this side.
The northwest path leads to a clearing inhabited by a giant dancing creature somewhat resembling Yume Nikki's Mizume. Equipping the Chainsaw effect makes it move faster, though it cannot be chainsawed. A hidden path allows access to another streetlamp here in the top-left, which can be turned on and off.
Along the western path is a neon creature moving around in the water. Equipping the Glasses effect will turn him black and white and make his face disappear. Using the Marginal effect will do the same with the colors inverted.
A path going north here leads to a stone gate with three eyes on it. This is where you will appear if you enter from the unlocked shortcut in Urotsuki's Dream Apartments.
Further west the boardwalk begins to twist around and branch off. The first southern path here leads to a dead-end with a lone bench. The second is more obscured and leads to the Southern Area, while making way through the bridges going north leads to the Northern Boat Area.
Southern Area
As you enter from the north, the boardwalk angles eastward and leads to a small shoreline. A neon butterfly-looking creature can be seen in the water to the left here. Equipping the Marginal effect will make it turn into a tentacled eyeball, and the Bug effect will turn it into a human-like blob. Flapping your wings with the Bug effect will make it change color.
There is actually a branching path; hugging the shoreline to the north, just after you get off the boardwalk leads, to a series of obscure pathways beneath the canopy (highlighted on this page's map in yellow-orange and red-orange). Eventually along this trail you will find a tribal stone gateway. Going through it and continuing along the hidden paths leads back to the clearing with the winged statue entity. From this side, you will be able to hit it with the chainsaw, causing the red creature surrounding it to disappear. Doing this unlocks the entrance to the Hidden Shoal.
You can also continue east instead of taking the hidden northern path. This route continues onto another boardwalk and passes underneath the aforementioned stone gate.
A green NPC wading in the water along this route reacts to many effects. If you equip the Wolf, Twintails, Penguin, or Bunny Ears effects, it follows alongside you in the water. It moves away if the Chainsaw is equipped and freezes in place with the Marginal effect. Using the Invisible effect will give it a glitchy appearance.
The boardwalk is broken here, and you will need the Fairy or Spacesuit effect to cross to the other side and head to the Southern Boat Area.
Southern Boat Area
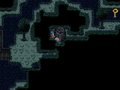
The transition lets out next to a dock with a boat on a dead-end island, almost completely obscured by tree canopy. You can ride in the boat through a passage to the northeast of the dock, continuing down to the south upon reaching a small section of bridge poking out of the trees.
This leads you through two ends of a broken bridge and down a long river, passing some odd black sludge when the river bends back up to the north, and eventually leading out into a large lake. You can continue through a game on the western side of this lake or dock at a pier on the eastern side with a bench and an over-sized vending machine.
Continuing west via boat leads to an even larger, circular laek with a black monolith in the center. Provided you have chainsawed the winged statue at least once, interacting with the monolith will fade the screen to black and teleport you to the Hidden Shoal.
If you instead dock at the pier, you'll find the vending machine here is similar to the one in the Travel Hotel; it grants Urotsuki a physical soda can which then must be used up by sitting on the bench and then thrown away in the trash next to the vending machine.
To the northeast, this pier leads to another gap, crossable with the Fairy or Spacesuit effect, which then leads to a large clearing. The clearing holds a giant, half-buried sun statue, a few streetlamps, an Egg. Interacting with this Egg grants Menu Theme #9.
You can continue to the west and find a small hidden passage under the canopy. This leads to the shoreline around the circular lake. The path going clockwise is blocked by a single traffic cone.
Northern Boat Area
Making your way through a series of maze-like boardwalks partially obscured by the canopy, you will eventually find a boat. By sailing north and then following the river west, you will arrive in a silent area with a large stone gate similar to the one at the Cog Maze entrance. Passing through this gate leads to a darkened river and eventually to the Abandoned Factory.
Directions
- The Nexus → Red Streetlight World → Gray Road → Sprout World → Green Neon World → Construction Frame Building → Cog Maze → Forest Pier
After visiting this area at least once:
- The Nexus → Urotsuki's Dream Apartments → Forest Pier
Trivia
- This world was removed from the game in version 0.113 (Wataru's Patch) and readded in version 0.119d Patch 1.
- If viewed in the RPGM editor, tiles can be found out of bounds that are the letters U, R, and O which together spell out Uro.
Gallery
This ambiguous manhole-dwelling blob seems to like rainbows.
The water in the area isn't animated and even has holes on its surface.
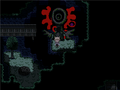
The Angel Statue that allows entry to the shoal once chainsawed
The Sad Jellyfish appears when you pull out the chainsaw. It's trapped in the two-tile space behind that pillar, though.
The vending machine that allows you to sit and drink a soda, rather than just showing a quick animation. How fun!
Dancing queen, young and sweet...


- 102c21
- 4a6563