SalmSamuel (talk | contribs) m (it doesnt) |
No edit summary |
||
| (15 intermediate revisions by 3 users not shown) | |||
| Line 1: | Line 1: | ||
{{MissingInfo| | {{MissingInfo|Make sure that all the info regarding the bathroom is still accurate in version 0.127c. Also add soundtrack for when you are shining light on the chasers (this is slightly different from when you equip the Chainsaw/Lantern)}} | ||
{{Locationbox | {{Locationbox | ||
|headercolor = #191c42 | |headercolor = #191c42 | ||
| Line 10: | Line 10: | ||
|Masks = [[Yume 2kki:Masks/Others#Kong|Eyeball]] | |Masks = [[Yume 2kki:Masks/Others#Kong|Eyeball]] | ||
|Events = None | |Events = None | ||
|NPCS = | |NPCS = [[Yume 2kki:Minor Characters#Pixel Gang|Pixel Gang]], [[Yume 2kki:Chasers#Security Guard|Security Guards]] | ||
|Connections = {{Connection|Vibrant Funhouse|effects_needed=Fairy}} | |Connections = {{Connection|Vibrant Funhouse|effects_needed=Fairy}} | ||
|BGM = {{BGM|title=In The Hour|filename=Y2 In The Hour 80.ogg|soundroom=1092A}},{{BGM|title=In The Hour|filename=Y2 In The Hour | |BGM = {{BGM|title=In The Hour|filename=Y2 In The Hour 70.ogg|label=Restroom|soundroom=1092B}}, | ||
|Map ID = 1608, 1609 | {{BGM|title=In The Hour|filename=Y2 In The Hour 80.ogg|label=First Floor|soundroom=1092A}}, | ||
{{BGM|title=In The Hour|filename=In_The_Hour_90.ogg|speed=90|label=Second Floor|soundroom=1092C}}, | |||
{{BGM|title=In The Hour|filename=In_The_Hour.ogg|speed=100|label=Third Floor|soundroom=1092D}}, | |||
{{BGM|title=In The Hour|filename=In_The_Hour_150.ogg|speed=150|label=Chainsaw/Lantern equipped}},{{BGM|title=e37|filename=e37_50.ogg|speed=50|label=Crossing effect active}}, | |||
{{BGM|title=In The Hour_reverb|filename=In_The_Hour_reverb_60.ogg|speed=60|label=Basement|soundroom=1092E}}, | |||
{{BGM|filename=Y2 In The Hour reverb 150.ogg|label=Basement (Chainsaw/Lantern equipped)}}, | |||
{{BGM|title=Kong_大広間|filename=Kong_大広間_80.ogg|speed=80|label=Security Room|soundroom=1278}} | |||
|Map ID = 1608 (Bathroom), 1609 (Main area) | |||
|Primary = Kong | |Primary = Kong | ||
|Contributing = Nakatsu | |Contributing = Nakatsu | ||
| Line 21: | Line 28: | ||
'''Fliperama Hall''' is an area accessible from [[Yume 2kki:Vibrant Funhouse|Vibrant Funhouse]]. | '''Fliperama Hall''' is an area accessible from [[Yume 2kki:Vibrant Funhouse|Vibrant Funhouse]]. | ||
{{LocationMap|filename=Fliperama Hall map.png|caption=Annotated map of Fliperama Hall.}} | {{LocationMap|filename=Fliperama Hall map.png|caption=Annotated map of Fliperama Hall.}} | ||
{{LocationMap|filename=Fliperama Hall mazes map.png|caption=Annotated map of Fliperama Hall with guide to mazes.}} | |||
==Features== | ==Features== | ||
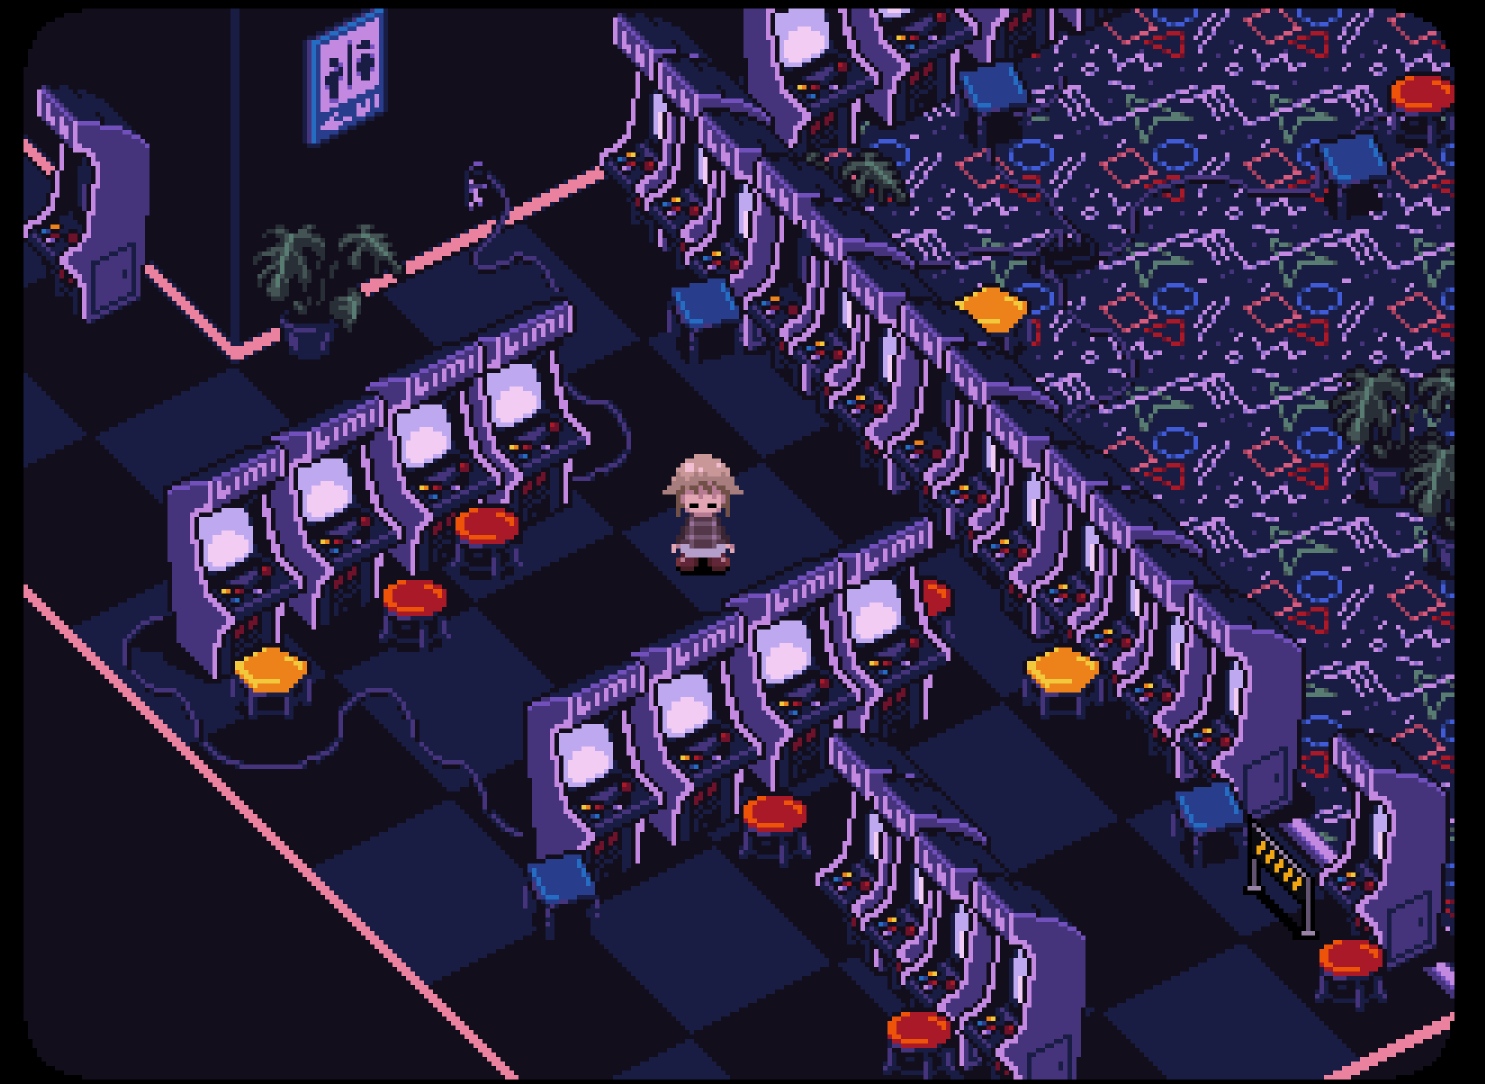
Fliperama Hall is a | Fliperama Hall is a vast area resembling the interior of an arcade. Arcade booths, outlets, and charging stations fill the area, as do [[Yume 2kki:Minor Characters#Pixel Gang|purple NPCs]] in the style of early video game characters. The [[Yume 2kki:Effects#Bat|Bat]] and [[Yume 2kki:Effects#Penguin|Penguin]] actions cannot be used in this world. | ||
The area is entered from a toilet in the men's restroom, which can be re-entered with the [[Yume 2kki:Effects#Fairy|Fairy]] effect equipped to return to Vibrant Funhouse. The sinks and toilet are interactable. Equipping the [[Yume 2kki:Effects#Stretch|Stretch]] effect here will turn this area to a grayscale color scheme, and equipping the [[Yume 2kki:Effects#Child|Child]] effect will make the colors more vibrant. | The area is entered from a toilet in the men's restroom, which can be re-entered with the [[Yume 2kki:Effects#Fairy|Fairy]] effect equipped to return to Vibrant Funhouse. The sinks and toilet are interactable. Equipping the [[Yume 2kki:Effects#Stretch|Stretch]] effect here will turn this area to a grayscale color scheme, and equipping the [[Yume 2kki:Effects#Child|Child]] effect will make the colors more vibrant. | ||
If Variable #44 is between 64 and 191, an NPC resembling a large eye with two legs (otherwise depicted on a nearby purple poster) will be present. If it is present, the poster will be blank. Beyond the typical reaction to the [[Yume 2kki:Effects#Crossing|Crossing]] effect, this NPC has some unique interactions: | If Variable #44 is between 64 and 191, an NPC resembling a large eye with two legs (otherwise depicted on a nearby purple poster) will be present. If it is present, the poster will be blank. Beyond the typical reaction to the [[Yume 2kki:Effects#Crossing|Crossing]] effect, this NPC has some unique interactions: | ||
*Equipping the [[Yume 2kki:Effects#Chainsaw|Chainsaw]] or [[Yume 2kki:Effects#Lantern|Lantern]] will make it disappear, manifesting on the poster. Leaving and re-entering this area will make it | *Equipping the [[Yume 2kki:Effects#Chainsaw|Chainsaw]] or [[Yume 2kki:Effects#Lantern|Lantern]] will make it disappear, manifesting on the poster. Leaving and re-entering this area will make it reappear. | ||
*Equipping the [[Yume 2kki:Effects#Eyeball Bomb|Eyeball Bomb]] will make [[Yume 2kki:Urotsuki|Urotsuki]] lose control, walking around the area rapidly as you suddenly [[Yume 2kki:Masks/Others#Kong|gain control of the NPC]]. Opening the menu reflects this, as the portrait is replaced with the NPC. | *Equipping the [[Yume 2kki:Effects#Eyeball Bomb|Eyeball Bomb]] will make [[Yume 2kki:Urotsuki|Urotsuki]] lose control, walking around the area rapidly as you suddenly [[Yume 2kki:Masks/Others#Kong|gain control of the NPC]]. Opening the menu reflects this, as the portrait is replaced with the NPC. | ||
Upon exiting, Urotsuki will enter the area's first floor | Upon exiting, Urotsuki will enter the area's first floor. Two of the stairways on this floor are inaccessible, blocked by gates and stools. The player should navigate southeast, where they will find a stairway leading up to the second floor. | ||
The second floor begins with a large maze of stools and arcade machines. Many purple NPCs roam about, which cannot be removed using the [[Yume 2kki:Effects#Chainsaw|Chainsaw]] effect; rather, equipping the Chainsaw or [[Yume 2kki:Effects#Lantern|Lantern]] effects just causes the NPCs to glitch out and move much faster. The player should navigate to the upwards stairway northeast of the room, which leads to the right side of the third floor. To access the left side, the player must open a gated door by pressing two yellow buttons. There is a purple NPC resembling Urotsuki on the left side, which will mimic the player's movements. The player can use it to press the button on the left side, while they press the button on the right side themselves. | |||
After opening the gate, the player should send the Urotsuki clone through the door, which will bring it downstairs. The player should head downstairs and enter the newly-opened door the clone had come out of, which leads to the left side of the third floor. Heading south, the player will find a sparkling green key beside a [[Yume 2kki:Vending Machine|Vending Machine]]. After grabbing the key, they should head back down to the second floor. | After opening the gate, the player should send the Urotsuki clone through the door, which will bring it downstairs. The player should then head downstairs and enter the newly-opened door the clone had come out of, which leads to the left side of the third floor. Heading south, the player will find a sparkling green key beside a [[Yume 2kki:Vending Machine|Vending Machine]]. After grabbing the key, they should head back down to the second floor. | ||
There is a gated door at the west end of this floor; unlike before, the buttons for this must be held down simultaneously. The player should control the Urotsuki clone to step on the red button beside the door, and keep it in place by activating the [[Yume 2kki:Effects#Crossing|Crossing]] effect. The player can then navigate to a blue button at the southwest of the floor. Once both buttons are pressed, the player can enter the door and head down to the arcade's basement. | There is a gated door at the west end of this floor; unlike before, the buttons for this must be held down simultaneously. The player should control the Urotsuki clone to step on the red button beside the door, and keep it in place by activating the [[Yume 2kki:Effects#Crossing|Crossing]] effect. The player can then navigate to a blue button at the southwest of the floor. Once both buttons are pressed, the player can enter the door and head down to the arcade's basement. | ||
===Basement=== | ===Basement=== | ||
The basement is very dark, though Urotsuki will passively have a light shining in front of her. There is a locked red door near the beginning of the room, as well as a green door on the northern end that can be opened with the green key. There are two [[Yume 2kki:Chasers| | The basement is very dark, though Urotsuki will passively have a light shining in front of her. There is a locked red door near the beginning of the room, as well as a green door on the northern end that can be opened with the green key. There are two [[Yume 2kki:Chasers#Security Guard|Security Guard]] chasers in this area, which will become aggressive and very fast if the player shines light on them. If caught, you will be sent to a supply closet located beside the red door. The closets can be exited by opening a door at the bottom; if the player makes the mistake of waking up, they will lose all their progress in the area (using the [[Yume 2kki:Effects#Eyeball Bomb|Eyeball Bomb]] effect causes the same problem, due to the fact the [[Yume 2kki:Board Game Islands|Board Game Islands]] door required to access this world only appears once per dream session). | ||
To avoid the | To avoid the guards, the player should equip the [[Yume 2kki:Effects#Invisible|Invisible]] effect and activate it when the guards are nearby (their footsteps can be heard as you get closer to them). This will turn off the player's light, though the guard can still be seen as a sparkling dot; if necessary, the player can raise their monitor's brightness to see better in the dark. Once past the guard, the Invisible effect can be deactivated to restore the light. Note that the Lantern effect does not make the area easier to see; on the contrary, equipping the Lantern or Chainsaw effects will immediately make the guards aggressive even if you are not shining light on them. They will also become aggressive if you try to freeze them using the Crossing effect. | ||
After reaching the green door, the player will arrive at a dark storage room containing many boxes and a red key near the top left. After picking up the key, new boxes will be added to this room that make it significantly more difficult to navigate back. There is one | After reaching the green door, the player will arrive at a dark storage room containing many boxes and a red key near the top left. After picking up the key, new boxes will be added to this room that make it significantly more difficult to navigate back. There is one Security Guard in this room, who will send you to a different supply closet connecting to the top left of the storage room. | ||
With the red key collected, the player should head for the red door located near the beginning of the basement. If caught by a | With the red key collected, the player should head for the red door located near the beginning of the basement. If caught by a Security Guard at this point, the player will be sent to a supply closet located beside the green door, and there will be a new third guard standing right outside this closet (which can catch the player by surprise if they do not have the Invisible effect activated beforehand). | ||
The red door leads to the arcade's security room. Standing on the stool and interacting with a computer unlocks the [[Yume 2kki:Memory Game|Memory Game]] minigame in Urotsuki's [[Yume 2kki:Console|game console]]. | The red door leads to the arcade's security room. Standing on the stool and interacting with a computer unlocks the [[Yume 2kki:Memory Game|Memory Game]] minigame in Urotsuki's [[Yume 2kki:Console|game console]]. | ||
| Line 54: | Line 62: | ||
*The Nexus → [[Yume 2kki:Garden World|Garden World]] → [[Yume 2kki:Board Game Islands|Board Game Islands]] → [[Yume 2kki:Vibrant Funhouse|Vibrant Funhouse]] → '''Fliperama Hall''' | *The Nexus → [[Yume 2kki:Garden World|Garden World]] → [[Yume 2kki:Board Game Islands|Board Game Islands]] → [[Yume 2kki:Vibrant Funhouse|Vibrant Funhouse]] → '''Fliperama Hall''' | ||
*The Nexus → [[Yume 2kki: | *The Nexus → [[Yume 2kki:Marijuana Goddess World|Marijuana Goddess World]] → [[Yume 2kki:Dark Room|Dark Room]] → [[Yume 2kki:Sewers|Sewers]] → [[Yume 2kki:Monochrome Feudal Japan|Monochrome Feudal Japan]] → [[Yume 2kki:Bishop Cathedral|Bishop Cathedral]] → [[Yume 2kki:Board Game Islands|Board Game Islands]] → [[Yume 2kki:Vibrant Funhouse|Vibrant Funhouse]] → '''Fliperama Hall''' | ||
==Trivia== | ==Trivia== | ||
*"Fliperama" is a loanword from Portuguese which means "Arcade". | *"Fliperama" is a loanword from Portuguese which means "Arcade". | ||
*There is a poster with the kanji 旱 (drought) in a corner to the right of the green door. If the player walks around the entire corridor without leaving it, there is a chance new shelves will be added that block access to this corner from both sides, and an NPC named Dry Body can be seen lying beneath a now blank poster. The shelves will be removed upon going to a different room. | |||
==Gallery== | ==Gallery== | ||
| Line 69: | Line 78: | ||
FliperamaHallCrossing.png | FliperamaHallCrossing.png | ||
FliperamaHallFreakout.png|NPCs glitching out from the Lantern effect | FliperamaHallFreakout.png|NPCs glitching out from the Lantern effect | ||
FliperamaHallChaser.png|A | FliperamaHallChaser.png|A Security Guard becoming aggressive | ||
File:FliperamaHallShelves.png|Shelves blocking the path to the right of the green door, with Dry Body barely visible | |||
FliperamaHallRedKey.png|Location of the red key | FliperamaHallRedKey.png|Location of the red key | ||
FliperamaHallEnd.png|Security room containing the minigame | FliperamaHallEnd.png|Security room containing the minigame | ||
FliperamaHallChaserRoom1.png|First supply closet; the wall hints at how to avoid the | FliperamaHallChaserRoom1.png|First supply closet; the wall hints at how to avoid the Security Guards | ||
FliperamaHallChaserRoom2.png|Second supply closet | FliperamaHallChaserRoom2.png|Second supply closet | ||
FliperamaHallChaserRoom3.png|Third supply closet | FliperamaHallChaserRoom3.png|Third supply closet | ||
</gallery> | </gallery> | ||
Revision as of 07:12, 26 April 2025
| This page is missing information. You can help YumeWiki by expanding it. Details: Make sure that all the info regarding the bathroom is still accurate in version 0.127c. Also add soundtrack for when you are shining light on the chasers (this is slightly different from when you equip the Chainsaw/Lantern) |
| Fliperama Hall | |||||||||||||
|---|---|---|---|---|---|---|---|---|---|---|---|---|---|

| |||||||||||||
| Basic Info | |||||||||||||
| Regional Name(s) |
フリペラーマ広間 | ||||||||||||
| Effects | None | ||||||||||||
| Collectibles | |||||||||||||
| Masks | Eyeball | ||||||||||||
| Events | None | ||||||||||||
| Notable NPCs | Pixel Gang, Security Guards | ||||||||||||
| Other | |||||||||||||
| Connecting Areas | Vibrant Funhouse ✨ | ||||||||||||
| BGM | 🔊 In The Hour – Restroom (No. 1092B) 🔊 In The Hour – First Floor (No. 1092A) 🔊 In The Hour – Second Floor (No. 1092C) 🔊 In The Hour – Third Floor (No. 1092D) 🔊 In The Hour – Chainsaw/Lantern equipped 🔊 e37 – Crossing effect active 🔊 In The Hour_reverb – Basement (No. 1092E) 🔊 In The Hour_reverb – Basement (Chainsaw/Lantern equipped) 🔊 Kong_大広間 – Security Room (No. 1278) | ||||||||||||
| Map ID | 1608 (Bathroom) 1609 (Main area) | ||||||||||||
| Version Added | 0.125a | ||||||||||||
| Last Updated | 0.127c | ||||||||||||
| Primary Author | Kong | ||||||||||||
| Contributing Author(s) | Nakatsu | ||||||||||||
| |||||||||||||


Fliperama Hall is an area accessible from Vibrant Funhouse.
Features
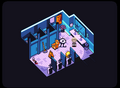
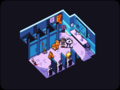
Fliperama Hall is a vast area resembling the interior of an arcade. Arcade booths, outlets, and charging stations fill the area, as do purple NPCs in the style of early video game characters. The Bat and Penguin actions cannot be used in this world.
The area is entered from a toilet in the men's restroom, which can be re-entered with the Fairy effect equipped to return to Vibrant Funhouse. The sinks and toilet are interactable. Equipping the Stretch effect here will turn this area to a grayscale color scheme, and equipping the Child effect will make the colors more vibrant.
If Variable #44 is between 64 and 191, an NPC resembling a large eye with two legs (otherwise depicted on a nearby purple poster) will be present. If it is present, the poster will be blank. Beyond the typical reaction to the Crossing effect, this NPC has some unique interactions:
- Equipping the Chainsaw or Lantern will make it disappear, manifesting on the poster. Leaving and re-entering this area will make it reappear.
- Equipping the Eyeball Bomb will make Urotsuki lose control, walking around the area rapidly as you suddenly gain control of the NPC. Opening the menu reflects this, as the portrait is replaced with the NPC.
Upon exiting, Urotsuki will enter the area's first floor. Two of the stairways on this floor are inaccessible, blocked by gates and stools. The player should navigate southeast, where they will find a stairway leading up to the second floor.
The second floor begins with a large maze of stools and arcade machines. Many purple NPCs roam about, which cannot be removed using the Chainsaw effect; rather, equipping the Chainsaw or Lantern effects just causes the NPCs to glitch out and move much faster. The player should navigate to the upwards stairway northeast of the room, which leads to the right side of the third floor. To access the left side, the player must open a gated door by pressing two yellow buttons. There is a purple NPC resembling Urotsuki on the left side, which will mimic the player's movements. The player can use it to press the button on the left side, while they press the button on the right side themselves.
After opening the gate, the player should send the Urotsuki clone through the door, which will bring it downstairs. The player should then head downstairs and enter the newly-opened door the clone had come out of, which leads to the left side of the third floor. Heading south, the player will find a sparkling green key beside a Vending Machine. After grabbing the key, they should head back down to the second floor.
There is a gated door at the west end of this floor; unlike before, the buttons for this must be held down simultaneously. The player should control the Urotsuki clone to step on the red button beside the door, and keep it in place by activating the Crossing effect. The player can then navigate to a blue button at the southwest of the floor. Once both buttons are pressed, the player can enter the door and head down to the arcade's basement.
Basement
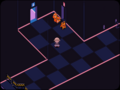
The basement is very dark, though Urotsuki will passively have a light shining in front of her. There is a locked red door near the beginning of the room, as well as a green door on the northern end that can be opened with the green key. There are two Security Guard chasers in this area, which will become aggressive and very fast if the player shines light on them. If caught, you will be sent to a supply closet located beside the red door. The closets can be exited by opening a door at the bottom; if the player makes the mistake of waking up, they will lose all their progress in the area (using the Eyeball Bomb effect causes the same problem, due to the fact the Board Game Islands door required to access this world only appears once per dream session).
To avoid the guards, the player should equip the Invisible effect and activate it when the guards are nearby (their footsteps can be heard as you get closer to them). This will turn off the player's light, though the guard can still be seen as a sparkling dot; if necessary, the player can raise their monitor's brightness to see better in the dark. Once past the guard, the Invisible effect can be deactivated to restore the light. Note that the Lantern effect does not make the area easier to see; on the contrary, equipping the Lantern or Chainsaw effects will immediately make the guards aggressive even if you are not shining light on them. They will also become aggressive if you try to freeze them using the Crossing effect.
After reaching the green door, the player will arrive at a dark storage room containing many boxes and a red key near the top left. After picking up the key, new boxes will be added to this room that make it significantly more difficult to navigate back. There is one Security Guard in this room, who will send you to a different supply closet connecting to the top left of the storage room.
With the red key collected, the player should head for the red door located near the beginning of the basement. If caught by a Security Guard at this point, the player will be sent to a supply closet located beside the green door, and there will be a new third guard standing right outside this closet (which can catch the player by surprise if they do not have the Invisible effect activated beforehand).
The red door leads to the arcade's security room. Standing on the stool and interacting with a computer unlocks the Memory Game minigame in Urotsuki's game console.
Directions
With the Child and Fairy effects and a 1/2 chance per dream session, if the day/times slept counter on the PC is an odd number before going to bed:
- The Nexus → Garden World → Board Game Islands → Vibrant Funhouse → Fliperama Hall
- The Nexus → Marijuana Goddess World → Dark Room → Sewers → Monochrome Feudal Japan → Bishop Cathedral → Board Game Islands → Vibrant Funhouse → Fliperama Hall
Trivia
- "Fliperama" is a loanword from Portuguese which means "Arcade".
- There is a poster with the kanji 旱 (drought) in a corner to the right of the green door. If the player walks around the entire corridor without leaving it, there is a chance new shelves will be added that block access to this corner from both sides, and an NPC named Dry Body can be seen lying beneath a now blank poster. The shelves will be removed upon going to a different room.
Gallery
A unique NPC found in the entrance that appears when Variable #44 is from 64 to 191.
Which one is me?


Location of the green key


NPCs glitching out from the Lantern effect

A Security Guard becoming aggressive

Shelves blocking the path to the right of the green door, with Dry Body barely visible

Location of the red key

Security room containing the minigame

First supply closet; the wall hints at how to avoid the Security Guards

Second supply closet

Third supply closet


 (Annotated map of Fliperama Hall., https://yume.wiki/images/3/37/Fliperama Hall map.png) + and
 (Annotated map of Fliperama Hall with guide to mazes., https://yume.wiki/images/e/e2/Fliperama Hall mazes map.png) +
- 191c42
- b5a9fc