The Style Guide has recently been rewritten. Please take a moment to review the new guidelines.
mNo edit summary |
No edit summary |
||
| (6 intermediate revisions by 2 users not shown) | |||
| Line 1: | Line 1: | ||
{{ | {{SpoilerWarning}} | ||
Despite having no real plot or structure, ''[[Yume Nikki:Yume Nikki|Yume Nikki]]'' does in fact have an ending scene. | |||
The mere existence of the ending is only alluded to in-game, with the cryptic [[Yume Nikki:Effects#Instructions|Instructions]] saying the player can ''"get rid of the "Effects" in the [[Yume Nikki:Nexus|Room of Doors]]"'', although there is no indication of what the purpose of this is. | The mere existence of the ending is only alluded to in-game, with the cryptic [[Yume Nikki:Effects#Instructions|Instructions]] saying the player can ''"get rid of the "Effects" in the [[Yume Nikki:Nexus|Room of Doors]]"'', although there is no indication of what the purpose of this is. | ||
| Line 6: | Line 7: | ||
==The Ending Sequence== | ==The Ending Sequence== | ||
[[File:Effect Eggs.png|thumb|right|The effect eggs, all dropped in the Nexus.]] | [[File:YN Effect Eggs.png|thumb|right|The effect eggs, all dropped in the Nexus.]] | ||
After collecting all 24 proper [[Yume Nikki:Effects|effects]] in the game, [[Yume Nikki:Madotsuki|Madotsuki]] must return to the Nexus. The player must then drop every last one of her effects in the Nexus room (done by equipping them and pressing the '5' key). If an effect has been dropped, an egg will appear behind Madotsuki. Interacting with the egg will give Madotsuki the effect it holds. If all of the effects are dropped and the Nexus is reentered after going into a different room, the effect eggs will be arranged in a pattern. | After collecting all 24 proper [[Yume Nikki:Effects|effects]] in the game, [[Yume Nikki:Madotsuki|Madotsuki]] must return to the Nexus. The player must then drop every last one of her effects in the Nexus room (done by equipping them and pressing the '5' key). If an effect has been dropped, an egg will appear behind Madotsuki. Interacting with the egg will give Madotsuki the effect it holds. If all of the effects are dropped and the Nexus is reentered after going into a different room, the effect eggs will be arranged in a pattern. | ||
Madotsuki must then leave the dream world by pinching herself awake. Upon going to the real-world room's balcony, a set of stairs has appeared, leading over the railing. | |||
Madotsuki must then leave the dream world by pinching herself awake. Upon going to the real-world room's balcony, a set of stairs has appeared, leading over the railing. | |||
Madotsuki climbs the stairs and, upon pressing the 'interact' button, she jumps off the side of the balcony and plummets downward, causing the screen to fade to black. | Madotsuki climbs the stairs and, upon pressing the 'interact' button, she jumps off the side of the balcony and plummets downward, causing the screen to fade to black. | ||
[[File: | [[File:The Jump.png|thumb|right]] | ||
[[File:End Screen.png|thumb|right|The ending credits.]] | |||
A heavy, echoing thud breaks the silence, and a pool of blood fades into view. Two [[Yume Nikki:Jellyfish|Jellyfish]] from her dream world approach from different directions and surround the red smear as the credits appear, and the mournful ending theme begins to play. By pressing the '1' key, the lower Jellyfish produces a low chime noise. When the '3' key is pressed, the upper Jellyfish produces a high chime noise. When the 'interact' key is pressed again, the screen will slowly fade to black and the player will return to the title screen. | A heavy, echoing thud breaks the silence, and a pool of blood fades into view. Two [[Yume Nikki:Jellyfish|Jellyfish]] from her dream world approach from different directions and surround the red smear as the credits appear, and the mournful ending theme begins to play. By pressing the '1' key, the lower Jellyfish produces a low chime noise. When the '3' key is pressed, the upper Jellyfish produces a high chime noise. When the 'interact' key is pressed again, the screen will slowly fade to black and the player will return to the title screen. | ||
==Trivia== | ==Trivia== | ||
* | *The same pool of blood can be found in various dream worlds in the game. It appears in front of the [[Yume Nikki:Severed Blue Head|Severed Blue Head]] in [[Yume Nikki:Eyeball World|Eyeball World]] and by the [[Yume Nikki:Mouth Monster|Mouth Monsters]] in [[Yume Nikki:Mural World|Mural World]] and [[Yume Nikki:Underground World|Underground World]]. | ||
*The game's ending music resembles the wailing sirens of an ambulance, possibly suggesting one is coming to the scene. | |||
*The game's ending music | |||
==Gallery== | ==Gallery== | ||
<gallery | <gallery> | ||
Yume Nikki Ending.jpg|The ending as portrayed in the manga. | |||
LNEnding.jpg|[[ | LNEnding.jpg|[[Yume Nikki:Poniko|Poniko]] watching Madotsuki jump in [[Yume Nikki:Yume Nikki: I Am Not in Your Dream|the light novel]]. | ||
</gallery> | </gallery> | ||
[[Category:Yume Nikki Events]] | [[Category:Yume Nikki Events]] | ||
[[Category: | [[Category:Yume Nikki Guides]] | ||
Latest revision as of 17:25, 2 April 2025
Despite having no real plot or structure, Yume Nikki does in fact have an ending scene.
The mere existence of the ending is only alluded to in-game, with the cryptic Instructions saying the player can "get rid of the "Effects" in the Room of Doors", although there is no indication of what the purpose of this is.
At first, the simple act of dropping all the effects in the Nexus appears to have no result, and there is no indication that anything has changed. Only when the player ventures out onto the balcony in the real world does the nature of the ending become apparent.
The Ending Sequence
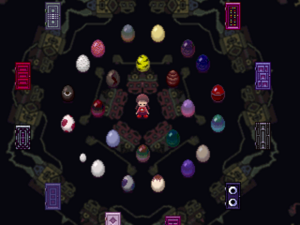
After collecting all 24 proper effects in the game, Madotsuki must return to the Nexus. The player must then drop every last one of her effects in the Nexus room (done by equipping them and pressing the '5' key). If an effect has been dropped, an egg will appear behind Madotsuki. Interacting with the egg will give Madotsuki the effect it holds. If all of the effects are dropped and the Nexus is reentered after going into a different room, the effect eggs will be arranged in a pattern.
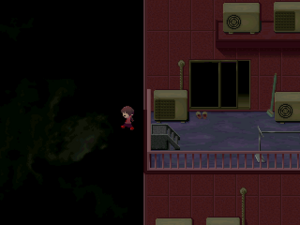
Madotsuki must then leave the dream world by pinching herself awake. Upon going to the real-world room's balcony, a set of stairs has appeared, leading over the railing.
Madotsuki climbs the stairs and, upon pressing the 'interact' button, she jumps off the side of the balcony and plummets downward, causing the screen to fade to black.
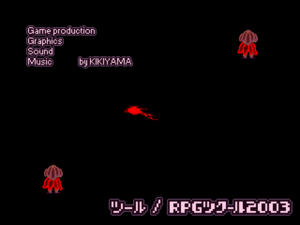
A heavy, echoing thud breaks the silence, and a pool of blood fades into view. Two Jellyfish from her dream world approach from different directions and surround the red smear as the credits appear, and the mournful ending theme begins to play. By pressing the '1' key, the lower Jellyfish produces a low chime noise. When the '3' key is pressed, the upper Jellyfish produces a high chime noise. When the 'interact' key is pressed again, the screen will slowly fade to black and the player will return to the title screen.
Trivia
- The same pool of blood can be found in various dream worlds in the game. It appears in front of the Severed Blue Head in Eyeball World and by the Mouth Monsters in Mural World and Underground World.
- The game's ending music resembles the wailing sirens of an ambulance, possibly suggesting one is coming to the scene.
Gallery
Poniko watching Madotsuki jump in the light novel.


