| Magnet Room | |
|---|---|

| |
| Basic Info | |
| Japanese Name(s) |
マグネッツファクトリー |
| Effects | None |
| Collectibles |
WP #62 |
| Events | Zalgo |
| Notable NPCs | None |
| Other | |
| Connecting Areas | Red Streetlight World 🔐 Urotsuki's Dream Apartments Stone Maze ⛔ Birch Forest ⛔ Intestines Maze ➡️ |
| BGM | 🔊 short_bgm2 (No. 182A) 🔊 bgm-m 2 – Zalgo Event (No. 128A) |
| Map ID | 0262, 0263, 0266 |
| Version Added | 0.091c |
| Author | Bokun |
The Magnet Room is an area that is primarily accessible through the streetlight with 3 lamps on the right side in Red Streetlight World.

Features
The area is dotted with large blue and red-orange cubes that bounce Urotsuki backwards if she runs into them. Some of them will propel her across otherwise impassable barriers if she runs into them from a specific direction (note that this is required to enter the Magnet Room from the Red Streetlight World entrance). Initially, the larger room is dark and silent (it can be illuminated temporarily by the Lantern effect, however). There is a machine in the southwest-most corner of the room that, when interacted with, will activate the room's lights and music. Several NPCs that resemble masks on legs will also appear once the lights are on, which make baby-talk sounds if Urotsuki interacts with them.
Even after the machine is active, the cubes in the larger room will not bounce Urotsuki. This can be fixed by interacting with the blue ball out of the pair of balls that are located to the east of the center of the room.

This area houses the Zalgo event, which can be accessed using the following process:
- Enter the Magnet Room.
- Activate the machine (Thus, by extension, activating the entire room).
- Interact with the blue ball to activate the cubes' bounciness.
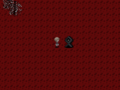
- Find the fenced-off section of wall with a crevice in it at the top of the room and head directly south from the crevice's position in the wall.
- Continue south and run into the north face of the blue cube. It should push Urotsuki over the barrier and into the enclosed area with the crevice.
- Interact with the crevice to enter the event's area.
Once there, immediately begin moving towards the center of the map, as there is a limited time before Urotsuki is dropped off in the Intestines Maze. Urotsuki will appear in a random corner of the map each time she enters the zone, so the only way to accurately travel to the center is by going in the opposite direction of the end of the map (which does not loop). Note that the Motorcycle effect cannot be equipped here. In older versions, the Bat effect could be used, allowing Urotsuki to go back to her previous position if she was sent to the Intestines Maze before she reached the end, but this exploit has since been patched out of the game.
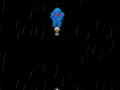
Interacting with the dark gray Teleport Rune (located in a bloody area in the middle of the map) will bring Urotsuki into a black room with a large NPC and rain. Interacting with the NPC gives you a wallpaper. Chainsawing it will cause it to start shaking, but not kill it. Leaving this room will put Urotsuki right outside the area with the enclosed crevice back in the main map.
Directions
- The Nexus → Red Streetlight World → Magnet Room
- The Nexus → Urotsuki's Dream Apartments → Stone Maze → Magnet Room
Trivia
- The NPCs inhabiting this area are most likely based on the Shiteyan'yo, a fan-made creature that is a horribly disfigured Hatsune Miku. (Pixiv account where it is originated from)
- Using the Bat effect to start to fly right before you're taken to the Intestines Maze will teleport you back to Zalgo's map even after you're taken to the Intestines Maze. The countdown before you're teleported will be reset, although the music will play faster this time around.
Gallery
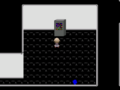
The machine needed to light up the entire room.

The entrance to Zalgo.
The Teleport Rune to the Zalgo Figure Room.


- 000000
- ffffff