The rewritten Style Guide has an open discussion of the spoiler policy. The current policy will be used if no new consensus is reached. Discuss it here.
| TST_MAP | |
|---|---|
 Entrance from Legacy of Ruin. | |
| Basic Info | |
| Regional Name(s) |
テストマップ |
| Effects | None |
| Masks | Mask Storage |
| Events | None |
| Notable NPCs | Shadow Gentleman |
| Other | |
| Connecting Areas | Legacy of Ruin ⛔ Worm Labyrinth ↩️ (Becomes two-way after obtaining Menu Theme #96) Pastel Mall ↩️ |
| Removed Connections | Underground Subway 🔐 ➡️ (Unintentional) |
| BGM | 🔊 UroChlorine (No. 863C) |
| Map ID | 2565 |
| Version Added | 0.126e |
| Last Updated | 0.126g |
| Primary Author | Bean |
| Contributing Author(s) | oneirokamara |
TST_MAP is an area accessible from the multicolored cube in the Legacy of Ruin.
Features
TST_MAP is a small area themed like a debug map, consisting of a checkered blue floor, dark purple walls, and various objects used as templates or to test certain game features.
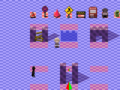
Just by the entrance from Legacy of Ruin are two ramps used to test stairs; east from them is a short ladder and a small pool with a boat. South from the entrance you'll find a row of multiple objects found within the dream world, such as construction signs, cones, a barricade, a vending machine, a chair, a telephone, a teleport rune, a Sugar Road portal, a Deluxe Mask Shop sign, and a mask storage cabinet. The teleport rune and Sugar Road portal send you back to the entrance, and the telephone will darken the screen and fade out the music, Urotsuki will make a call, but no one will answer.
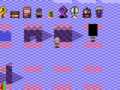
Below these objects is a small series of walls used to test effects:
- A pair of pillars with Chainsawable wooden boards.
- A pool, passable with the Fairy, Spacesuit and Spring effects.
- A wall with a small gap, passable with the Fairy, Grave and Dice effects.
- A wall in which equipping the Glasses effect will reveal a clock on it.
- A pair of pillars with two red and green spikes of different sizes. They both change sizes when equipping and using the Polygon effect.
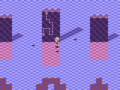
In here there is also a Shadow Gentleman and Urotsuki, censored with a black square. Getting caught by the Shadow Gentleman sends you back to the entrance.
The black square of the censored Urotsuki can be removed with either the Horse mask or the Clown mask, however both masks will make different results. The Horse mask will reveal that it is actually a Faceless Urotsuki underneath the black square, whereas with the Clown mask, it will reveal to be a normal Urotsuki.
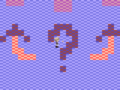
Another set of walls can be found northwest from the entrance, with two arrows and a question mark below them. If you have obtained Menu Theme #96, a star will appear in the middle of the question mark, stepping on it will transform Urotsuki into one of the Mask Storage Cabinets. There are some worms near the central wall, which shows a series of directions, these directions are a hint to solve the Doorway Maze in the Worm Labyrinth.
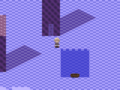
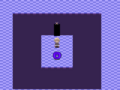
An isolated area can be seen above the question mark, which can be accessed from the Worm Labyrinth. Normally, entering from there leads to a dead end here, however, if you have obtained Menu Theme #96, a star will show up on top of the doorway and allow you to return the Worm Labyrinth from here. On this platform is a flashing O that takes Urotsuki to the Pastel Mall.
Directions
- The Nexus → Night World → Lavender Office → The Magic Nexus → Keychain Collection → Sunken Spore Sea → Legacy Nexus → Underground Subway → Nightmare Express → Legacy of Ruin → TST_MAP
With the Glasses effect, after unlocking the connection from Legacy Nexus to Blood Red Beach:
- The Nexus → Pudding World → Pillar Ark → Blood Red Beach → Legacy Nexus → Underground Subway → Nightmare Express → Legacy of Ruin → TST_MAP
If the connection from Urotsuki's Dream Apartments to Legacy Nexus is active:
- The Nexus → Urotsuki's Dream Apartments → Legacy Nexus → Underground Subway → Nightmare Express → Legacy of Ruin → TST_MAP
Trivia
- Prior to version 0.126g, having the Clown mask equipped and interacting with the back of the censored Urotsuki would've send you to the Underground Subway, right in front of the Legacy Nexus entrance, with no way of returning.
Gallery
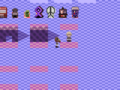
The censored Urotsuki with the Horse mask equipped.

The censored Urotsuki with the Clown mask equipped.
The star that appears after obtaining Menu Theme #96 and gives you the Mask Storage mask.

Isolated area from Worm Labyrinth leading to Pastel Mall.
Ditto, after obtaining Menu Theme #96.


- 7b77e5
- 6b345f