Qwertyuiop (talk | contribs) mNo edit summary |
SalmSamuel (talk | contribs) m (added SR No.) |
||
| (7 intermediate revisions by 4 users not shown) | |||
| Line 1: | Line 1: | ||
{{Locationbox | {{Locationbox | ||
|headercolor = #4a0000 | |headercolor = #4a0000 | ||
|headerfontcolor = #ff0084 | |headerfontcolor = #ff0084 | ||
|image = floating_brain_world.png | |image = floating_brain_world.png | ||
|Name = | |Name = Mad Red Brain | ||
|JapaneseName = 赤狂脳 | |JapaneseName = 赤狂脳 | ||
|Effects = None | |Effects = None | ||
| Line 10: | Line 9: | ||
|Wallpapers = None | |Wallpapers = None | ||
|NPCS = None | |NPCS = None | ||
|Connections = {{Connection|Wounded Turtle World|one_way_type=NoEntry}}, {{Connection|Spike Alley|one_way_type=NoReturn|effects_needed=Eyeball Bomb,Bat}} | |Connections = {{Connection|Wounded Turtle World|one_way_type=NoEntry}}, {{Connection|Spike Alley|one_way_type=NoReturn|effects_needed=Eyeball Bomb,Bat}}, {{Connection|Funeral Prison|chaser_type=Trap}}, {{Connection|Forest Cavern|chaser_type=Trap}} | ||
|BGM = {{BGM|title=e11|filename=E11(Floating_Brain_World).ogg}} | |BGM = {{BGM|title=e11|filename=E11(Floating_Brain_World).ogg|soundroom=230D|speed=80}} | ||
|Map ID = 1696 | |Map ID = 1696 | ||
|Primary = aediorugap | |Primary = aediorugap | ||
|VersionAdded = 0.117g patch 3 | |VersionAdded = 0.117g patch 3 | ||
|VersionsUpdated = 0.121g | |||
}} | }} | ||
The '''Floating Brain World''' is an area accessible from the red tentacle in [[Yume 2kki:Wounded Turtle World|Wounded Turtle World]]. | The '''Floating Brain World''' is an area accessible from the red tentacle in [[Yume 2kki:Wounded Turtle World|Wounded Turtle World]]. | ||
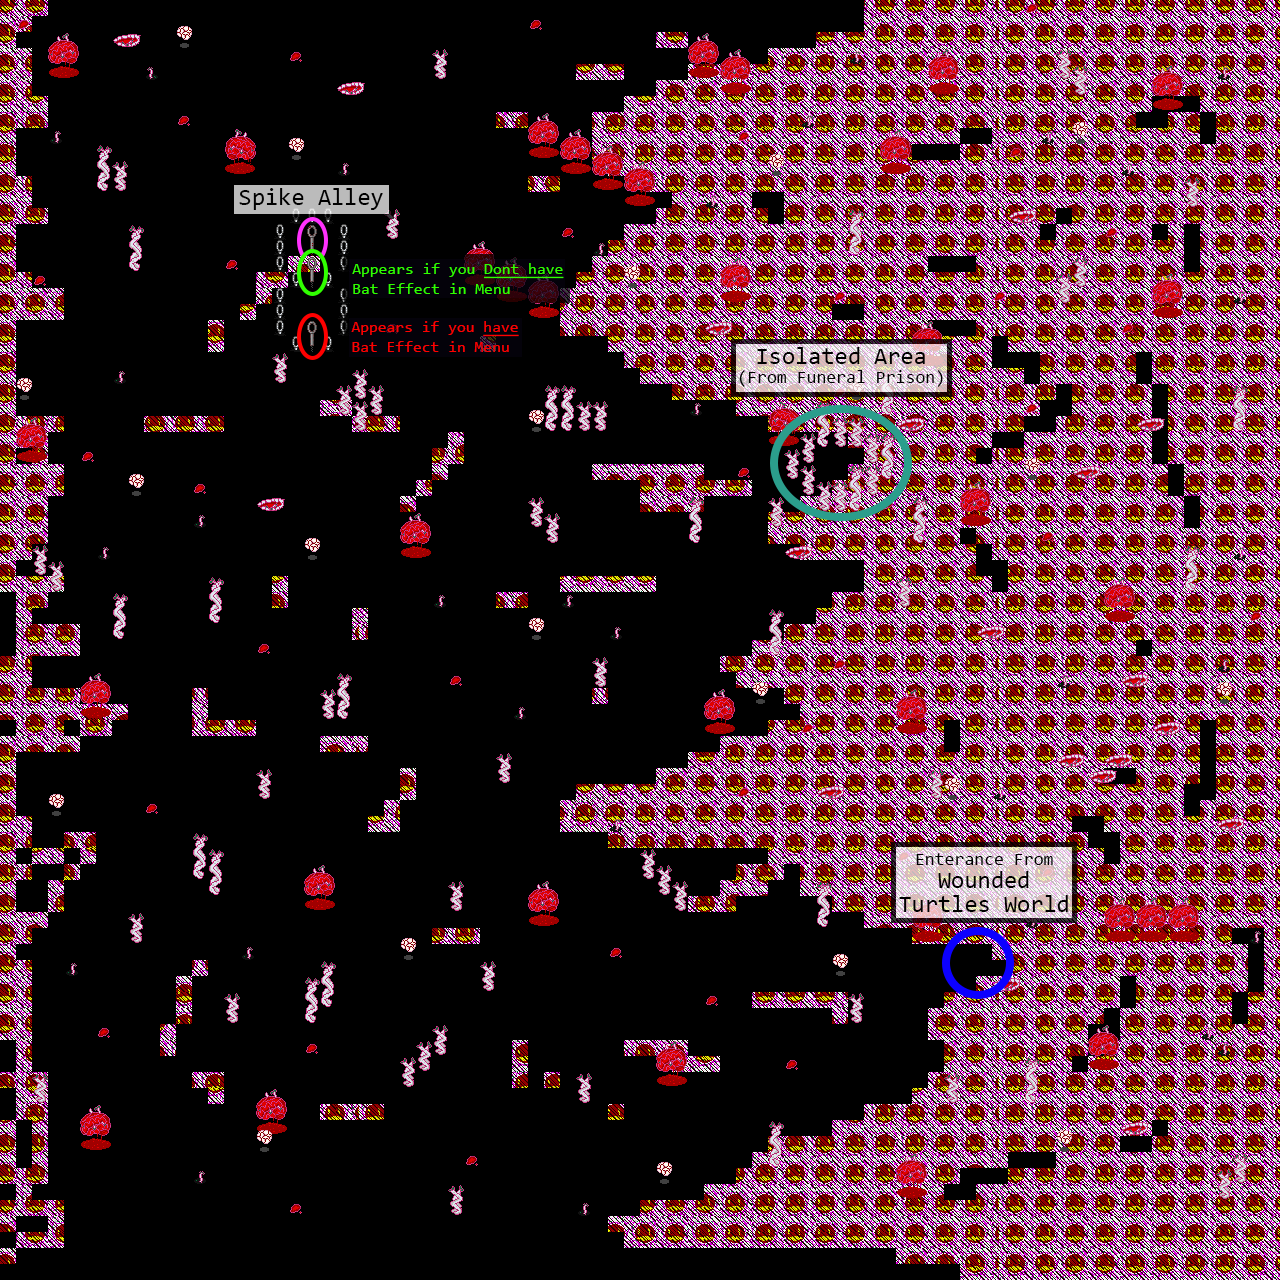
{{LocationMap|filename=Y2 Floating Brain World.png|caption=Map of Floating Brain World.}} | |||
==Features== | ==Features== | ||
This area is a large, looping, visceral world filled with mouths, tentacles, and as the name tells, floating brains, over a panorama of similarly-looking emojis. Smaller white floating brains wander the area, where equipping the [[Yume 2kki:Effects#Drum|Drum]] effect will make them show a single eye, and using the [[Yume 2kki:Effects#Glasses|Glasses]] effect will reveal them as the Maligned Turtle. These brains are immune to the [[Yume 2kki:Effects#Chainsaw|Chainsaw]]; they do not die once attacked. | |||
This area is a large, looping, visceral world filled with mouths, tentacles, and as the name tells, floating brains, over a panorama of similarly-looking emojis. Smaller white floating brains wander the area, where equipping the [[Yume 2kki:Effects#Drum|Drum]] will make them show a single eye, and using the [[Yume 2kki:Effects#Glasses|Glasses]] will reveal them as the Maligned Turtle. These brains are immune to the Chainsaw; they do not die once attacked. | |||
There is a set of ring-like objects forming an 8-shaped pattern, where the upper part has a bloody metallic instrument which takes you to the [[Yume 2kki:Spike Alley|Spike Alley]] blocked by a similar instrument, where its position is determined by a hidden condition. | There is a set of ring-like objects forming an 8-shaped pattern, where the upper part has a bloody metallic instrument which takes you to the [[Yume 2kki:Spike Alley|Spike Alley]] blocked by a similar instrument, where its position is determined by a hidden condition. | ||
{{SpoilerSectionStart}} | {{SpoilerSectionStart}} | ||
Much like the [[Yume 2kki: | Much like the [[Yume 2kki:Silhouette Complex#Marine Pavilion|Marine Pavilion]], making your way to the succeeding area is another paradoxical scenario, involving two mutually-exclusive states related to the instrument blocking the exit, in which it always blocks the bloody instrument in both states when accessing this area through normal means. The area allows the use of the [[Yume 2kki:Effects#Bat|Bat]] effect, which you must use to your advantage here, under the consideration that the marked position persists when you are in the same map and haven't woken up '''OR''' used the bed in [[Yume 2kki:Urotsuki's Dream Apartments|Urotsuki's Dream Apartments]]. As the position of the instrument guarding the exit is affected by the existence of the Bat effect in your inventory, it is very similar to the cone's appearance in the Marine Pavillion: the instrument will be in front if the Bat effect is present, and in the back if it is not currently in your inventory. <br> | ||
Once at the 8-shaped figure, you must mark a position just outside of it using the Bat effect. With the Eyeball Bomb, you can return straight to the Nexus and drop the Bat effect in the [[Yume 2kki:Trophy Room|Trophy Room]] (after favoriting it in the [[Yume 2kki:Urotsuki | Once at the 8-shaped figure, you must mark a position just outside of it using the Bat effect. With the Eyeball Bomb, you can return straight to the Nexus and drop the Bat effect in the [[Yume 2kki:Trophy Room|Trophy Room]] (after favoriting it in the [[Yume 2kki:Urotsuki's Room#Dream Room|Dream Room]]), then taking a shortcut back to this area by being caught by the chaser in the [[Yume 2kki:Funeral Prison|Funeral Prison]] or being caught by the spiders in [[Yume 2kki:Forest Cavern|Forest Cavern]] and returning to the marked position with the Bat effect from there, where you will need to repeat the process from within each part of the shape (alternating between dropping and obtaining the effect) until you have reached the bloody instrument to Spike Alley. | ||
{{SpoilerSectionEnd}} | {{SpoilerSectionEnd}} | ||
| Line 44: | Line 44: | ||
**If [[Yume 2kki:The Nexus|The Nexus]] was grey (Variable #44 is < 128), the instrument would be placed in front. If The Nexus was blue (Variable #44 is > 128), however, it would be in the back, making this the ideal starting position. | **If [[Yume 2kki:The Nexus|The Nexus]] was grey (Variable #44 is < 128), the instrument would be placed in front. If The Nexus was blue (Variable #44 is > 128), however, it would be in the back, making this the ideal starting position. | ||
**A similar return method was used as the one listed above in order to return to the world quickly, but only needed to be employed at least once. | **A similar return method was used as the one listed above in order to return to the world quickly, but only needed to be employed at least once. | ||
===Old Images=== | |||
<gallery> | |||
FloatingBrainWorldMap.png|Old map of Floating Brain World. | |||
</gallery> | |||
==Gallery== | ==Gallery== | ||
<gallery | <gallery> | ||
floating_brain_world_drum.png | floating_brain_world_drum.png | ||
floating_brain_world_turtle.png | floating_brain_world_turtle.png | ||
Latest revision as of 19:57, 20 November 2024
| Floating Brain World | |
|---|---|

| |
| Basic Info | |
| Japanese Name(s) |
赤狂脳 |
| Effects | None |
| Events | None |
| Notable NPCs | None |
| Other | |
| Connecting Areas | Wounded Turtle World ⛔ Spike Alley ✨ ➡️ Funeral Prison 🚷 Forest Cavern 🚷 |
| BGM | 🔊 e11 (No. 230D) |
| Map ID | 1696 |
| Version Added | 0.117g patch 3 |
| Last Updated | 0.121g |
| Author | aediorugap |
The Floating Brain World is an area accessible from the red tentacle in Wounded Turtle World.

Features
This area is a large, looping, visceral world filled with mouths, tentacles, and as the name tells, floating brains, over a panorama of similarly-looking emojis. Smaller white floating brains wander the area, where equipping the Drum effect will make them show a single eye, and using the Glasses effect will reveal them as the Maligned Turtle. These brains are immune to the Chainsaw; they do not die once attacked.
There is a set of ring-like objects forming an 8-shaped pattern, where the upper part has a bloody metallic instrument which takes you to the Spike Alley blocked by a similar instrument, where its position is determined by a hidden condition.
Spoilers:
Much like the Marine Pavilion, making your way to the succeeding area is another paradoxical scenario, involving two mutually-exclusive states related to the instrument blocking the exit, in which it always blocks the bloody instrument in both states when accessing this area through normal means. The area allows the use of the Bat effect, which you must use to your advantage here, under the consideration that the marked position persists when you are in the same map and haven't woken up OR used the bed in Urotsuki's Dream Apartments. As the position of the instrument guarding the exit is affected by the existence of the Bat effect in your inventory, it is very similar to the cone's appearance in the Marine Pavillion: the instrument will be in front if the Bat effect is present, and in the back if it is not currently in your inventory.
Once at the 8-shaped figure, you must mark a position just outside of it using the Bat effect. With the Eyeball Bomb, you can return straight to the Nexus and drop the Bat effect in the Trophy Room (after favoriting it in the Dream Room), then taking a shortcut back to this area by being caught by the chaser in the Funeral Prison or being caught by the spiders in Forest Cavern and returning to the marked position with the Bat effect from there, where you will need to repeat the process from within each part of the shape (alternating between dropping and obtaining the effect) until you have reached the bloody instrument to Spike Alley.
Directions
- The Nexus → Lemonade Edifice → Pulsating Yellow Passage → Lemon World → Totem Hotel → Omurice Labyrinth → Rotten Fish Lake → Trophy Animal Land → Silhouette Complex → Grand Beach → Wounded Turtle World → Floating Brain World
Spoilers:
After setting up the teleport with the Bat effect:
- The Nexus → Toy World → Wooden Block World → Pancake World → Mackerel Desert → Egyptian Rave Dungeon → Dream Easter Island → Funeral Prison → Floating Brain World
- The Nexus → Toy World → Wooden Block World → Chicken World → Nazca Valley → Forest Cavern → Floating Brain World
Trivia
- Prior to version 0.121g, Variable #44 could be rerolled in the bed in Urotsuki's Dream Apartments, with the Bat effect's last marked position being held. As such, the previous solution to the puzzle involving the 8-shaped figure heavily utilized this feature in order to change the position of the instrument each visit.
- If The Nexus was grey (Variable #44 is < 128), the instrument would be placed in front. If The Nexus was blue (Variable #44 is > 128), however, it would be in the back, making this the ideal starting position.
- A similar return method was used as the one listed above in order to return to the world quickly, but only needed to be employed at least once.
Old Images
Old map of Floating Brain World.

Gallery


- 4a0000
- ff0084