| Platformer World | |
|---|---|
 The first area of the world | |
| Basic Info | |
| Regional Name(s) |
2Dステージ |
| Effects | None |
| Collectibles |
WP #529 |
| Masks | Platformer Urotsuki |
| Events | None |
| Notable NPCs | None |
| Other | |
| Connecting Areas | Oriental Pub 🔐 Tribulation Complex Abandoned Grounds 🔐 |
| BGM | 🔊 camellia_hysar2 – First area (No. 155D) 🔊 tech3 – Second area (No. 214E) 🔊 bgm055 – Path to Tribulation Complex (No. 016D) 🔊 bgm080 – Construction Sign Room (No. 152C) 🔊 yumeorugo_arr2 – Fake Computer Screen (No. 003G) 🔊 sniperbob4 – First Secret Area (No. 690) 🔊 sniperbob7_aura – Second Secret Area (No. 591) 🔊 konaki_dynamic_02 – Out of Bound area (No. 524B) |
| Map ID | 1446 |
| Map Type | Large, Non-looping, Multiple maps, Platformer |
| Version Added | 0.120 |
| Primary Author | sniperbob |
| Contributing Author(s) | Nakatsu |
Platformer World is an area accessible through with the humanoid creature in the Oriental Pub when it is green or through the Abandoned Grounds.
Features
Platformer World, as its name suggests, changes the gameplay to match that of a platformer, in a similar yet mechanically distinct way to the FC Caverns. The world is two-dimensional, and Urotsuki is able to jump and move freely. This area features a unique menu, with some of Urotsuki's effects being available to use. It also features a Waking Up and Eyeball Bomb option, which will automatically wake up Urotsuki and teleport her to The Nexus, respectively. The available effects are:
- Spring: Allows Urotsuki to double jump once. This double jump only recharges once Urotsuki lands on the ground. This jump will only be granted to the player if they have jumped to get in the air. Falling off a platform without jumping from it will not allow the player to use this jump.
- Rainbow: Allows Urotsuki to create a rainbow with a cloud platform underneath her by pressing Z. This ability works both on the ground and in mid-air. Using this ability while a platform already exists will remove the first one and spawn the new one instantly. There is a considered cooldown in-between uses of this ability, approximately as long as the sound effect played when it is used.
- Fairy: Allows Urotsuki to jump in mid-air up to 10 times. These jumps are much shorter than the one provided by the Spring effect, but if strung together fast enough, grant much greater height. Similarly to the Spring effect, these jumps will only recharge when touching the ground and will not be granted if the players fell off a platform rather than having jump into the air themselves.
- Bat: Works the same as the regular version, giving Urotsuki the ability to set up a waypoint by pressing Z and going back to it later by pressing Z again.
- Bunny Ears: Upon equipping this, Urotsuki will keep jumping regardless of input. These jumps are higher than normal ones.
- Haniwa: Removes Urotsuki's ability to jump.
- Glasses: Allows Urotsuki to teleport back to the entrance of the screen she is in by pressing Z.
- Spacesuit: Upon equipping this, Urotsuki will be locked at her current height. This allows her to glide horizontally infinitely but prevents her from gaining height or falling. Gliding off a platform will count as falling off one for the purpose of Spring and Fairy, preventing the player from jumping mid-air after switching off the Spacesuit effect.
- Penguin: Allows Urotsuki to slide on the ground by pressing Z. This slide is faster than regular movement and will continue until Urotsuki hits a wall, which will cause her to bounce off it.
- Lantern: When equipped, the background of the two first platforming areas and of the Construction Sign area will be changed to show a looping, disfigured face.
- Plaster Cast: When equipped, reduces Urotsuki's jump height. This will also cause the blue creature to avoid blocking your path in both areas where it appears, showing a concerned face in the second area.
- Crossing: Allows Urotsuki to stop time, just like the regular version. This stops the moving background, as well as prevents the blue creature from stopping you in the first area.
- Drum: When falling a long enough distance, Urotsuki's fall will speed up and she will shake the screen upon hitting the ground.
If Urotsuki idles in any of the areas in this world (except the Fake Computer Screen and the secret areas), the music will slow down and a visual effect will appear on the screen until the player moves again.
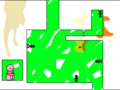
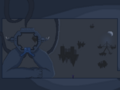
The player first appears in a relatively simple room, with a path featuring the Oriental Pub NPC that allows them to go back to said map (or to the Abandoned Grounds if this world was reached this way). There is a second path, unreachable from ground level. This path can be reached through the use of effects, or by using the various stick figures around the area. By stepping on where the figures are standing, the map's gravity will switch to the opposite of the figure's orientation, as well as sometimes changing some details of the map.
Trying to enter the second path will cause a blue creature to quickly push Urotsuki out, preventing access. This creature can be bypassed by using the Crossing effect or by wearing the Plaster Cast. The creature will also not appear if this path is entered vertically as opposed to horizontally (whether by falling into the path or by flying up it). Without effects, the way to enter this path successfully is by interacting with the first figure at ground level, then by touching the figure on the now-ceiling and moving right to the small hole to the side, and interacting with the figure in that hole. Finally, the player can jump down to the figure at ground level and then fall into the hole at the now bottom part of the area to enter the second area.
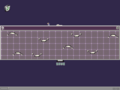
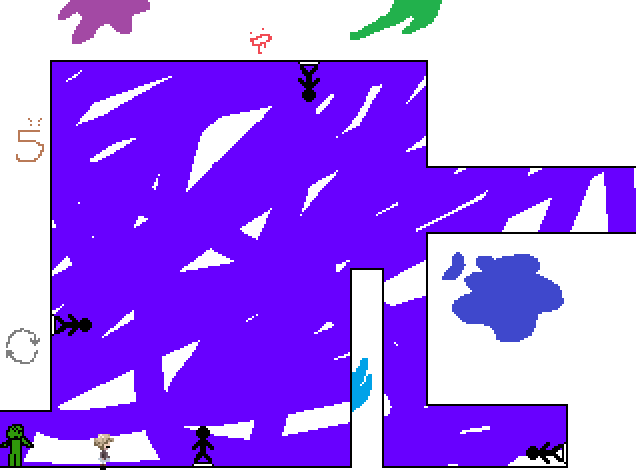
The second area is much larger, featuring many more walls to avoid. There are three paths in this area, one leading back to the first, one at the opposite end of the area, and one in the ceiling. The blue creature is back, blocking Urotsuki's path and acting as a wall to her. The stick figures are also present, albeit they can only reverse gravity vertically. A portal on the underside of a long wall near the blue creature can take Urotsuki straight to the path at the opposite end of the area, but it can only be entered in reverse gravity and is mainly useful as a shortcut for those entering from the opposite side.
Once again, using effects it is easily possible to reach both entrances, although this can also be done using the stick figures. Reversing gravity for the first time will cause the blue creature to fall upwards to its death, removing it from the entire world until it is re-entered. Once the creature is gone, the path to the right can be easily accessed by interacting with the figure next to the wall past where the blue creature used to be and letting Urotsuki fall inside the small maze above her. The maze can then be navigated using the figures in order to reach the rightmost exit. The upper exit is a bit harder to reach but can be accessed by using the stick figures to have Urotsuki fall into the thin passage at the middle of the map and eventually fall into the hole above.
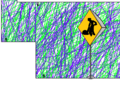
The upper path leads to a large, somewhat silent room with three stick figures and a giant Construction Sign. The Construction Sign blocks the way forward, and cannot be jumped over in regular ways. Inverting the gravity with the stick figures will not change the Construction Sign itself, which will always be upwards. This prevents it from being bypassed even using those. While this area might seem like a dead-end at first glance, it is actually possible to go over the Construction Sign and into the next room. This can be more easily achieved by equipping the Spacesuit effect when interacting with the stick figures the closest to the Sign, allowing Urotsuki to pass over the Sign. The Rainbow effect can also be used to bypass the Sign, by creating several platforms to slowly jump over the obstacle (do note that, without the Rainbow, Glasses, or Bat effect, it is impossible to go back to the main area if Urotsuki has reached the other side with the Spacesuit, as she cannot gain enough height to bypass the Sign alone). Past the Construction Sign is one of the Secret Areas.
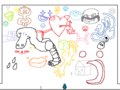
The right path leads to a smaller room filled with drawings, and with the shocked version of the Oriental Pub NPC in the middle. Touching this NPC will send the player to the Tribulation Complex. The drawings in this room contain various miscellaneous characters, as well as each face the Oriental Pub NPC can make. Jumping over the NPC allows the player to exit to the other side and enter the Fake Computer Screen.
Fake Computer Screen
This area is a recreation of Urotsuki's Computer screen, using the default background and default music. The time in the bottom right corner is stuck at "66:66". The player can jump on the icons shown on screen in order to "activate" them, although this is impossible without effects.
Landing on the Save icon will cause it to grow legs and eyes before walking away as a jingle plays. It will stay gone until the player re-enters the room. Landing on the Tools icon will spawn the usual Tools menu, with Urotsuki on top of it. The window acts as a giant wall, and thus the player cannot press the buttons inside. The other icons cannot be pressed while this window is on, they will simply act as walls. Landing on the "X" button on the far right of the window will close it. Landing on the Data icon will spawn a large window (as large as the width of the map), although all the information found in the usual window is replaced with several strange faces. Unlike the Tools window, only the very top of this window is solid. It is thus possible to go through the underside of the window (after using the Glasses or Bat effect). Landing on the Music icon will cause a giant fist to appear out of the icon and punch Urotsuki into the top of the screen. This will repeat infinitely as long as Urotsuki does not move from above the icon.
The Recycle icon is out of the way compared to the other icons, making it harder to reach. It is, however, possible to land on it. It can be reached using the Rainbow effect, by using the Fairy effect on top of the Data window, or by switching to the Spacesuit effect right at the apex of the Music icon punch. Landing into the Recycle icon will teleport Urotsuki to the second Secret Area.
Secret Areas
The Secret Areas are two distinct areas in this world reached in hard-to-access spots. The first one is accessed by going over the Construction Sign, the second one is accessed by entering the Recycle bin on the Fake Computer Screen.
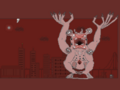
The first area is a red tunnel, with a giant red monster with many arms. The background shows a city landscape with a red sky and a dim sun. It is possible to get over the creature and reach the area behind it, where a standard Vending Machine can be found. The second area is a dark cyan tunnel, with a two-armed giant creature with tentacles and a large hole in its face. The background shows several floating islands in the distance and a crescent moon. Urotsuki's sprite is notably darkened while in this area.
Directions
- The Nexus → Heart World → Valentine Land → Cyber Maze → Oriental Pub → Platformer World
After visiting Cyber Maze once:
- The Nexus → Urotsuki's Dream Apartments → Simple Street → Cyber Maze → Oriental Pub → Platformer World
Trivia
- Should the player fall out of the bounds of the map, they will be teleported to a dark green room. After a while, a large monster will be heard crawling toward Urotsuki, before it catches up to her and forces her awake. This used to happen almost instantly when reaching this area from the Abandoned Grounds, although this now only happens in rare cases due to bugs.
- The Rainbow Effect alone can be used for infinite "flight", as one can simply create a platform right after jumping off their previous platform. This is most efficient with the Fairy and Rainbow effect used together, as the Rainbow platform can recharge the jumps of the Fairy, while the cooldown of the Rainbow effect will be mostly up once the jumps of the Fairy effect run out.
Gallery
A switched-up version of the first area, with two new characters

The second area
Upside down version of the second area
The third area, and the path to the Tribulation Complex
The Almighty Construction Sign
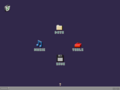
Urotsuki's PC
It looks like your data has been corrupted
Secret Area
Another Secret Area
You shouldn't be here


- ffffff
- 30980b