imported>LeahCCinnamon No edit summary |
mNo edit summary |
||
| (14 intermediate revisions by 7 users not shown) | |||
| Line 1: | Line 1: | ||
[[ | {{Locationbox | ||
The | |headercolor = #202430 | ||
|headerfontcolor = #f7fcf8 | |||
|image = Complex.jpg | |||
|Effects = None | |||
|Events = None | |||
|Map Type = Small, Non-looping | |||
|NPCS = None | |||
|Connections = {{Connection|Elevator Room|directions=Enter the elevator.}}, {{Connection|Apartment|directions=Enter the door on the far left end of the hall.}}, {{Connection|Symbols Maze|chaser_type=Trap}} | |||
|Map ID = 0093, 0107 | |||
|BGM = {{BGM|title=Complex|filename=BGM 19 complex.ogg}} | |||
}} | |||
The [[Answered Prayers:Complex|Complex]] can be reached by interacting with the Chimiko in the [[Answered Prayers:Elevator|Elevator]]. | |||
==Features== | |||
The Complex is an apartment complex with a dark, somewhat futuristic interior. A night city skyline can be seen on either end of the hallway. All the doors are locked except for the last one on the left, which leads to the [[Answered Prayers:Apartment|Apartment]]. | |||
==Directions== | ==Directions== | ||
[[Nexus]] | [[Answered Prayers:Nexus|Nexus]] → [[Answered Prayers:Green World|Green World]] → [[Answered Prayers:Green World#Green Hallway|Green Hallway]] → [[Answered Prayers:Outlands|Outlands]] → [[Answered Prayers:Borderland Corridor|Borderland Corridor]] → [[Answered Prayers:Spirit Town|Spirit Town]] → [[Answered Prayers:Elevator Room|Elevator Room]] → Complex | ||
* | * After obtaining the '''Rusted Key''' from [[Answered Prayers:Underwater Ship|Underwater Ship]]: | ||
[[Answered Prayers:Nexus|Nexus]] → [[Answered Prayers:Clock Work World|Clock Work World]] → [[Answered Prayers:Industrial Maze|Industrial Maze]] → [[Answered Prayers:Spirit Town|Spirit Town]] → [[Answered Prayers:Elevator Room|Elevator Room]] → Complex | |||
==Trivia== | ==Trivia== | ||
* | *A cone blocks off the right end of the hallway, suggesting that there may be future expansions here. | ||
[[Category:Locations]] | ==Gallery== | ||
<gallery widths="150" columns="4" bordercolor="transparent" spacing="small" hideaddbutton="true"> | |||
File:AP Complex Isolated Map.png|Chimiko's Isolated area when you get caught at [[Answered Prayers:Symbols Maze|Symbols Maze]]. | |||
</gallery> | |||
[[Category:Answered Prayers Locations]] | |||
Revision as of 20:46, 26 May 2024
| Complex | |
|---|---|

| |
| Basic Info | |
| Prayers | None |
| Events | None |
| Notable NPCs | None |
| Other | |
| Connecting Areas | Elevator Room Apartment Symbols Maze 🚷 |
| BGM | 🔊 Complex |
| Map ID | 0093, 0107 |
| Map Type | Small, Non-looping |
The Complex can be reached by interacting with the Chimiko in the Elevator.
Features
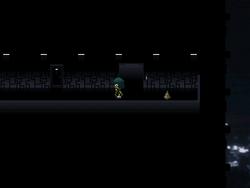
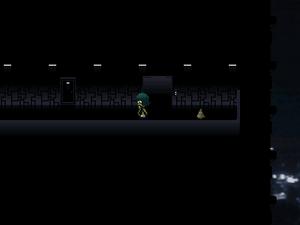
The Complex is an apartment complex with a dark, somewhat futuristic interior. A night city skyline can be seen on either end of the hallway. All the doors are locked except for the last one on the left, which leads to the Apartment.
Directions
Nexus → Green World → Green Hallway → Outlands → Borderland Corridor → Spirit Town → Elevator Room → Complex
- After obtaining the Rusted Key from Underwater Ship:
Nexus → Clock Work World → Industrial Maze → Spirit Town → Elevator Room → Complex
Trivia
- A cone blocks off the right end of the hallway, suggesting that there may be future expansions here.
Gallery
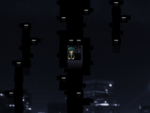
Chimiko's Isolated area when you get caught at Symbols Maze.
... more about "Complex"
- 202430
- f7fcf8
Has subobject"Has subobject" is a predefined property representing a container construct and is provided by Semantic MediaWiki.


